
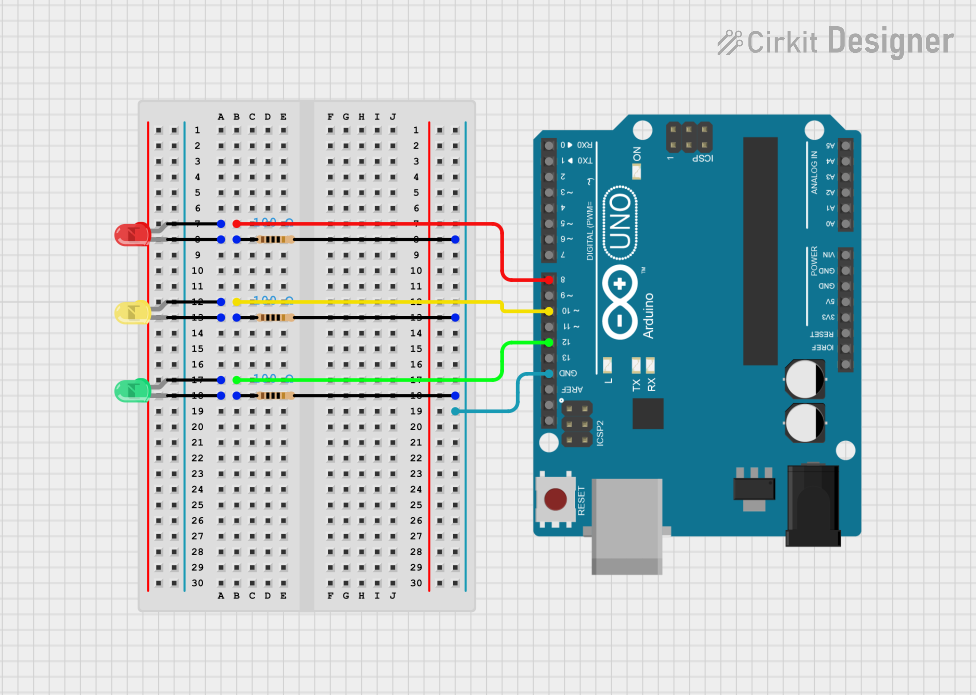
Circuit Documentation
Summary of the Circuit
This circuit consists of an Arduino UNO microcontroller connected to three LEDs (red, green, and yellow) through individual resistors. Each LED has a dedicated resistor to limit the current flowing through it, ensuring that the LEDs are protected from excessive current that could potentially damage them. The anodes of the LEDs are connected to different digital pins on the Arduino UNO, allowing for individual control of each LED. The cathodes of the LEDs are connected to the ground (GND) through their respective resistors, completing the circuit for each LED.
Component List
Arduino UNO
- Description: A microcontroller board based on the ATmega328P.
- Pins: UNUSED, IOREF, Reset, 3.3V, 5V, GND, Vin, A0-A5, SCL, SDA, AREF, D0-D13
LED: Two Pin (red)
- Description: A red light-emitting diode.
- Pins: cathode, anode
LED: Two Pin (green)
- Description: A green light-emitting diode.
- Pins: cathode, anode
LED: Two Pin (yellow)
- Description: A yellow light-emitting diode.
- Pins: cathode, anode
Resistor (100 Ohms)
- Description: A resistor with a resistance of 100 Ohms.
- Pins: pin1, pin2
Wiring Details
Arduino UNO
- D8 connected to the anode of the red LED.
- D10 connected to the anode of the yellow LED.
- D12 connected to the anode of the green LED.
- GND connected to pin2 of all three resistors.
LED: Two Pin (red)
- Anode connected to D8 on the Arduino UNO.
- Cathode connected to pin1 of a 100 Ohm resistor.
LED: Two Pin (green)
- Anode connected to D12 on the Arduino UNO.
- Cathode connected to pin1 of a 100 Ohm resistor.
LED: Two Pin (yellow)
- Anode connected to D10 on the Arduino UNO.
- Cathode connected to pin1 of a 100 Ohm resistor.
Resistor (100 Ohms)
- Pin1 connected to the cathode of the corresponding LED.
- Pin2 connected to GND on the Arduino UNO.
Documented Code
Arduino UNO Code (sketch.ino)
void setup() {
  // put your setup code here, to run once:

}

void loop() {
  // put your main code here, to run repeatedly:

}
Additional Notes (documentation.txt)
No additional code documentation provided.
This documentation provides an overview of the circuit components, their wiring, and the initial code for the Arduino UNO. Further details, such as the specific functionality of the code and the purpose of each LED in the circuit, would be added as the design and implementation progress.