
Arduino UNO-Based Smart Train Barrier System with Ultrasonic, Motion, and Light Sensors
View and Edit Project In Cirkit Designer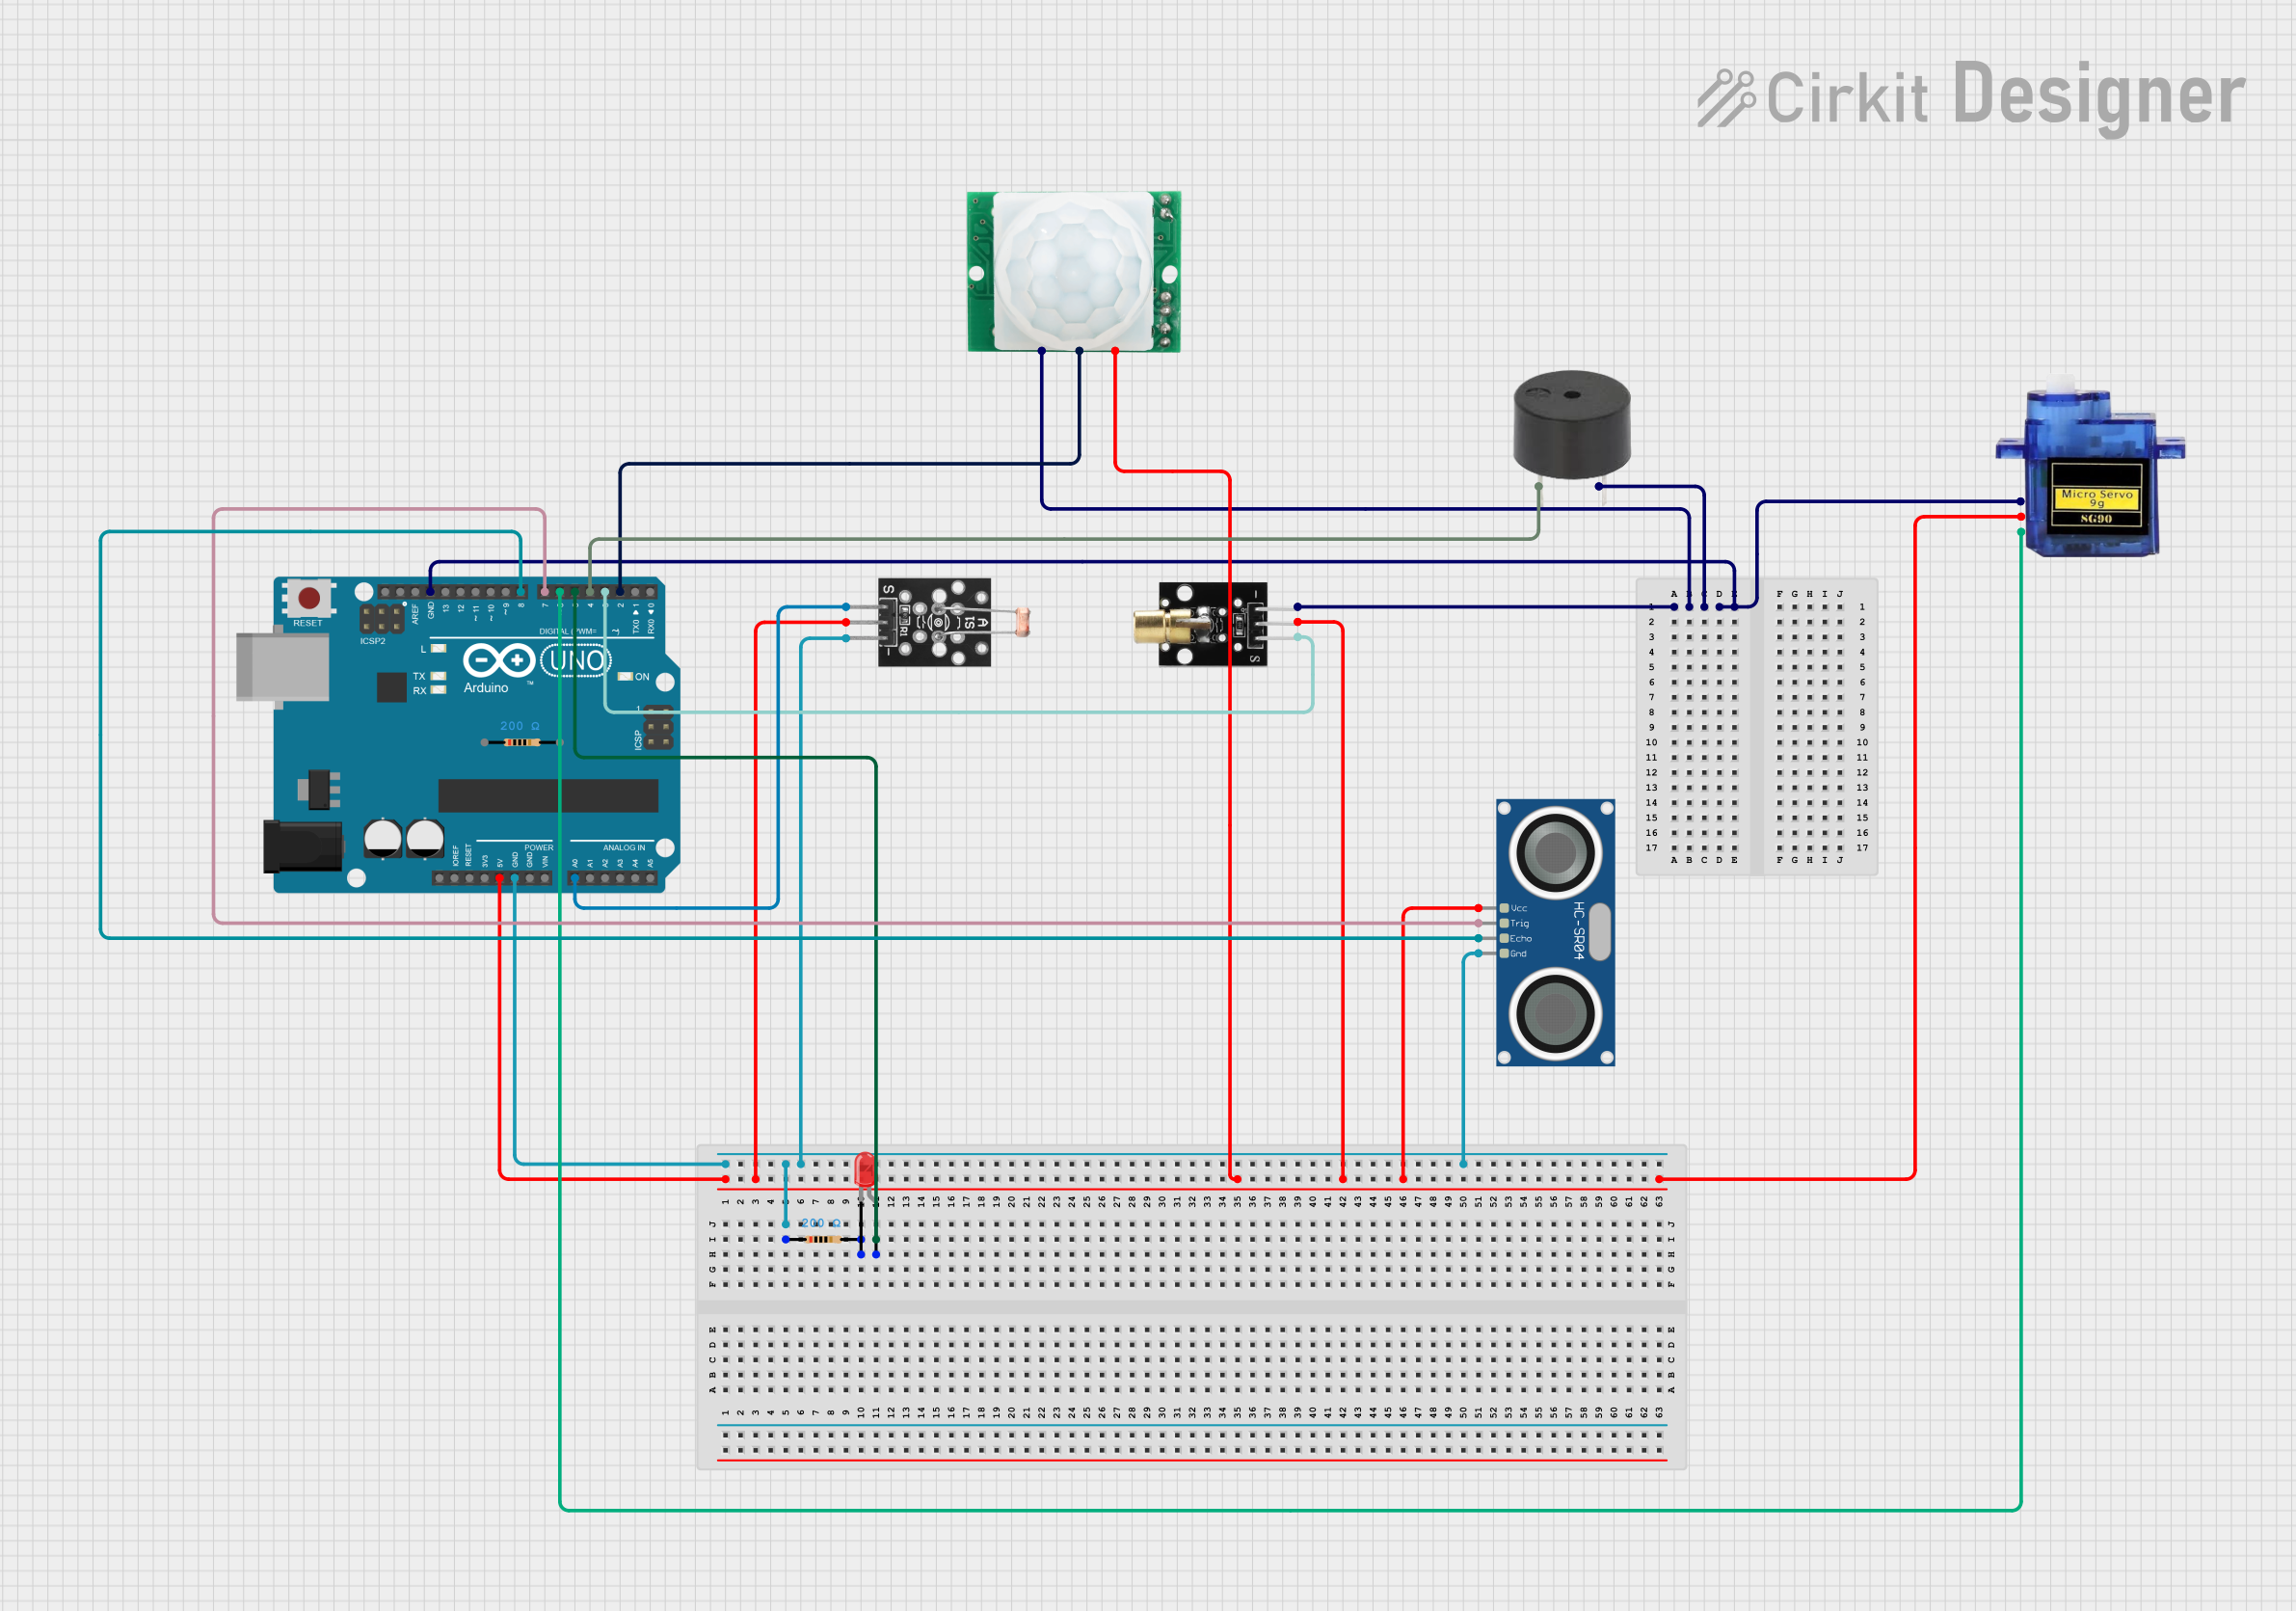
Circuit Documentation
Summary
This circuit is designed to control a train barrier system using an Arduino UNO. The system includes various sensors and actuators such as an ultrasonic sensor, motion sensor, laser emitter, photoresistor, LED, buzzer, and a servo motor. The Arduino UNO reads inputs from the sensors and controls the actuators based on the sensor readings.
Component List
Resistor (200 Ohms)
- Pins: pin1, pin2
- Description: Used to limit current in the circuit.
Arduino UNO
- Pins: UNUSED, IOREF, Reset, 3.3V, 5V, GND, Vin, A0, A1, A2, A3, A4, A5, SCL, SDA, AREF, D13, D12, D11, D10, D9, D8, D7, D6, D5, D4, D3, D2, D1, D0
- Description: Microcontroller used to control the entire circuit.
HC-SR04 Ultrasonic Sensor
- Pins: VCC, TRIG, ECHO, GND
- Description: Used to measure distance to detect the presence of a train.
KY-008 Laser Emitter
- Pins: SIG, 5v, GND
- Description: Emits a laser beam used in conjunction with the photoresistor to detect interruptions.
HC-SR501 Motion Sensor
- Pins: GND, OUT, VCC
- Description: Detects motion to activate the laser emitter.
KY-018 LDR Photo Resistor
- Pins: Signal, VCC, Ground
- Description: Detects the presence of the laser beam to determine if it is interrupted.
Buzzer
- Pins: PIN, GND
- Description: Emits sound when the laser beam is interrupted.
LED (Red)
- Pins: cathode, anode
- Description: Lights up when the laser beam is interrupted.
Micro Servo 9G
- Pins: GND, +5V, PWM
- Description: Controls the barrier to allow or block passage.
Wiring Details
Resistor (200 Ohms)
- pin1: Connected to GND of Arduino UNO, Ground of KY-018 LDR Photo Resistor, and GND of HC-SR04 Ultrasonic Sensor.
- pin2: Connected to cathode of LED (Red).
Arduino UNO
- GND: Connected to pin1 of Resistor, GND of Buzzer, GND of KY-008 Laser Emitter, GND of HC-SR501 Motion Sensor, and GND of Micro Servo 9G.
- 5V: Connected to VCC of KY-018 LDR Photo Resistor, VCC of HC-SR501 Motion Sensor, 5v of KY-008 Laser Emitter, VCC of HC-SR04 Ultrasonic Sensor, and +5V of Micro Servo 9G.
- A0: Connected to Signal of KY-018 LDR Photo Resistor.
- D2: Connected to OUT of HC-SR501 Motion Sensor.
- D3: Connected to SIG of KY-008 Laser Emitter.
- D4: Connected to PIN of Buzzer.
- D5: Connected to anode of LED (Red).
- D6: Connected to PWM of Micro Servo 9G.
- D7: Connected to TRIG of HC-SR04 Ultrasonic Sensor.
- D8: Connected to ECHO of HC-SR04 Ultrasonic Sensor.
HC-SR04 Ultrasonic Sensor
- VCC: Connected to 5V of Arduino UNO.
- TRIG: Connected to D7 of Arduino UNO.
- ECHO: Connected to D8 of Arduino UNO.
- GND: Connected to pin1 of Resistor.
KY-008 Laser Emitter
- SIG: Connected to D3 of Arduino UNO.
- 5v: Connected to 5V of Arduino UNO.
- GND: Connected to GND of Arduino UNO.
HC-SR501 Motion Sensor
- GND: Connected to GND of Arduino UNO.
- OUT: Connected to D2 of Arduino UNO.
- VCC: Connected to 5V of Arduino UNO.
KY-018 LDR Photo Resistor
- Signal: Connected to A0 of Arduino UNO.
- VCC: Connected to 5V of Arduino UNO.
- Ground: Connected to pin1 of Resistor.
Buzzer
- PIN: Connected to D4 of Arduino UNO.
- GND: Connected to GND of Arduino UNO.
LED (Red)
- cathode: Connected to pin2 of Resistor.
- anode: Connected to D5 of Arduino UNO.
Micro Servo 9G
- GND: Connected to GND of Arduino UNO.
- +5V: Connected to 5V of Arduino UNO.
- PWM: Connected to D6 of Arduino UNO.
Code Documentation
#include <Servo.h>

// Pin definitions for components
int motionPin = 2;         // HC-SR501 Motion Sensor
int laserPin = 3;          // KY-008 Laser
int photoResistorPin = A0; // Photoresistor
int buzzerPin = 4;         // Buzzer
int ledPin = 5;            // LED
int servoPin = 6;          // Servo motor
int trigPin = 7;           // TRIG pin of HC-SR04 Ultrasonic Sensor
int echoPin = 8;           // ECHO pin of HC-SR04 Ultrasonic Sensor

Servo barrierServo;

void setup() {
  // Initialize pin modes
  pinMode(motionPin, INPUT);
  pinMode(laserPin, OUTPUT);
  pinMode(buzzerPin, OUTPUT);
  pinMode(ledPin, OUTPUT);
  pinMode(trigPin, OUTPUT);
  pinMode(echoPin, INPUT);

  // Attach the servo motor and set its initial position
  barrierServo.attach(servoPin);
  barrierServo.write(0); // Barrier is initially lowered

  // Initialize serial communication for debugging
  Serial.begin(9600);
}

// Function to measure distance using HC-SR04 Ultrasonic Sensor
long measureDistance() {
  // Send ultrasonic pulse
  digitalWrite(trigPin, LOW);
  delayMicroseconds(2);
  digitalWrite(trigPin, HIGH);
  delayMicroseconds(10);
  digitalWrite(trigPin, LOW);

  // Read the time taken for the echo to return
  long duration = pulseIn(echoPin, HIGH, 30000); // 30ms timeout

  // Calculate distance in centimeters
  long distance = duration * 0.034 / 2;

  return distance;
}

void loop() {
  // Read the state of sensors
  int motionDetected = digitalRead(motionPin);    // Motion sensor state
  int lightLevel = analogRead(photoResistorPin);  // Photoresistor light level
  long distance = measureDistance();             // Ultrasonic sensor distance

  Serial.print("Distance: ");
  Serial.println(distance);

  // Condition: If the train has stopped (distance <= 10 cm), deactivate laser
  if (distance <= 10) {
    digitalWrite(laserPin, LOW); // Turn off laser
    barrierServo.write(0);       // Lower the barrier
    Serial.println("Train detected. Laser deactivated.");
    delay(100);                  // Allow people to board the train
    return;                      // Skip the rest of the loop iteration
  }

  // Condition: If motion is detected, activate laser
  if (motionDetected == HIGH) {
    digitalWrite(laserPin, HIGH); // Turn on laser
    Serial.println("Motion detected. Laser activated.");

    // Check if the laser beam is interrupted
    if (lightLevel < 800) { // 800 is the threshold for the photoresistor
      Serial.println("Laser interrupted!");
      digitalWrite(buzzerPin, HIGH); // Turn on the buzzer
      digitalWrite(ledPin, HIGH);    // Turn on the LED
      barrierServo.write(90);        // Raise the barrier (90 degrees)
      delay(500);                    // Allow the person to pass
    } else {
      barrierServo.write(0);         // Lower the barrier if no interruption
      digitalWrite(buzzerPin, LOW);  // Turn off the buzzer
      digitalWrite(ledPin, LOW);     // Turn off the LED
    }
  } else {
    // If no motion is detected, turn off the laser and lower the barrier
    digitalWrite(laserPin, LOW);
    barrierServo.write(0);
  }

  delay(100); // Delay for stability
}

// The code that i wrote for the prorotype
#include <Servo.h>

const int trigPin = 7;
const int echoPin = 8;
const int ledPin = 9;
const int buzzerPin = 10;
const int motionPin = 11;
Servo barrierServo;

void setup() {