
Arduino Nano Controlled OLED Display with Rotary Encoder and Button Input
View and Edit Project In Cirkit Designer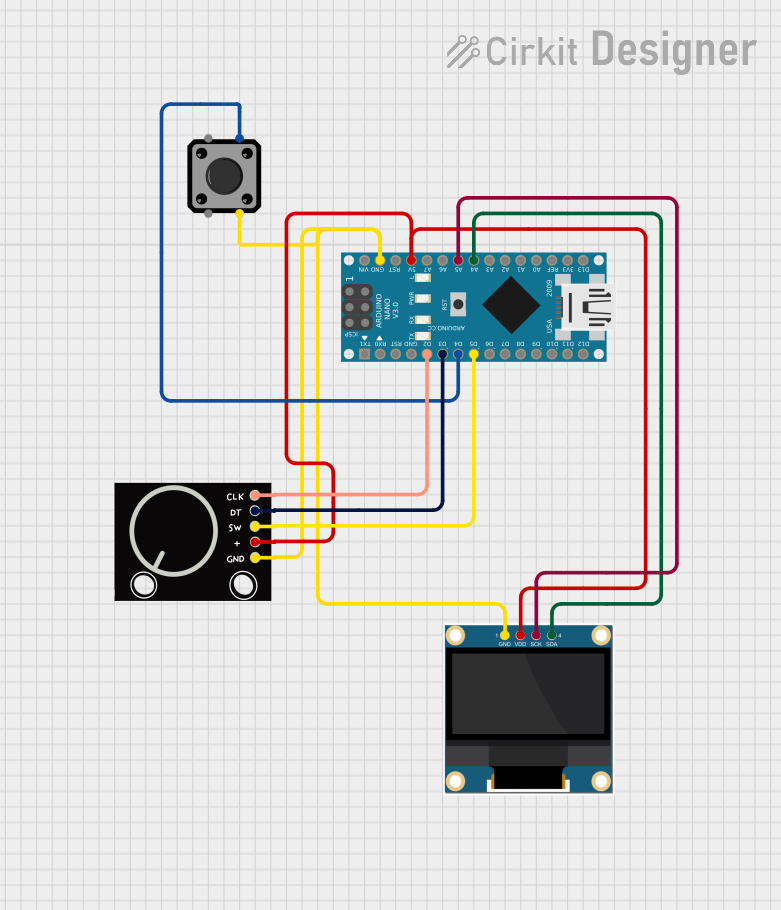
Circuit Documentation
Summary
This circuit integrates an Arduino Nano microcontroller with a 0.96" OLED display, a tactile switch button, and a rotary encoder. The Arduino Nano serves as the central processing unit, managing inputs from the rotary encoder and the tactile switch, and driving the OLED display to provide visual feedback. The rotary encoder allows for incremental input, the tactile switch serves as a simple user interface element, and the OLED display offers a means to output information such as menu options or sensor data.
Component List
Arduino Nano
- Description: A compact microcontroller board based on the ATmega328P.
- Pins: D1/TX, D0/RX, RESET, GND, D2, D3, D4, D5, D6, D7, D8, D9, D10, D11/MOSI, D12/MISO, VIN, 5V, A7, A6, A5, A4, A3, A2, A1, A0, AREF, 3V3, D13/SCK.
0.96" OLED
- Description: A small display module for visual output, using I2C communication.
- Pins: GND, VDD, SCK, SDA.
Tactile Switch Buttons - 12mm Square
- Description: A simple push-button switch for user input.
- Pins: 3, 1, 4, 2.
Rotary Encoder
- Description: An input device that provides rotational position feedback and a push-button feature.
- Pins: GND, +, SW, DT, CLK.
Wiring Details
Arduino Nano
- D2 connected to Rotary Encoder CLK
- D3 connected to Rotary Encoder DT
- D4 connected to Tactile Switch Button pin 2
- D5 connected to Rotary Encoder SW
- GND connected to Tactile Switch Button pin 4, OLED GND, and Rotary Encoder GND
- 5V connected to OLED VDD and Rotary Encoder +
- A5 connected to OLED SCK
- A4 connected to OLED SDA
0.96" OLED
- GND connected to Arduino Nano GND
- VDD connected to Arduino Nano 5V
- SCK connected to Arduino Nano A5
- SDA connected to Arduino Nano A4
Tactile Switch Buttons - 12mm Square
- Pin 2 connected to Arduino Nano D4
- Pin 4 connected to Arduino Nano GND
Rotary Encoder
- CLK connected to Arduino Nano D2
- DT connected to Arduino Nano D3
- SW connected to Arduino Nano D5
- GND connected to Arduino Nano GND
-
- connected to Arduino Nano 5V
Documented Code
Arduino Nano Code (sketch.ino)
void setup() {
  // put your setup code here, to run once:

}

void loop() {
  // put your main code here, to run repeatedly:

}
Note: The provided code is a template and does not include specific functionality. It should be populated with setup configurations and operational loops that correspond to the intended behavior of the circuit components.