
Arduino Nano-Based Smart Temperature Control System with DHT11 and Servo
View and Edit Project In Cirkit Designer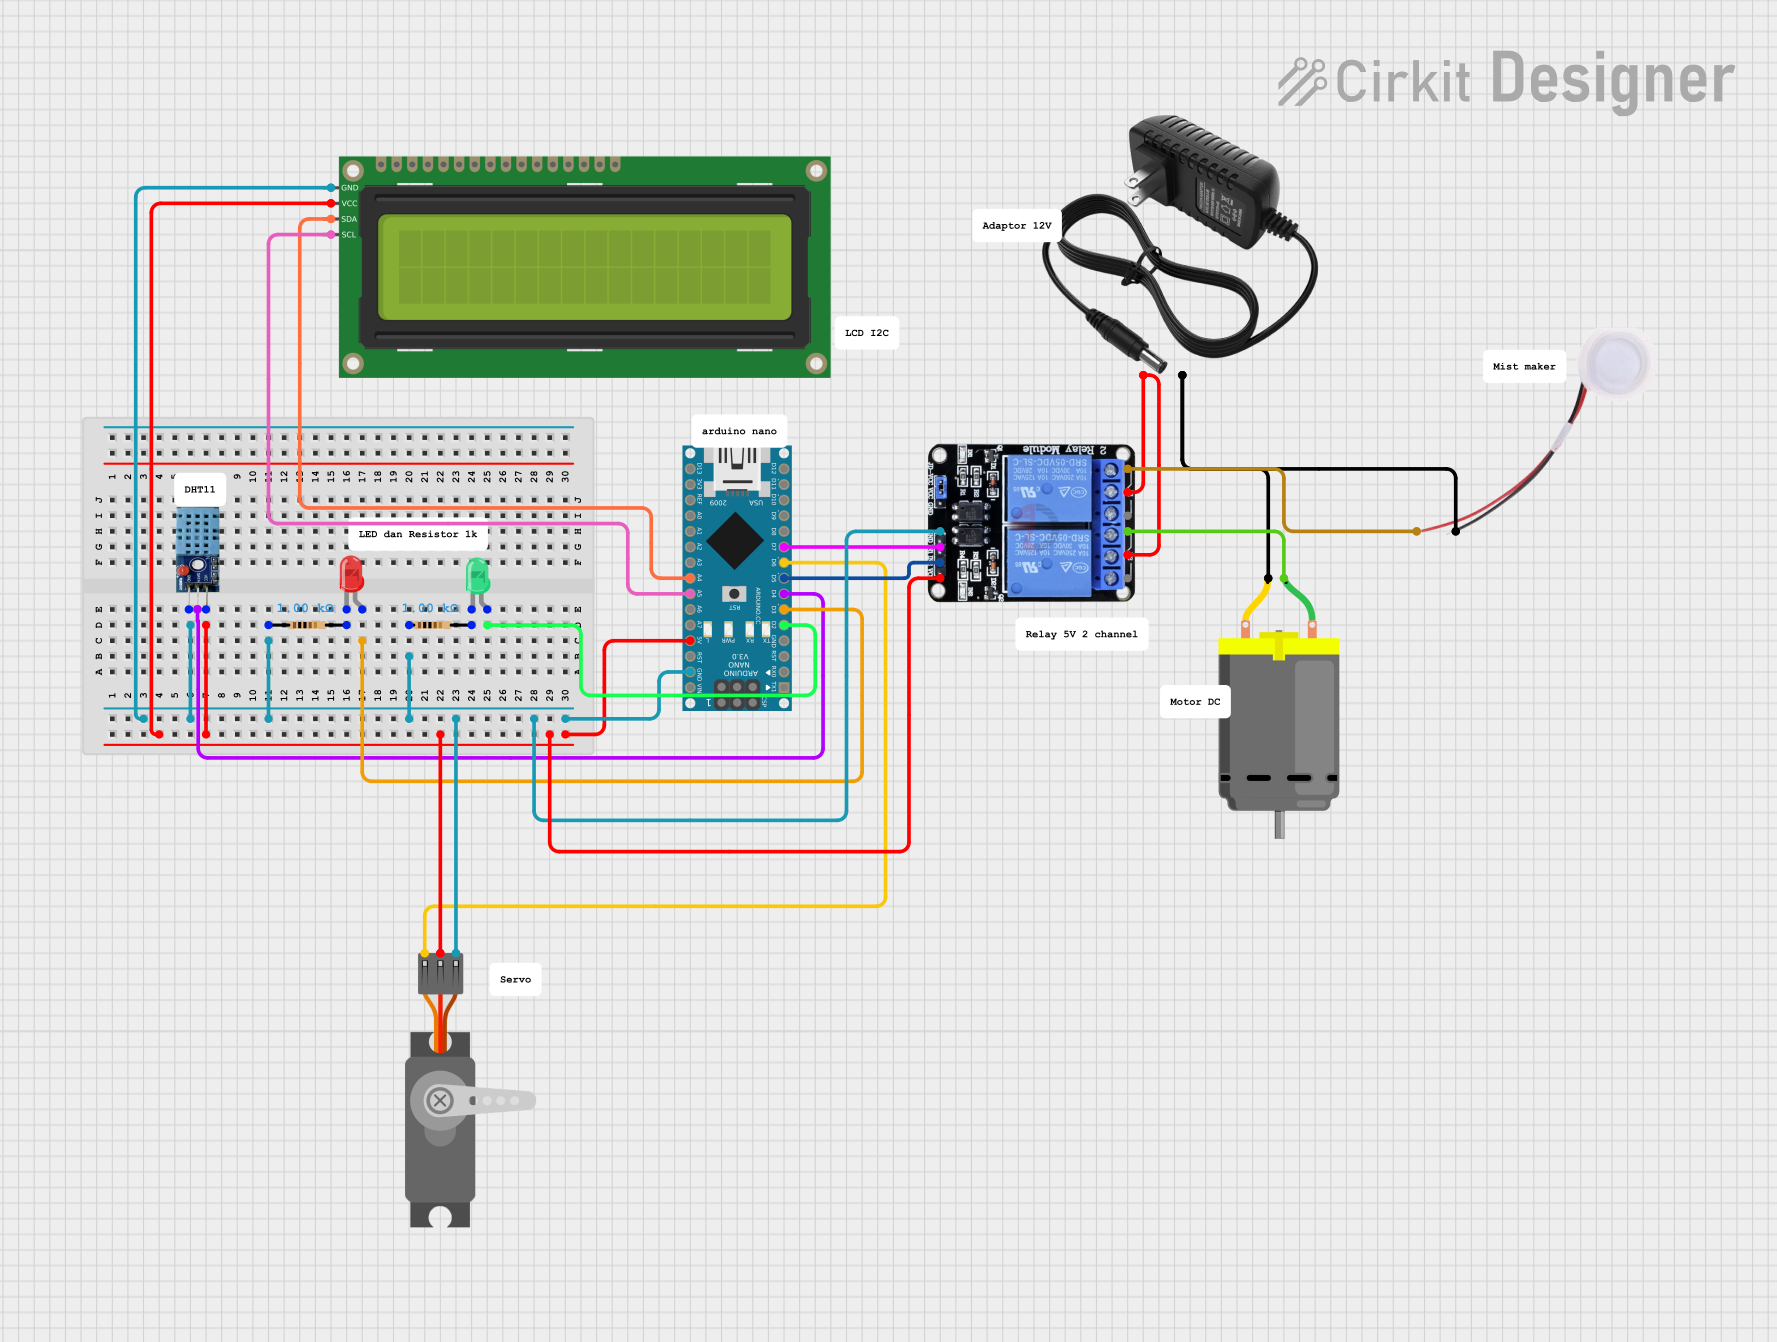
Circuit Documentation
Summary
This circuit is designed to monitor temperature using a DHT11 sensor and control a DC motor and LEDs based on the temperature readings. The circuit also includes a 16x2 I2C LCD for displaying information, a servo motor, and a two-channel relay for controlling a humidifier and the DC motor. The Arduino Nano microcontroller is used to manage the entire system.
Component List
Arduino Nano
- Description: Microcontroller board based on the ATmega328P.
- Pins: D1/TX, D0/RX, RESET, GND, D2, D3, D4, D5, D6, D7, D8, D9, D10, D11/MOSI, D12/MISO, VIN, 5V, A7, A6, A5, A4, A3, A2, A1, A0, AREF, 3V3, D13/SCK
DC Motor
- Description: A motor that runs on DC power.
- Pins: pin 1, pin 2
Resistor (1k Ohms)
- Description: Resistor with a resistance of 1000 Ohms.
- Pins: pin1, pin2
Servo (Wokwi Compatible)
- Description: Servo motor compatible with Wokwi.
- Pins: GND, V+, PWM
LED: Two Pin (red)
- Description: Red LED with two pins.
- Pins: cathode, anode
LED: Two Pin (green)
- Description: Green LED with two pins.
- Pins: cathode, anode
DHT 11
- Description: Temperature and humidity sensor.
- Pins: VCC, GND, DATA
16x2 I2C LCD
- Description: 16x2 character LCD with I2C interface.
- Pins: GND, VCC, SDA, SCL
Two Channel Relay 5v
- Description: Relay module with two channels, operates at 5V.
- Pins: VCC, IN2, IN1, GND, NC2, C2, NO2, NC1, C1, NO1
12v Power Supply
- Description: Power supply providing 12V.
- Pins: +, -
Humidifier
- Description: Device to add moisture to the air.
- Pins: GND, 5V
Wiring Details
Arduino Nano
GND connected to:
- DHT 11 (GND)
- Resistor (pin1)
- Resistor (pin1)
- 16x2 I2C LCD (GND)
- Servo (Wokwi Compatible) (GND)
- Two Channel Relay 5v (GND)
5V connected to:
- DHT 11 (VCC)
- 16x2 I2C LCD (VCC)
- Servo (Wokwi Compatible) (V+)
- Two Channel Relay 5v (VCC)
D2 connected to:
- LED: Two Pin (green) (anode)
D3 connected to:
- LED: Two Pin (red) (anode)
D4 connected to:
- DHT 11 (DATA)
D5 connected to:
- Two Channel Relay 5v (IN2)
D6 connected to:
- Servo (Wokwi Compatible) (PWM)
D7 connected to:
- Two Channel Relay 5v (IN1)
A5 connected to:
- 16x2 I2C LCD (SCL)
A4 connected to:
- 16x2 I2C LCD (SDA)
DC Motor
pin 1 connected to:
- Two Channel Relay 5v (NO2)
pin 2 connected to:
- 12v Power Supply (-)
- Humidifier (GND)
Resistor (1k Ohms)
pin1 connected to:
- Arduino Nano (GND)
- DHT 11 (GND)
- 16x2 I2C LCD (GND)
- Servo (Wokwi Compatible) (GND)
- Two Channel Relay 5v (GND)
pin2 connected to:
- LED: Two Pin (red) (cathode)
- LED: Two Pin (green) (cathode)
Servo (Wokwi Compatible)
GND connected to:
- Arduino Nano (GND)
V+ connected to:
- Arduino Nano (5V)
PWM connected to:
- Arduino Nano (D6)
LED: Two Pin (red)
cathode connected to:
- Resistor (pin2)
anode connected to:
- Arduino Nano (D3)
LED: Two Pin (green)
cathode connected to:
- Resistor (pin2)
anode connected to:
- Arduino Nano (D2)
DHT 11
GND connected to:
- Arduino Nano (GND)
VCC connected to:
- Arduino Nano (5V)
DATA connected to:
- Arduino Nano (D4)
16x2 I2C LCD
GND connected to:
- Arduino Nano (GND)
VCC connected to:
- Arduino Nano (5V)
SDA connected to:
- Arduino Nano (A4)
SCL connected to:
- Arduino Nano (A5)
Two Channel Relay 5v
GND connected to:
- Arduino Nano (GND)
VCC connected to:
- Arduino Nano (5V)
IN2 connected to:
- Arduino Nano (D5)
IN1 connected to:
- Arduino Nano (D7)
NO2 connected to:
- DC Motor (pin 1)
C2 connected to:
- 12v Power Supply (+)
- Two Channel Relay 5v (C1)
NO1 connected to:
- Humidifier (5V)
12v Power Supply
+ connected to:
- Two Channel Relay 5v (C2)
- Two Channel Relay 5v (C1)
- connected to:
- DC Motor (pin 2)
- Humidifier (GND)
Humidifier
GND connected to:
- 12v Power Supply (-)
- DC Motor (pin 2)
5V connected to:
- Two Channel Relay 5v (NO1)
Documented Code
#include <DHT.h>
#define DHT11PIN 4
#define ledHijau 2
#define ledMerah 3
#define kipas 5

DHT dht11(DHT11PIN, DHT11);

float suhu;
float suhuNormal = 0;

void setup() {
  Serial.begin(9600);
  dht11.begin();
  //set DHT11 sebagai input
  pinMode(DHT11PIN, INPUT);

  // set led sebagai output
  pinMode(ledHijau, OUTPUT);
  pinMode(ledMerah, OUTPUT);

  //set kipas sebagai output
  pinMode(kipas, OUTPUT);

  //Set kondisi awal led dalam keadaan mati
  digitalWrite(ledHijau, LOW);
  digitalWrite(ledMerah, LOW);

  //Set kondisi awal motor dalam keadaan mati
  digitalWrite(kipas, LOW);
}

void loop() {
  suhuNormal = 40;
  suhu = dht11.readTemperature();
  Serial.print("Suhu sekarang: ");
  Serial.print(suhu);
  Serial.println(" °C");
  if (suhu>=20 && suhu<=suhuNormal){
    digitalWrite(ledHijau, HIGH);
    digitalWrite(ledMerah, LOW);
    digitalWrite(kipas, HIGH);
    Serial.println("Suhu panas, kipas angin hidup");
  }

  //suhu kurang dari 20 dan lebih dari 15
  else if (suhu<20){
    digitalWrite(ledHijau, LOW);
    digitalWrite(ledMerah, HIGH);
    digitalWrite(kipas, LOW);
    Serial.println("Suhu dingin, kipas angin mati");
  }

  delay(500);
}
This code initializes the DHT11 sensor, LEDs, and the DC motor (referred to as "kipas" in the code). It reads the temperature from the DHT11 sensor and controls the LEDs and the motor based on the temperature readings. The green LED and the motor are turned on if the temperature is between 20°C and 40°C, while the