
Circuit Documentation
Summary
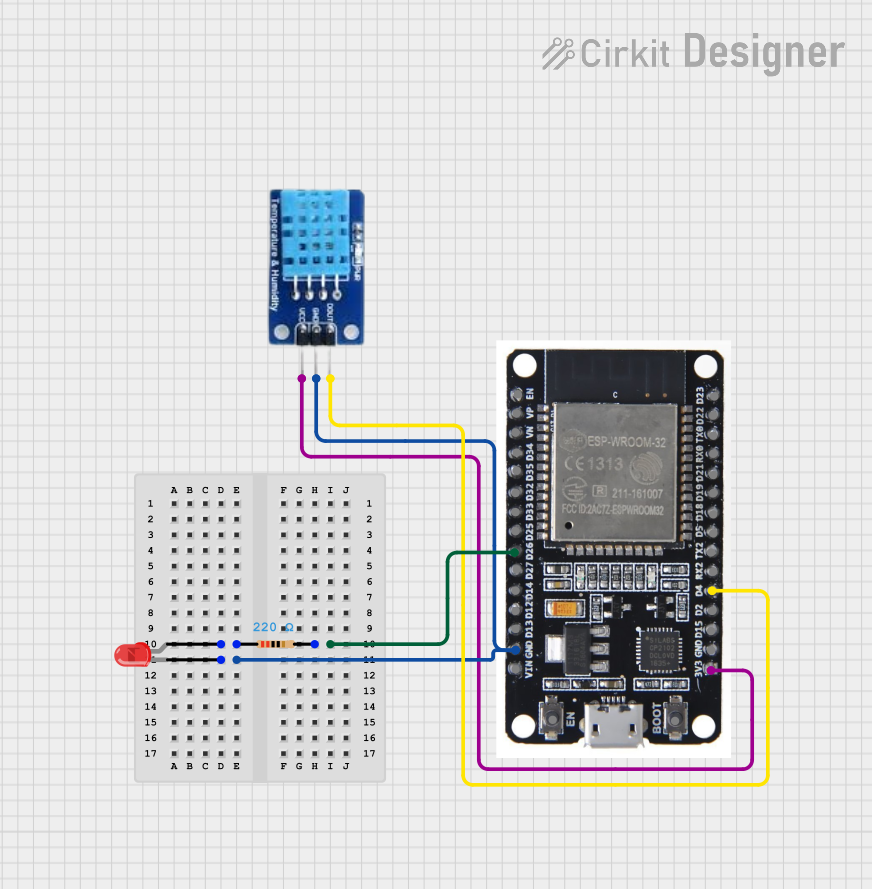
This circuit involves an ESP32 microcontroller, a DHT11 temperature and humidity sensor, a red LED, and a 220 Ohm resistor. The ESP32 reads temperature data from the DHT11 sensor and controls the LED based on the temperature readings. If the temperature exceeds 30°C, the LED is turned on; otherwise, it remains off.
Component List
ESP32
- Description: A powerful microcontroller with Wi-Fi and Bluetooth capabilities.
- Pins: EN, VP, VN, D34, D35, D32, D33, D25, D26, D27, D14, D12, D13, GND, VIN, 3V3, D15, D2, D4, RX2, TX2, D5, D18, D19, D21, RX0, TX0, D22, D23, BOOT
LED: Two Pin (red)
- Description: A red LED used for visual indication.
- Pins: cathode, anode
DHT11
- Description: A temperature and humidity sensor.
- Pins: DATA, GND, VCC
Resistor
- Description: A 220 Ohm resistor used to limit current through the LED.
- Pins: pin1, pin2
- Properties:
- Resistance: 220 Ohms
Wiring Details
ESP32
- D26 is connected to pin2 of the Resistor.
- GND is connected to cathode of the LED and GND of the DHT11.
- 3V3 is connected to VCC of the DHT11.
- D4 is connected to DATA of the DHT11.
LED: Two Pin (red)
- cathode is connected to GND of the ESP32.
- anode is connected to pin1 of the Resistor.
DHT11
- GND is connected to GND of the ESP32.
- VCC is connected to 3V3 of the ESP32.
- DATA is connected to D4 of the ESP32.
Resistor
- pin1 is connected to anode of the LED.
- pin2 is connected to D26 of the ESP32.
Code Documentation
ESP32 Code
#include <DHT.h>

#define DHTPIN 4       // DHT22 sensor pin
#define DHTTYPE DHT11  // DHT11 sensor type
#define LEDPIN 26      // LED pin

DHT dht(DHTPIN, DHTTYPE);

void setup() {
  pinMode(LEDPIN, OUTPUT);
  digitalWrite(LEDPIN, LOW);
  dht.begin();
}

void loop() {
  float temperature = dht.readTemperature();
  if (isnan(temperature)) {
    Serial.println("Error reading temperature!");
    return;
  }

  if (temperature >= 30.0) {
    digitalWrite(LEDPIN, HIGH);
  } else {
    digitalWrite(LEDPIN, LOW);
  }

  delay(1000); // Delay 1 second
}
DHT11 Code
void setup() {
  // put your setup code here, to run once:
}

void loop() {
  // put your main code here, to run repeatedly:
}
This documentation provides a comprehensive overview of the circuit, including a summary, detailed component descriptions, wiring details, and the embedded code for the microcontrollers.