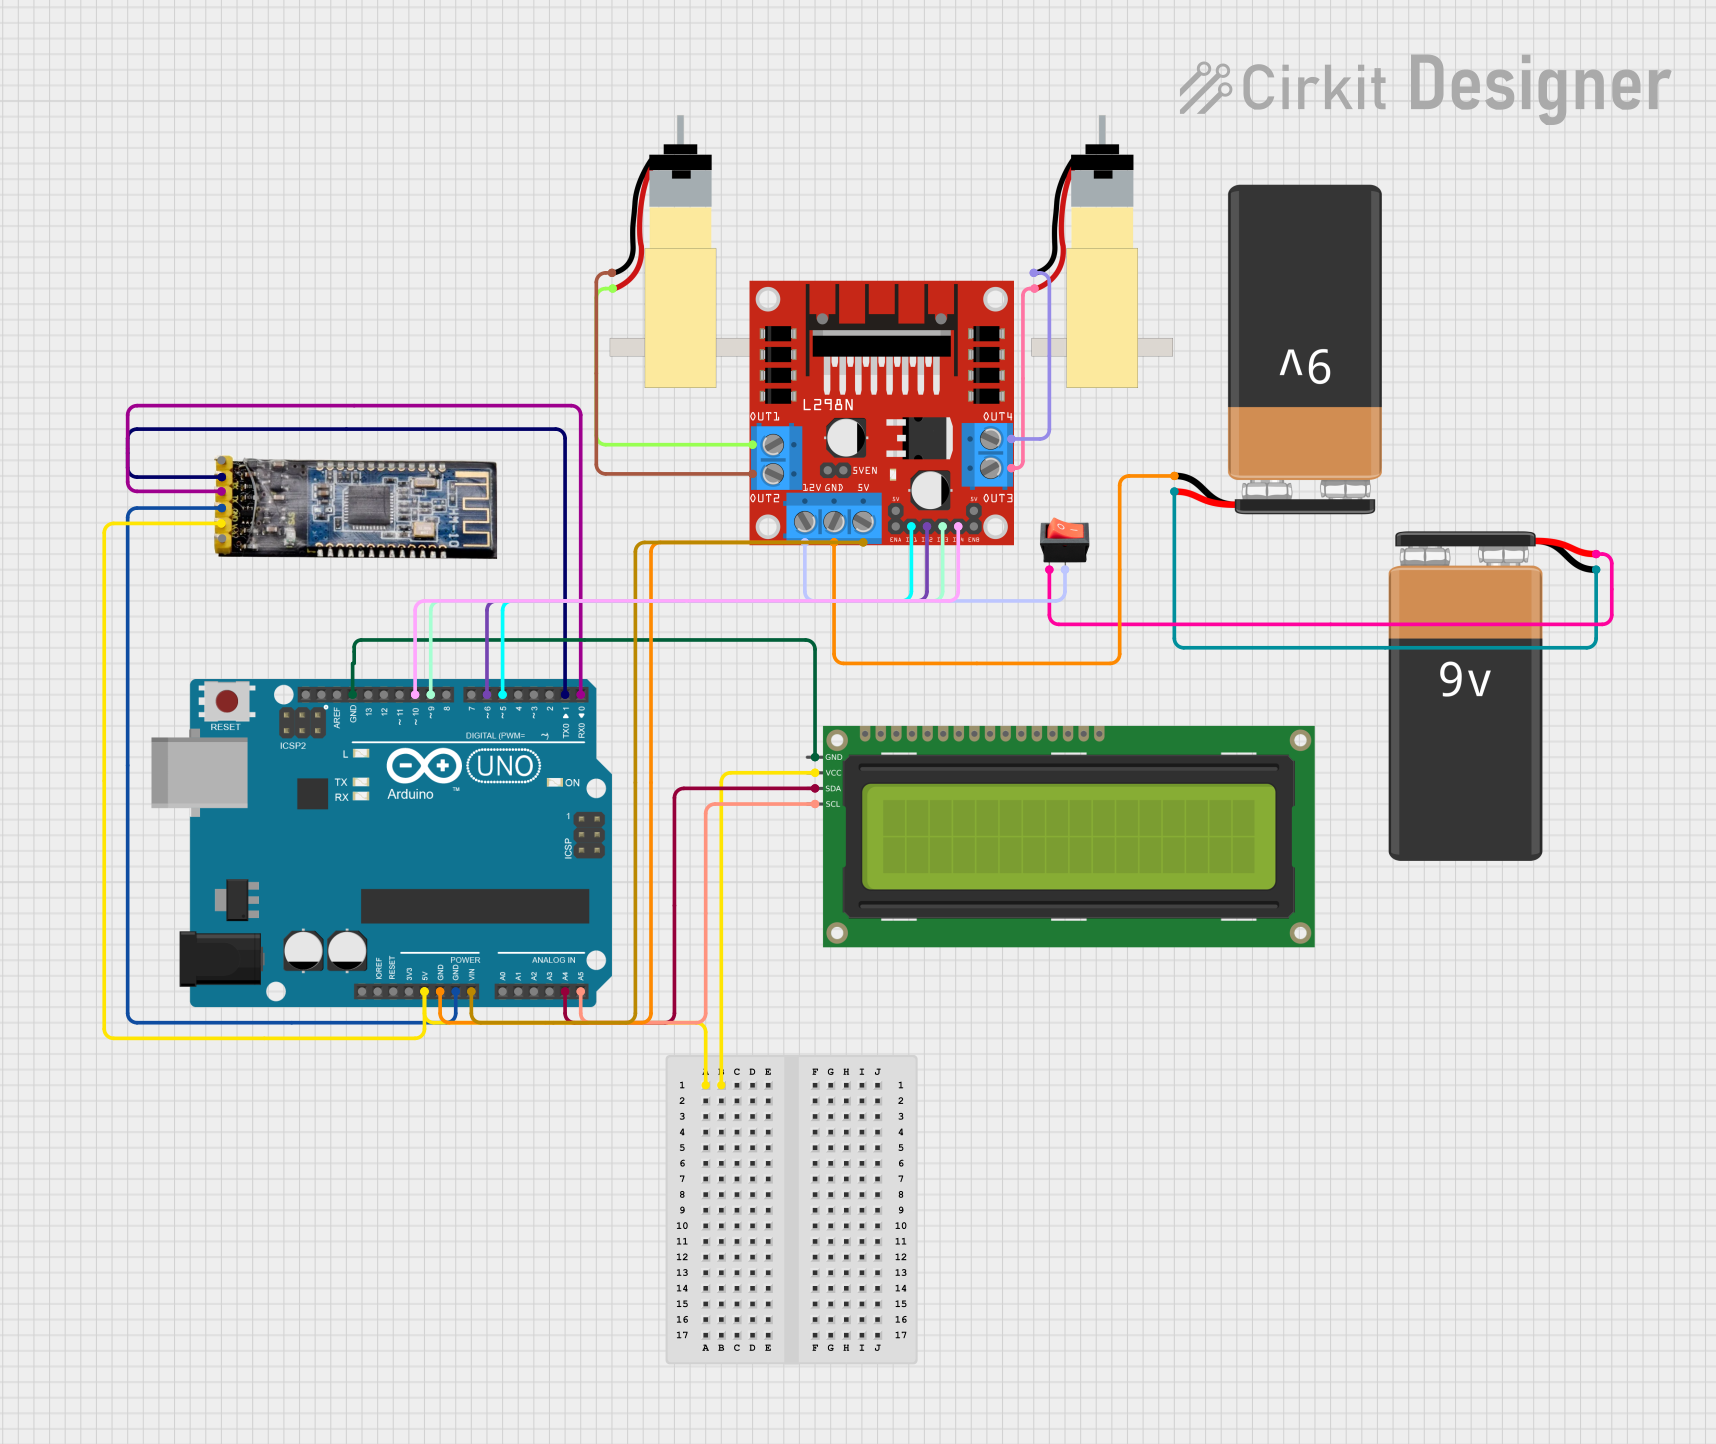
Arduino UNO Bluetooth-Controlled Robot with I2C LCD Feedback

Circuit Documentation
Summary
This circuit integrates an Arduino UNO microcontroller with a Bluetooth module (HM-10), a 16x2 I2C LCD display, two hobby gearmotors with a 48:1 gearbox, a 9V battery, a rocker switch, and an L298N DC motor driver. The Arduino UNO serves as the central processing unit, interfacing with the Bluetooth module for wireless communication, controlling the LCD for display purposes, and managing the motor driver to operate the gearmotors. The circuit is powered by a 9V battery, with a rocker switch included for power control.
Component List
Arduino UNO
- Microcontroller board based on the ATmega328P
- Provides I/O pins for interfacing with other components
Bluetooth module HM-10
- Bluetooth 4.0 module for wireless communication
16x2 I2C LCD
- Liquid Crystal Display with I2C communication interface
- Displays text information
Hobby Gearmotor with 48:1 gearbox (x2)
- DC motors with a 48:1 reduction gearbox for torque
9V Battery (x2)
- Provides power to the circuit
Rocker Switch
- Controls the power supply to the motor driver
L298N DC motor driver
- Dual H-bridge motor driver for controlling the direction and speed of DC motors
Wiring Details
Arduino UNO
5Vconnected to Bluetooth module HM-10 VCC and 16x2 I2C LCD VCCGNDconnected to Bluetooth module HM-10 GND, 16x2 I2C LCD GND, and L298N DC motor driver GNDVinconnected to L298N DC motor driver 5VA4 (SDA)connected to 16x2 I2C LCD SDAA5 (SCL)connected to 16x2 I2C LCD SCLD10connected to L298N DC motor driver IN4D9connected to L298N DC motor driver IN3D6connected to L298N DC motor driver IN2D5connected to L298N DC motor driver IN1D1 (TX)connected to Bluetooth module HM-10 RXD0 (RX)connected to Bluetooth module HM-10 TX
Bluetooth module HM-10
VCCconnected to Arduino UNO 5VGNDconnected to Arduino UNO GNDRXconnected to Arduino UNO D1 (TX)TXconnected to Arduino UNO D0 (RX)
16x2 I2C LCD
VCCconnected to Arduino UNO 5VGNDconnected to Arduino UNO GNDSDAconnected to Arduino UNO A4 (SDA)SCLconnected to Arduino UNO A5 (SCL)
Hobby Gearmotor with 48:1 gearbox
pin 1of one motor connected to L298N DC motor driver OUT4pin 2of the same motor connected to L298N DC motor driver OUT3pin 1of the other motor connected to L298N DC motor driver OUT2pin 2of the other motor connected to L298N DC motor driver OUT1
9V Battery
- One battery
-connected to the other battery+ - The
-of the second battery connected to L298N DC motor driver GND - The
+of the first battery connected to rocker switch input
Rocker Switch
inputconnected to the+of the first 9V batteryoutputconnected to L298N DC motor driver 12V
L298N DC motor driver
GNDconnected to Arduino UNO GND and the-of the second 9V battery5Vconnected to Arduino UNO Vin12Vconnected to rocker switch outputIN1connected to Arduino UNO D5IN2connected to Arduino UNO D6IN3connected to Arduino UNO D9IN4connected to Arduino UNO D10OUT1connected to one gearmotor pin 2OUT2connected to one gearmotor pin 1OUT3connected to the other gearmotor pin 2OUT4connected to the other gearmotor pin 1
Documented Code
Arduino UNO Code (sketch.ino)
void setup() {
  // put your setup code here, to run once:

}

void loop() {
  // put your main code here, to run repeatedly:

}
This code is a template for the Arduino UNO and does not contain any specific functionality. It provides the basic structure for an Arduino sketch with setup() and loop() functions. The setup() function is intended for initialization code that runs once, while the loop() function contains code that runs repeatedly, forming the main logic of the program.