
Circuit Documentation
Summary of the Circuit
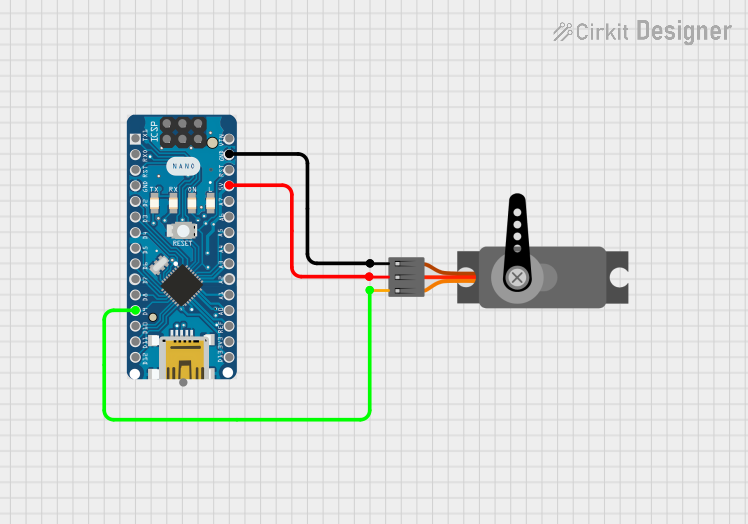
This circuit consists of an Arduino Nano microcontroller and a servo motor. The Arduino Nano is programmed to control the servo motor, which is likely used for actuating a mechanism, such as deploying a parachute. The circuit is designed to receive a signal via serial communication, which triggers a countdown timer. After the countdown, the servo motor is activated to rotate to a specific position.
Component List
Arduino Nano
- Description: A compact microcontroller board based on the ATmega328P.
- Pins: D1/TX, D0/RX, RESET, GND, D2, D3, D4, D5, D6, D7, D8, D9, D10, D11/MOSI, D12/MISO, VIN, 5V, A7, A6, A5, A4, A3, A2, A1, A0, AREF, 3V3, D13/SCK.
- Purpose: Acts as the central processing unit of the circuit, controlling the servo motor and handling serial communication.
Servo
- Description: An electromechanical device that can rotate to a specified position.
- Pins: GND, VCC, PWM.
- Purpose: To perform mechanical actions, such as deploying a parachute, when signaled by the Arduino Nano.
Wiring Details
Arduino Nano
- D9: Connected to the PWM pin of the Servo.
- GND: Shared ground with the Servo.
- 5V: Provides power to the VCC pin of the Servo.
Servo
- PWM: Receives pulse-width modulation signal from D9 of the Arduino Nano for position control.
- GND: Connected to the ground (GND) pin of the Arduino Nano.
- VCC: Powered by the 5V output from the Arduino Nano.
Documented Code
Arduino Nano Code (sketch.ino)
#include <Servo.h>

Servo myServo;
int servoPin = 9;
int servoPos = 0;
int launchTime = 5000;    // 타이머 설정 (5초)
bool launchSignal = false;  // 타이머 시작 신호

void setup() {
  // 서보모터 초기화
  myServo.attach(servoPin);
  myServo.write(servoPos);  // 서보모터 초기 위치 설정 (0도)

  // 시리얼 통신 시작
  Serial.begin(9600);
}

void loop() {
  // 시리얼로부터 데이터 수신 확인
  if (Serial.available() > 0) {
    char signal = Serial.read();

    if (signal == '1') {
      launchSignal = true;  // 타이머 시작 신호 수신
      delay(launchTime);     // 타이머 5초 대기
      activateServo();       // 서보모터 작동 (낙하산 발사)
    }
  }
}

void activateServo() {
  // 서보모터를 180도까지 회전하여 낙하산 발사
  myServo.write(180);
  delay(1000);  // 1초간 유지
  myServo.write(0);  // 서보모터 원래 위치로 복귀
}
Python Script for Serial Communication (monitor.txt)
import tkinter as tk
import time
import serial

# 시리얼 포트 설정 (컴퓨터에 연결된 Arduino의 시리얼 포트로 설정하세요)
ser = serial.Serial('COM3', 9600, timeout=1)

# 타이머 시작 함수
def start_timer():
    timer_duration = 5  # 5초 타이머 설정

    # Arduino에 타이머 시작 신호 전송
    ser.write(b'1')  # 아두이노로 '1'을 보내 타이머 시작 신호

    # 컴퓨터 화면에서 타이머 카운트다운
    for i in range(timer_duration, -1, -1):
        timer_label.config(text=f"Time left: {i} seconds")
        root.update()  # GUI 업데이트
        time.sleep(1)  # 1초 대기

    timer_label.config(text="Rocket launched!")

# GUI 설정
root = tk.Tk()
root.title("Parachute Launch Timer")

# 버튼 및 타이머 라벨 생성
timer_label = tk.Label(root, text="Click 'Start' to launch the parachute.", font=("Arial", 14))
timer_label.pack(pady=20)

start_button = tk.Button(root, text="Start Timer", font=("Arial", 14), command=start_timer)
start_button.pack(pady=20)

# Tkinter 이벤트 루프 실행
root.mainloop()
Servo Microcontroller Code (sketch.ino)
void setup() {
  // put your setup code here, to run once:

}

void loop() {
  // put your main code here, to run repeatedly:

}
Note: The servo microcontroller code is empty and does not contain any functional code.