
Arduino UNO-Based Flex and Accelerometer Controlled Dual Servo System
View and Edit Project In Cirkit Designer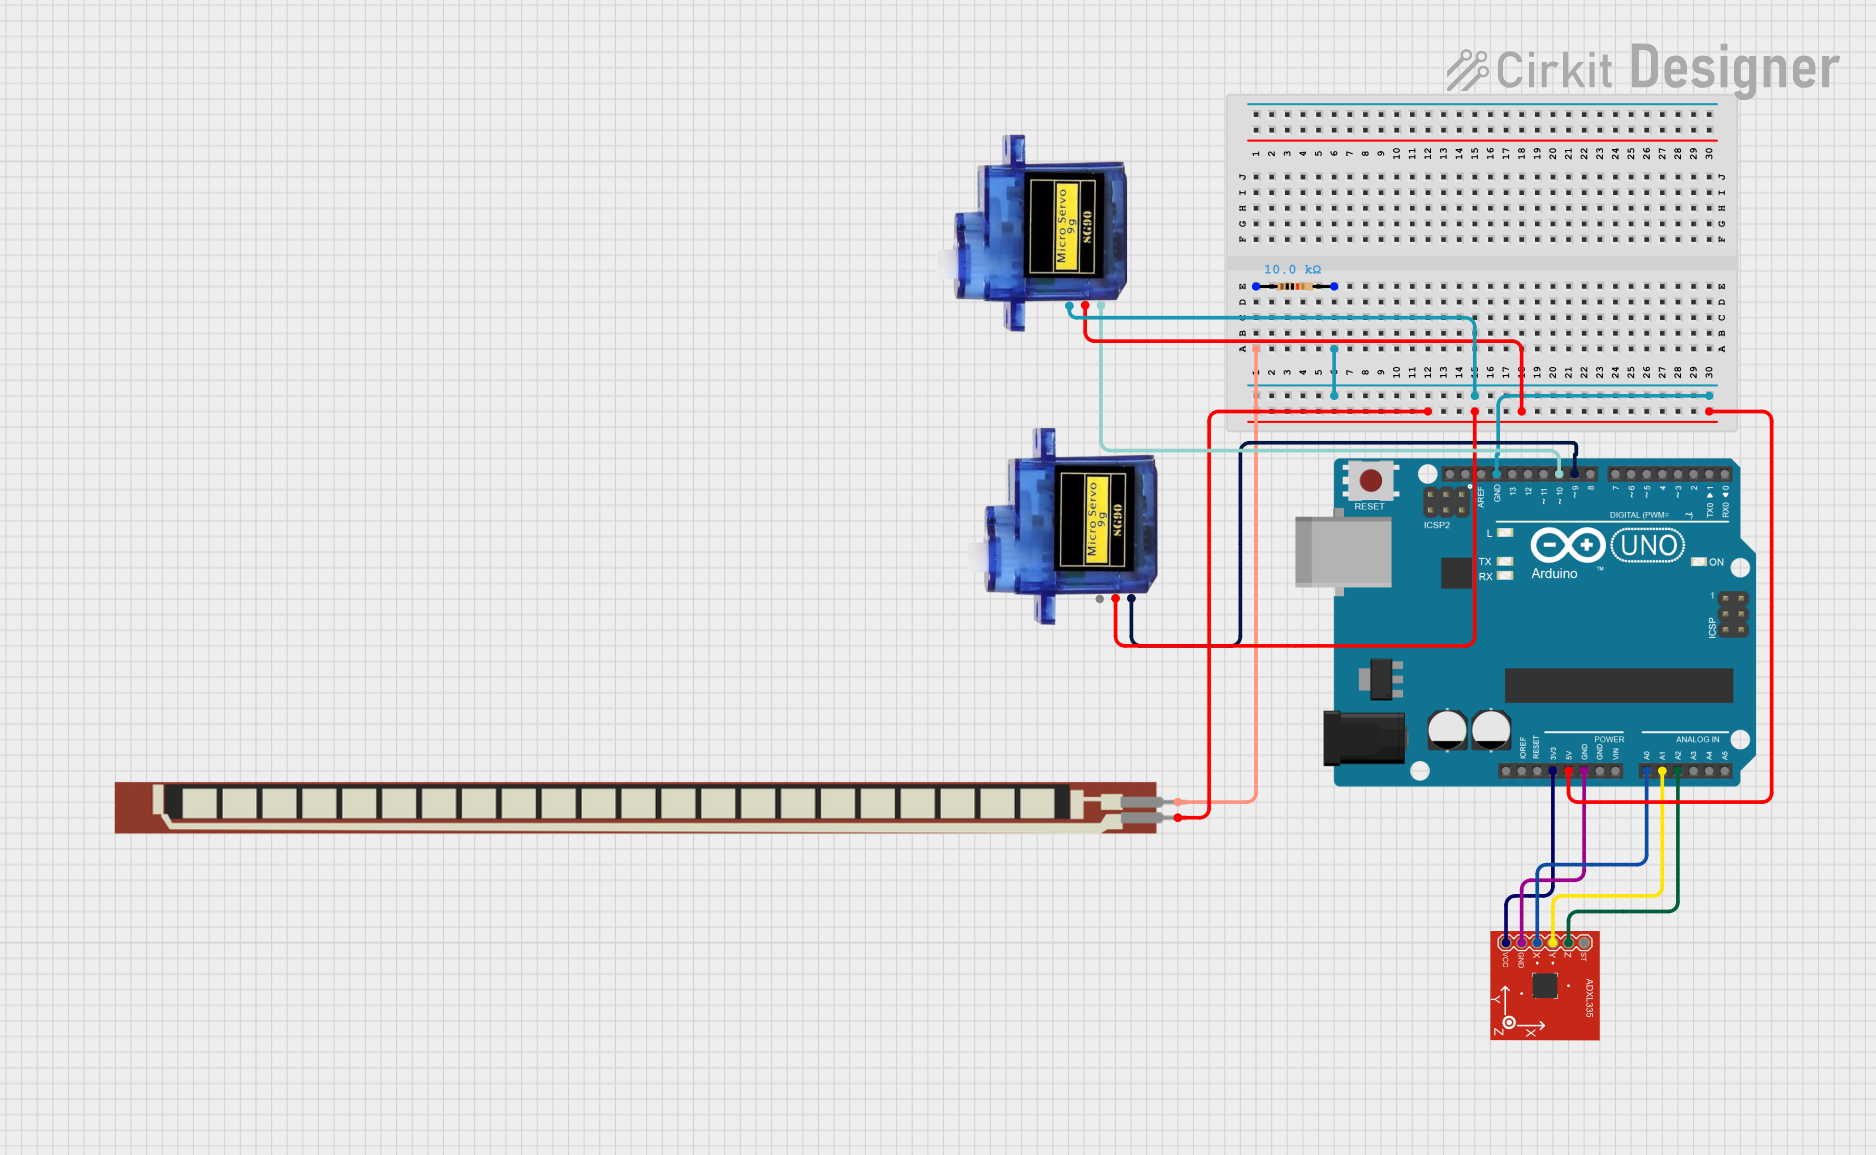
Circuit Documentation
Summary
This circuit involves an Arduino UNO microcontroller interfacing with a variety of sensors and actuators. The components include a flex sensor, a triple-axis accelerometer, and two micro servos. The Arduino reads data from the sensors and controls the servos based on the sensor inputs. The flex sensor and accelerometer provide analog inputs to the Arduino, which then maps these inputs to control the angles of the servos.
Component List
Arduino UNO
- Description: A microcontroller board based on the ATmega328P.
- Pins: UNUSED, IOREF, Reset, 3.3V, 5V, GND, Vin, A0, A1, A2, A3, A4, A5, SCL, SDA, AREF, D13, D12, D11, D10, D9, D8, D7, D6, D5, D4, D3, D2, D1, D0
Basic Flex Resistor
- Description: A sensor that changes resistance based on bending.
- Pins: Pin 2, Pin 1
Micro Servo 9G (Servo 1)
- Description: A small servo motor used for precise control of angular position.
- Pins: GND, +5V, PWM
Micro Servo 9G (Servo 2)
- Description: A small servo motor used for precise control of angular position.
- Pins: GND, +5V, PWM
Triple Axis Accelerometer (ADXL335)
- Description: A sensor that measures acceleration in three axes.
- Pins: ST, ZOUT, YOUT, XOUT, GND, VCC
Resistor
- Description: A 10k Ohm resistor used to limit current.
- Pins: pin1, pin2
- Properties: Resistance: 10k Ohms
Wiring Details
Arduino UNO
- 5V: Connected to +5V of both Micro Servo 9G (Servo 1) and Micro Servo 9G (Servo 2), and Pin 1 of Basic Flex Resistor.
- GND: Connected to GND of both Micro Servo 9G (Servo 1) and Micro Servo 9G (Servo 2), GND of Triple Axis Accelerometer (ADXL335), and pin2 of Resistor.
- 3.3V: Connected to VCC of Triple Axis Accelerometer (ADXL335).
- A0: Connected to XOUT of Triple Axis Accelerometer (ADXL335).
- A1: Connected to YOUT of Triple Axis Accelerometer (ADXL335).
- A2: Connected to ZOUT of Triple Axis Accelerometer (ADXL335).
- A3: Connected to Pin 2 of Basic Flex Resistor.
- D9: Connected to PWM of Micro Servo 9G (Servo 1).
- D10: Connected to PWM of Micro Servo 9G (Servo 2).
Basic Flex Resistor
- Pin 1: Connected to 5V of Arduino UNO.
- Pin 2: Connected to A3 of Arduino UNO and pin1 of Resistor.
Micro Servo 9G (Servo 1)
- GND: Connected to GND of Arduino UNO.
- +5V: Connected to 5V of Arduino UNO.
- PWM: Connected to D9 of Arduino UNO.
Micro Servo 9G (Servo 2)
- GND: Connected to GND of Arduino UNO.
- +5V: Connected to 5V of Arduino UNO.
- PWM: Connected to D10 of Arduino UNO.
Triple Axis Accelerometer (ADXL335)
- GND: Connected to GND of Arduino UNO.
- VCC: Connected to 3.3V of Arduino UNO.
- XOUT: Connected to A0 of Arduino UNO.
- YOUT: Connected to A1 of Arduino UNO.
- ZOUT: Connected to A2 of Arduino UNO.
Resistor
- pin1: Connected to Pin 2 of Basic Flex Resistor.
- pin2: Connected to GND of Arduino UNO.
Code Documentation
#include <Servo.h>

Servo myServo1;
Servo myServo2;

const int flexPin = A3; // Flex sensor connected to A3
const int servoPin1 = 9; // Servo 1 connected to digital pin 9
const int servoPin2 = 10; // Servo 2 connected to digital pin 10
const int xAxisPin = A0; // Accelerometer X-axis connected to A0

void setup() {
  Serial.begin(9600); // Start the serial communication at 9600 baud rate
  myServo1.attach(servoPin1); // Attach servo 1 to pin 9
  myServo2.attach(servoPin2); // Attach servo 2 to pin 10
}

void loop() {
  // Read flex sensor value
  int flexValue = analogRead(flexPin);
  Serial.print("Flex Value: "); // Print flex sensor value
  Serial.println(flexValue);

  // Map flex sensor value to servo angle (0-180 degrees)
  int servoAngle1 = map(flexValue, 0, 1023, 0, 180);
  myServo1.write(servoAngle1); // Move servo 1 based on flex sensor

  // Read accelerometer X-axis value
  int xAxisValue = analogRead(xAxisPin);
  Serial.print("X-Axis Value: "); // Print accelerometer X-axis value
  Serial.println(xAxisValue);

  // Map accelerometer X-axis value to servo angle (0-180 degrees)
  int servoAngle2 = map(xAxisValue, 0, 1023, 0, 180);
  myServo2.write(servoAngle2); // Move servo 2 based on X-axis input

  delay(15); // Short delay for stability
}
This code initializes two servos and reads values from a flex sensor and an accelerometer. The flex sensor value is mapped to control the angle of the first servo, and the X-axis value of the accelerometer is mapped to control the angle of the second servo. The values are also printed to the serial monitor for debugging purposes.