
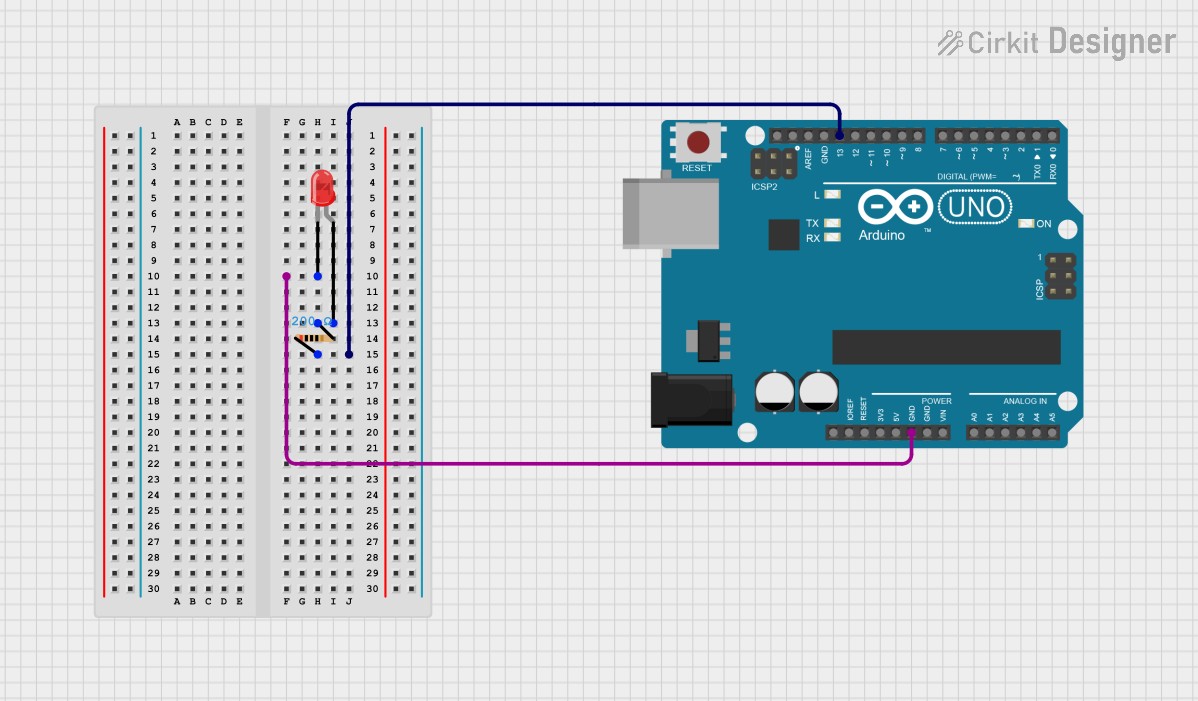
Circuit Documentation
Summary
This circuit consists of an Arduino UNO microcontroller, a red LED, and a resistor. The Arduino UNO controls the LED, making it blink with a specific timing pattern. The resistor is used to limit the current flowing through the LED to prevent damage.
Component List
Arduino UNO
- Description: A microcontroller board based on the ATmega328P.
- Pins: UNUSED, IOREF, Reset, 3.3V, 5V, GND, Vin, A0, A1, A2, A3, A4, A5, SCL, SDA, AREF, D13, D12, D11, D10, D9, D8, D7, D6, D5, D4, D3, D2, D1, D0
- Purpose in Circuit: Controls the LED blinking pattern.
LED: Two Pin (red)
- Description: A red light-emitting diode.
- Pins: cathode, anode
- Purpose in Circuit: Provides visual indication by emitting light when current flows through it.
Resistor
- Description: A passive electrical component that limits the current flow.
- Pins: pin1, pin2
- Properties:
- Resistance: 200 Ohms
- Purpose in Circuit: Limits the current flowing through the LED to prevent damage.
Wiring Details
Arduino UNO
- GND: Connected to the cathode of the LED.
- D13: Connected to pin1 of the resistor.
LED: Two Pin (red)
- cathode: Connected to GND of the Arduino UNO.
- anode: Connected to pin2 of the resistor.
Resistor
- pin1: Connected to D13 of the Arduino UNO.
- pin2: Connected to the anode of the LED.
Code Documentation
Arduino UNO Code
void setup() {
    pinMode(LED_BUILTIN, OUTPUT);
}

void loop() {
    digitalWrite(LED_BUILTIN, HIGH);
    delay(1000);
    digitalWrite(LED_BUILTIN, LOW);
    delay(10000);
}
Explanation:
- setup(): This function runs once when the Arduino is powered on or reset. It sets the built-in LED pin (D13) as an output.
- loop(): This function runs repeatedly after the setup function. It turns the LED on, waits for 1 second, turns the LED off, and then waits for 10 seconds before repeating the cycle.
This code makes the LED connected to pin D13 blink with a 1-second on and 10-second off pattern.