
Circuit Documentation
Summary
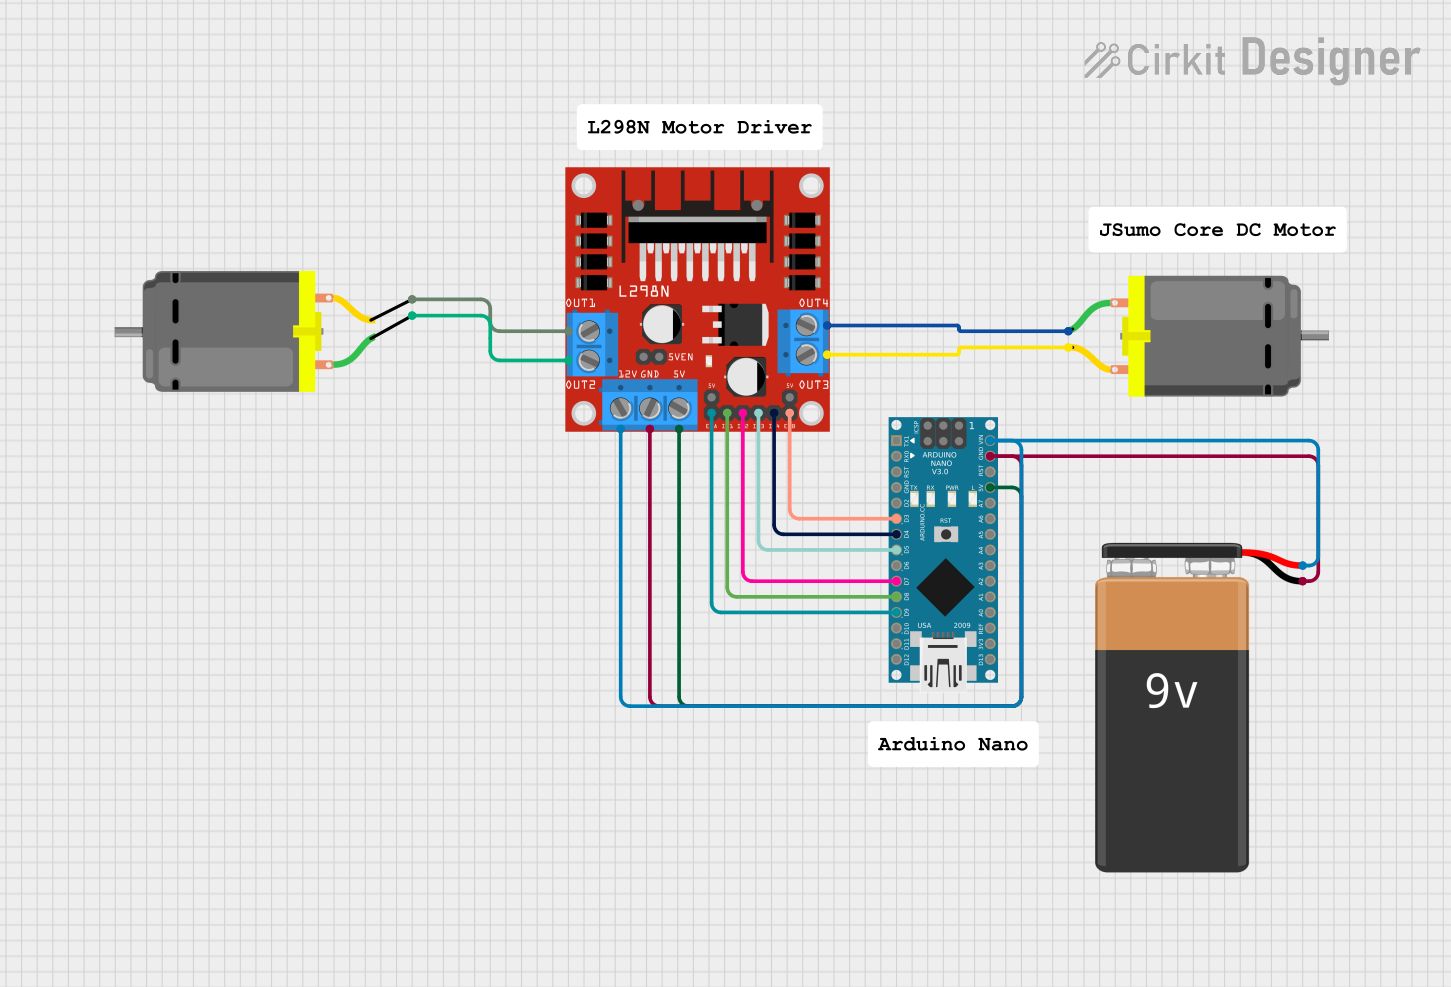
This circuit is designed to control two DC motors using an Arduino Nano microcontroller and an L298N DC motor driver. The Arduino Nano is responsible for sending control signals to the L298N driver, which in turn drives the motors. The circuit is powered by a 9V battery, which supplies power to both the Arduino and the motor driver.
Component List
Arduino Nano
- Microcontroller board based on the ATmega328P
- It has a variety of digital and analog I/O pins for interfacing with various components and sensors.
- Provides 5V and 3.3V power output, which can be used to power other components in the circuit.
L298N DC Motor Driver
- A dual H-bridge motor driver capable of driving two DC motors or one stepper motor.
- It has pins for motor outputs, motor inputs, and power supply connections.
- The driver can handle a supply voltage of up to 35V and a peak current of 2A per channel.
DC Motor (x2)
- Standard DC motors with two connection pins.
- These motors are driven by the L298N motor driver.
9V Battery
- Provides the power supply for the circuit.
- Connected to the VIN pin of the Arduino Nano and the 12V pin of the L298N motor driver.
Wiring Details
Arduino Nano
- D3: Connected to ENB on the L298N motor driver to enable motor B.
- D4: Connected to IN4 on the L298N motor driver to control motor B direction.
- D5: Connected to IN3 on the L298N motor driver to control motor B direction.
- D7: Connected to IN2 on the L298N motor driver to control motor A direction.
- D8: Connected to IN1 on the L298N motor driver to control motor A direction.
- D9: Connected to ENA on the L298N motor driver to enable motor A.
- VIN: Connected to the 12V pin on the L298N motor driver and the positive terminal of the 9V battery.
- GND: Connected to the GND pin on the L298N motor driver and the negative terminal of the 9V battery.
- 5V: Connected to the 5V pin on the L298N motor driver to provide logic power.
L298N DC Motor Driver
- OUT1 and OUT2: Connected to one of the DC motors.
- OUT3 and OUT4: Connected to the other DC motor.
- 12V: Connected to the VIN pin on the Arduino Nano and the positive terminal of the 9V battery.
- GND: Connected to the GND pin on the Arduino Nano and the negative terminal of the 9V battery.
- 5V: Connected to the 5V pin on the Arduino Nano to receive logic power.
DC Motors
- Each motor has two pins connected to the OUT1/OUT2 and OUT3/OUT4 pairs on the L298N motor driver, respectively.
9V Battery
- + (positive): Connected to the VIN pin on the Arduino Nano and the 12V pin on the L298N motor driver.
- - (negative): Connected to the GND pin on the Arduino Nano and the GND pin on the L298N motor driver.
Documented Code
Arduino Nano Code (sketch.ino)
void setup() {
  // put your setup code here, to run once:

}

void loop() {
  // put your main code here, to run repeatedly:

}
This code template is a starting point for the Arduino Nano. The setup() function is called once when the microcontroller is powered on or reset. It is used to initialize the pins and set the motor driver's initial state. The loop() function is called repeatedly and contains the main logic to control the motors via the L298N driver.
The actual implementation of the motor control logic will depend on the specific requirements of the application, such as the direction and speed of the motors, which should be coded within these functions.