
Arduino UNO and MPU-6050 Controlled DC Motor with nMOS Transistor
View and Edit Project In Cirkit Designer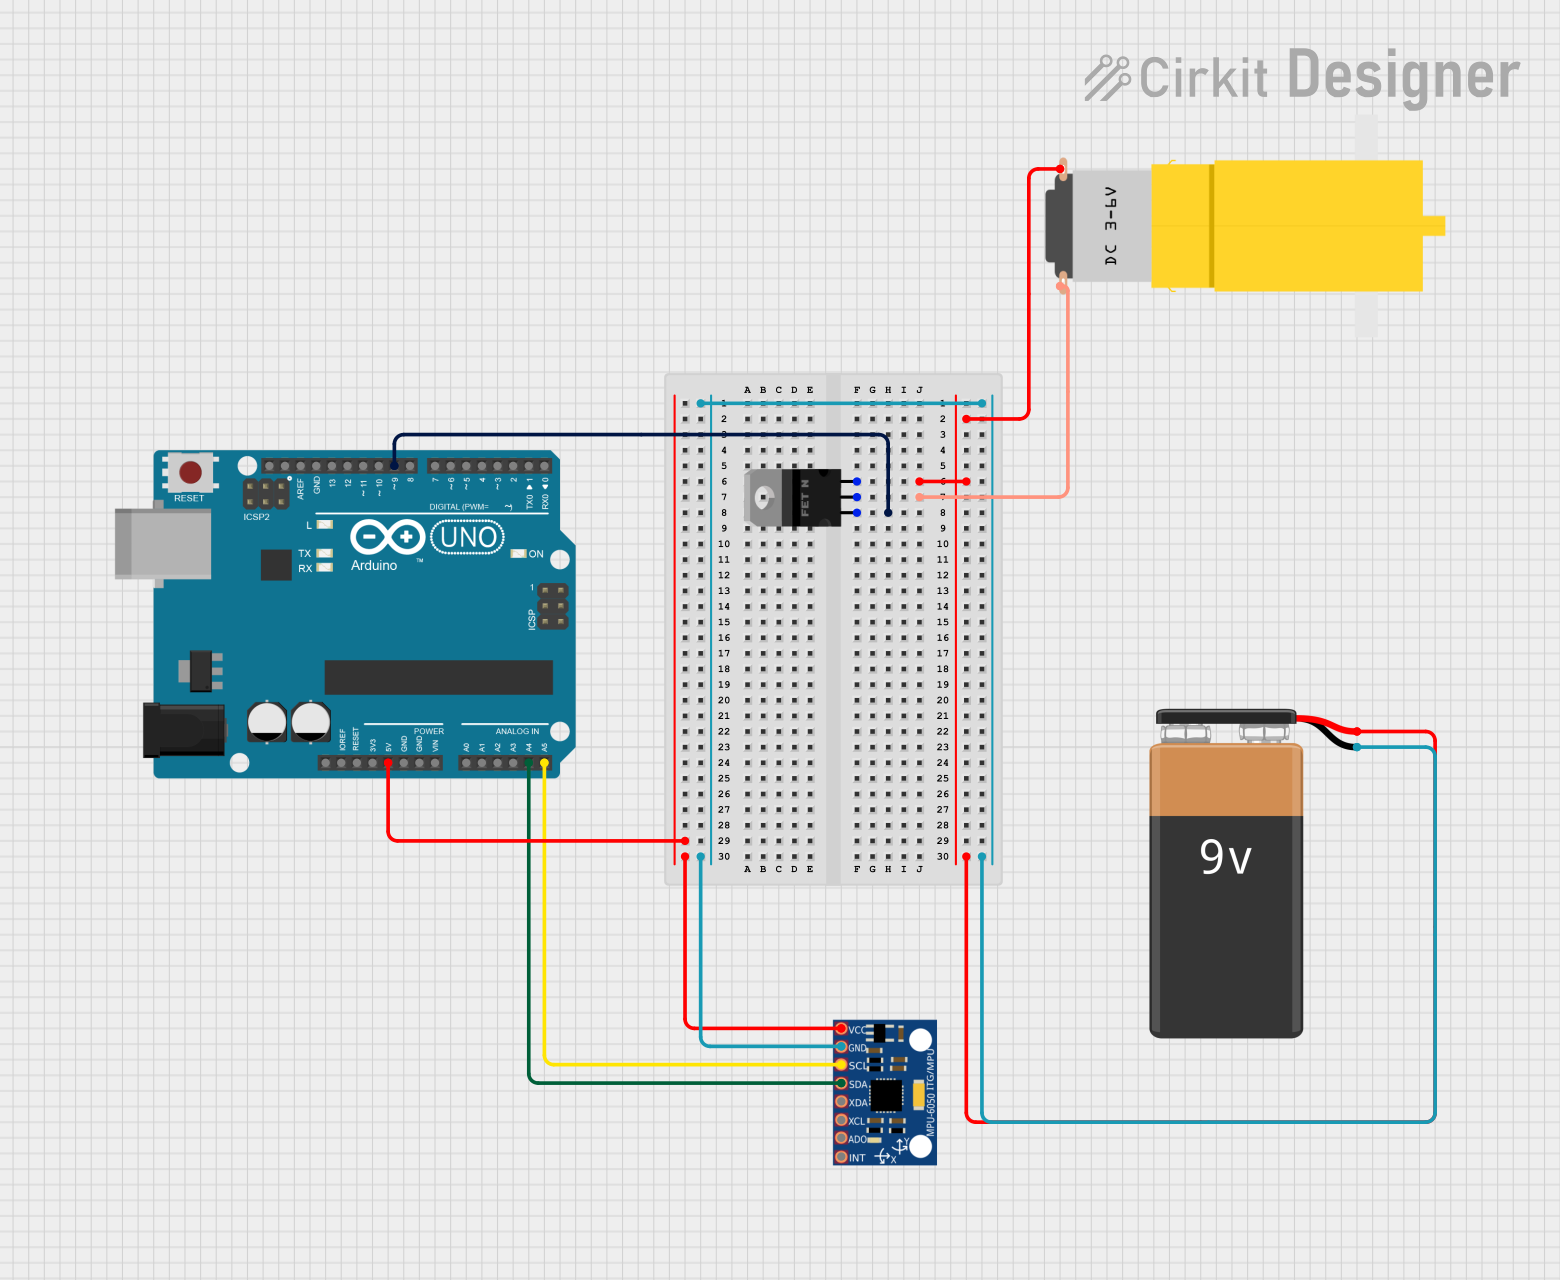
Circuit Documentation
Summary
This circuit is designed to control a DC motor using an nMOS transistor and an Arduino UNO. The motor is switched off if the x-axis value obtained from the MPU-6050 sensor exceeds 135. The MPU-6050 communicates with the Arduino via I2C.
Component List
Arduino UNO
- Description: A microcontroller board based on the ATmega328P.
- Pins: UNUSED, IOREF, Reset, 3.3V, 5V, GND, Vin, A0, A1, A2, A3, A4, A5, SCL, SDA, AREF, D13, D12, D11, D10, D9, D8, D7, D6, D5, D4, D3, D2, D1, D0
MPU-6050
- Description: A 6-axis motion tracking device that combines a 3-axis gyroscope and a 3-axis accelerometer.
- Pins: VCC, GND, SCL, SDA, XDA, XCL, AD0, INT
9V Battery
- Description: A standard 9V battery used to power the circuit.
- Pins: -, +
Motor amarillo motorreductor hobby
- Description: A small DC motor with a gearbox.
- Pins: vcc, GND
nMOS Transistor (MOSFET)
- Description: A type of transistor used for switching and amplifying electronic signals.
- Pins: gate, drain, source
Wiring Details
Arduino UNO
- 5V connected to MPU-6050 VCC
- GND connected to 9V Battery -
- D9 connected to nMOS Transistor gate
- A4 connected to MPU-6050 SDA
- A5 connected to MPU-6050 SCL
MPU-6050
- VCC connected to Arduino UNO 5V
- GND connected to 9V Battery -
- SCL connected to Arduino UNO A5
- SDA connected to Arduino UNO A4
9V Battery
- + connected to nMOS Transistor source and Motor amarillo motorreductor hobby vcc
- - connected to MPU-6050 GND and Arduino UNO GND
Motor amarillo motorreductor hobby
- vcc connected to 9V Battery + and nMOS Transistor source
- GND connected to nMOS Transistor drain
nMOS Transistor (MOSFET)
- gate connected to Arduino UNO D9
- drain connected to Motor amarillo motorreductor hobby GND
- source connected to 9V Battery + and Motor amarillo motorreductor hobby vcc
Code Documentation
/*
 * This Arduino Sketch controls a DC motor using an nMOS transistor. The motor
 * is switched off if the x-axis value obtained from the MPU-6050 sensor
 * exceeds 135. The MPU-6050 communicates with the Arduino via I2C.
 */

#include <Wire.h>

const int MPU_ADDR = 0x68; // I2C address of the MPU-6050
const int motorPin = 9;    // Pin connected to the gate of the nMOS transistor

void setup() {
  Wire.begin();
  Serial.begin(9600);
  pinMode(motorPin, OUTPUT);
  digitalWrite(motorPin, LOW); // Ensure motor is off initially

  // Initialize MPU-6050
  Wire.beginTransmission(MPU_ADDR);
  Wire.write(0x6B); // PWR_MGMT_1 register
  Wire.write(0);    // Set to zero (wakes up the MPU-6050)
  Wire.endTransmission(true);
}

void loop() {
  Wire.beginTransmission(MPU_ADDR);
  Wire.write(0x3B); // Starting with register 0x3B (ACCEL_XOUT_H)
  Wire.endTransmission(false);
  Wire.requestFrom(MPU_ADDR, 2, true); // Request only X-axis registers

  int16_t accelX = Wire.read() << 8 | Wire.read(); // Read X-axis

  Serial.print("Accel X: ");
  Serial.println(accelX);

  if (accelX > 135) {
    digitalWrite(motorPin, LOW); // Turn off motor
  } else {
    digitalWrite(motorPin, HIGH); // Turn on motor
  }

  delay(100); // Small delay to avoid overwhelming the sensor
}
This code initializes the MPU-6050 sensor and reads the x-axis acceleration value. If the value exceeds 135, the motor is turned off; otherwise, the motor is turned on. The motor is controlled via an nMOS transistor connected to pin D9 of the Arduino UNO.