
Circuit Documentation
Summary
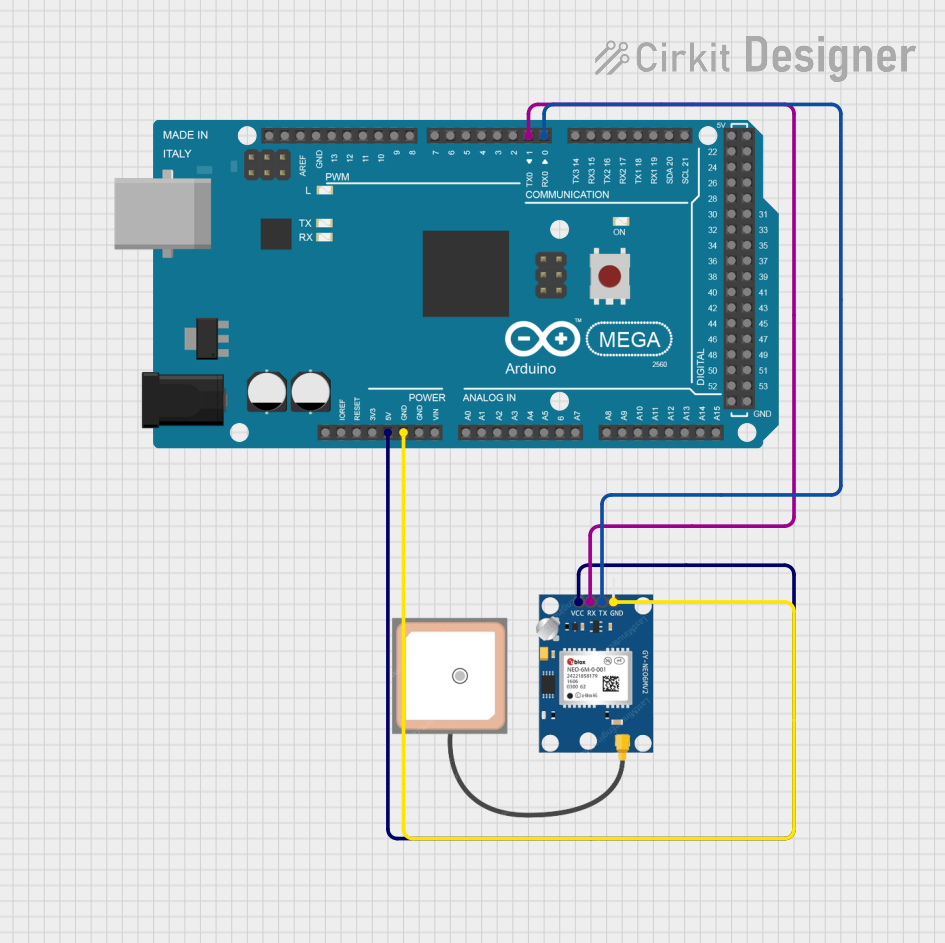
This document provides a detailed overview of a circuit involving three Arduino Mega 2560 microcontrollers and a GPS NEO 6M module. The circuit is designed to interface the GPS module with one of the Arduino Mega 2560 boards, allowing it to read and print GPS data to the Serial Monitor. The other two Arduino Mega 2560 boards are included but not connected to the GPS module.
Component List
Arduino Mega 2560
- Description: A microcontroller board based on the ATmega2560.
- Pins: IOREF, RESET, 3V3, 5V, GND, VIN, A0-A15, D21/SCL, D20/SDA, D19/RX1, D18/TX1, D17 PWM/RX2, D16 PWM/TX2, D15/RX3, D14/TX3, D0 RX0, D1 TX0, D2 PWM, D3 PWM, D4 PWM, D5 PWM, D6 PWM, D7 PWM, D8 PWM, D9 PWM, D10 PWM, D11 PWM, D12 PWM, D13 PWM, AREF, SDA, SCL, D52, D50, D48, D46, D44, D42, D40, D38, D36, D34, D32, D30, D28, D26, D24, D22, D53, D51, D49, D47, D45, D43, D41, D39, D37, D35, D33, D31, D29, D27, D25, D23.
GPS NEO 6M
- Description: A GPS module used for obtaining location data.
- Pins: VCC, RX, TX, GND.
Wiring Details
Arduino Mega 2560 (1st Instance)
- 5V connected to VCC of GPS NEO 6M.
- GND connected to GND of GPS NEO 6M.
- D0 RX0 connected to TX of GPS NEO 6M.
- D1 TX0 connected to RX of GPS NEO 6M.
Arduino Mega 2560 (2nd Instance)
- No connections to other components.
Arduino Mega 2560 (3rd Instance)
- No connections to other components.
GPS NEO 6M
- VCC connected to 5V of Arduino Mega 2560 (1st Instance).
- GND connected to GND of Arduino Mega 2560 (1st Instance).
- TX connected to D0 RX0 of Arduino Mega 2560 (1st Instance).
- RX connected to D1 TX0 of Arduino Mega 2560 (1st Instance).
Documented Code
Arduino Mega 2560 (1st Instance)
/*
 * Arduino Sketch for interfacing NEO 6M GPS module with Arduino Mega 2560
 * This code initializes the serial communication with the GPS module and
 * reads the data from the GPS module, then prints it to the Serial Monitor.
 */

void setup() {
  // Initialize serial communication with the computer
  Serial.begin(9600);
  // Initialize serial communication with the GPS module
  Serial1.begin(9600);
}

void loop() {
  // Check if data is available from the GPS module
  if (Serial1.available()) {
    // Read data from the GPS module
    char c = Serial1.read();
    // Print the data to the Serial Monitor
    Serial.print(c);
  }
}
Arduino Mega 2560 (2nd Instance)
void setup() {
  // put your setup code here, to run once:

}

void loop() {
  // put your main code here, to run repeatedly:

}
Arduino Mega 2560 (3rd Instance)
void setup() {
  // put your setup code here, to run once:

}

void loop() {
  // put your main code here, to run repeatedly:

}
This documentation provides a comprehensive overview of the circuit, including the components used, their wiring details, and the code running on the microcontrollers.