
Arduino UNO LED Blinking and LCD Display Control with Pushbuttons
View and Edit Project In Cirkit Designer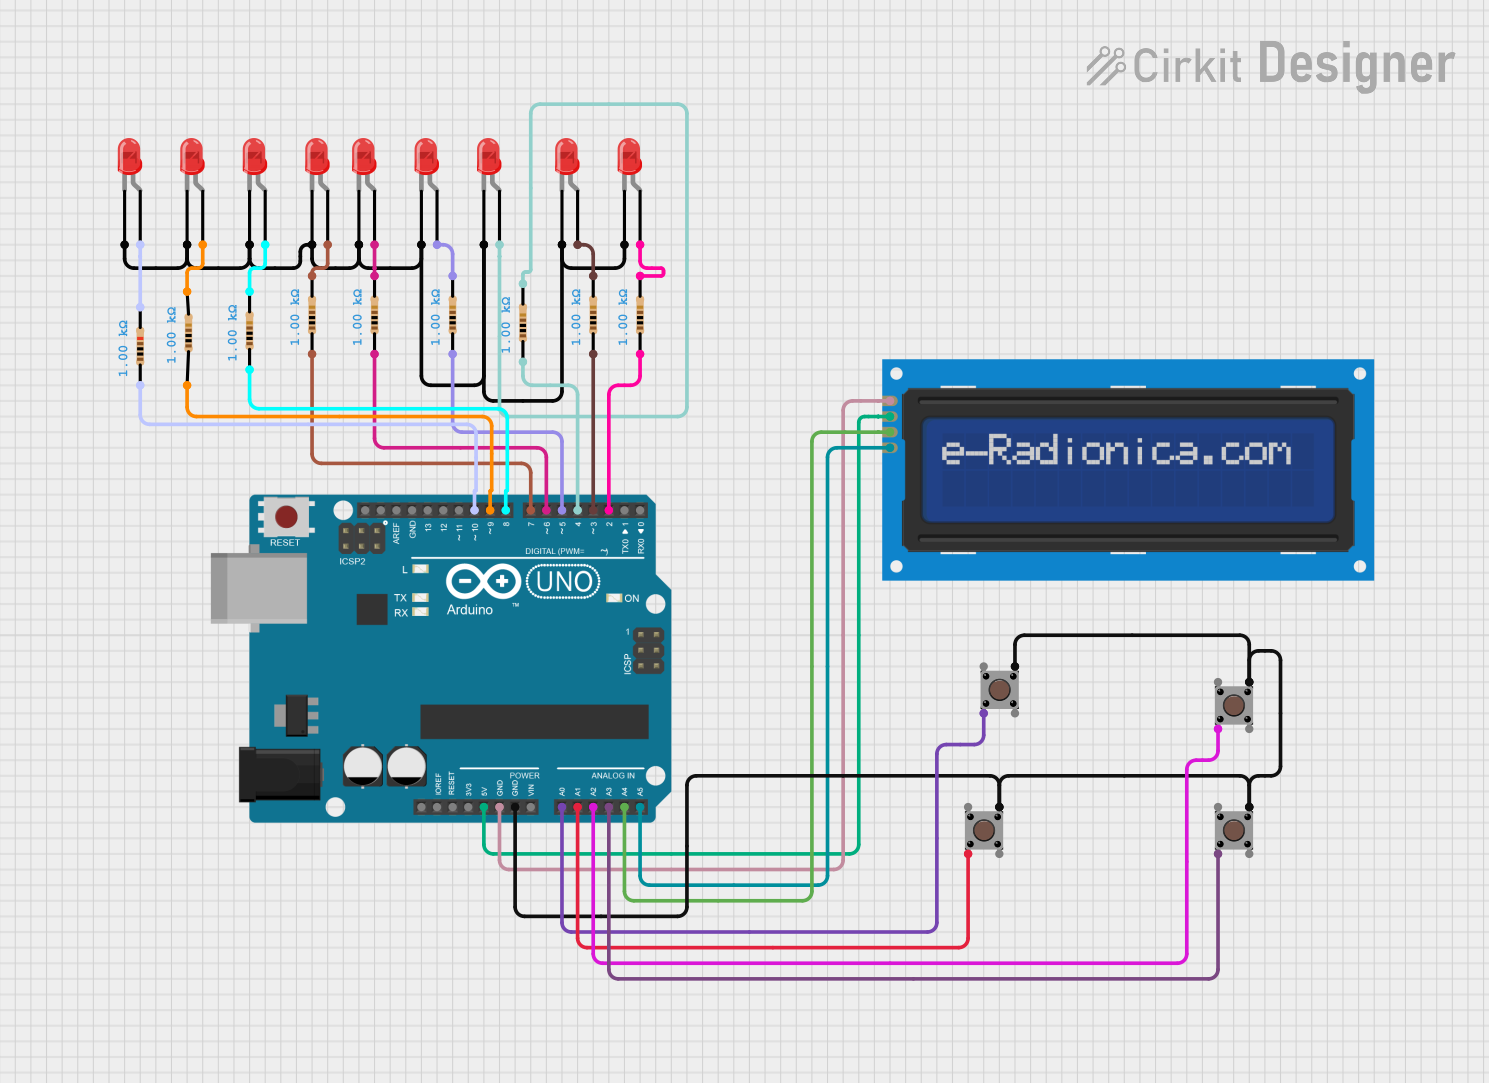
Circuit Documentation
Summary
This circuit is designed to control an array of LEDs and an LCD screen using an Arduino UNO. The user can select different modes using pushbuttons. Modes include random LED blinking at different speeds and all LEDs blinking simultaneously. The selected mode is displayed on the LCD screen.
Component List
Resistor (1000 Ohms)
- Pins: pin1, pin2
- Description: Standard resistor used to limit current to LEDs.
LED: Two Pin (red)
- Pins: cathode, anode
- Description: Red LED used for visual indication.
Arduino UNO
- Pins: UNUSED, IOREF, Reset, 3.3V, 5V, GND, Vin, A0, A1, A2, A3, A4, A5, SCL, SDA, AREF, D13, D12, D11, D10, D9, D8, D7, D6, D5, D4, D3, D2, D1, D0
- Description: Microcontroller used to control the LEDs and LCD screen.
LCD screen 16x2 I2C
- Pins: SCL, SDA, VCC, GND
- Description: 16x2 character LCD screen with I2C interface.
Pushbutton
- Pins: Pin 3 (out), Pin 4 (out), Pin 1 (in), Pin 2 (in)
- Description: Pushbutton used to select different modes.
Wiring Details
Resistor (1000 Ohms)
Resistor 1
- pin1: Connected to Arduino UNO D10
- pin2: Connected to LED anode
Resistor 2
- pin1: Connected to Arduino UNO D9
- pin2: Connected to LED anode
Resistor 3
- pin1: Connected to Arduino UNO D8
- pin2: Connected to LED anode
Resistor 4
- pin1: Connected to Arduino UNO D7
- pin2: Connected to LED anode
Resistor 5
- pin1: Connected to Arduino UNO D6
- pin2: Connected to LED anode
Resistor 6
- pin1: Connected to Arduino UNO D5
- pin2: Connected to LED anode
Resistor 7
- pin1: Connected to Arduino UNO D4
- pin2: Connected to LED anode
Resistor 8
- pin1: Connected to Arduino UNO D3
- pin2: Connected to LED anode
Resistor 9
- pin1: Connected to Arduino UNO D2
- pin2: Connected to LED anode
LED: Two Pin (red)
LED 1
- anode: Connected to Resistor pin2
- cathode: Connected to common cathode net
LED 2
- anode: Connected to Resistor pin2
- cathode: Connected to common cathode net
LED 3
- anode: Connected to Resistor pin2
- cathode: Connected to common cathode net
LED 4
- anode: Connected to Resistor pin2
- cathode: Connected to common cathode net
LED 5
- anode: Connected to Resistor pin2
- cathode: Connected to common cathode net
LED 6
- anode: Connected to Resistor pin2
- cathode: Connected to common cathode net
LED 7
- anode: Connected to Resistor pin2
- cathode: Connected to common cathode net
LED 8
- anode: Connected to Resistor pin2
- cathode: Connected to common cathode net
LED 9
- anode: Connected to Resistor pin2
- cathode: Connected to common cathode net
Arduino UNO
- 5V: Connected to LCD screen VCC
- GND: Connected to LCD screen GND and Pushbutton Pin 3 (out)
- A0: Connected to Pushbutton Pin 2 (in)
- A1: Connected to Pushbutton Pin 2 (in)
- A2: Connected to Pushbutton Pin 2 (in)
- A3: Connected to Pushbutton Pin 2 (in)
- A4: Connected to LCD screen SDA
- A5: Connected to LCD screen SCL
- D10: Connected to Resistor pin1
- D9: Connected to Resistor pin1
- D8: Connected to Resistor pin1
- D7: Connected to Resistor pin1
- D6: Connected to Resistor pin1
- D5: Connected to Resistor pin1
- D4: Connected to Resistor pin1
- D3: Connected to Resistor pin1
- D2: Connected to Resistor pin1
LCD screen 16x2 I2C
- VCC: Connected to Arduino UNO 5V
- GND: Connected to Arduino UNO GND
- SDA: Connected to Arduino UNO A4
- SCL: Connected to Arduino UNO A5
Pushbutton
Pushbutton 1
- Pin 3 (out): Connected to Arduino UNO GND
- Pin 2 (in): Connected to Arduino UNO A0
Pushbutton 2
- Pin 3 (out): Connected to Arduino UNO GND
- Pin 2 (in): Connected to Arduino UNO A1
Pushbutton 3
- Pin 3 (out): Connected to Arduino UNO GND
- Pin 2 (in): Connected to Arduino UNO A2
Pushbutton 4
- Pin 3 (out): Connected to Arduino UNO GND
- Pin 2 (in): Connected to Arduino UNO A3
Code Documentation
Arduino UNO Code
// This Arduino sketch controls an array of LEDs and an LCD screen. The user can
// select different modes using pushbuttons. Modes include random LED blinking
// at different speeds and all LEDs blinking simultaneously. The selected mode
// is displayed on the LCD screen.

#include <Wire.h>
#include <LiquidCrystal_I2C.h>

// Initialize the I2C LCD (address: 0x27, columns: 16, rows: 2)
LiquidCrystal_I2C lcd(0x27, 16, 2);

// Define LED and switch pins
const int ledPins[] = {2, 3, 4, 5, 6, 7, 8, 9, 10};
const int numLeds = 9;
const int switchPins[] = {A0, A1, A2, A3};

// Variables for timing
int delayTime = 500; // Default delay for blinking
unsigned long mode4StartTime = 0;
bool mode4Active = false;

// Setup function
void setup() {
  // Initialize LCD
  lcd.init();
  lcd.backlight();

  // Set LED pins as output
  for (int i = 0; i < numLeds; i++) {
    pinMode(ledPins[i], OUTPUT);
    digitalWrite(ledPins[i], LOW);
  }

  // Set switch pins as input
  for (int i = 0; i < 4; i++) {
    pinMode(switchPins[i], INPUT_PULLUP);
  }

  // Display initial message
  lcd.setCursor(0, 0);
  lcd.print("Select a Mode");
}

// Random LED blinking function
void randomBlink(int delayTime) {
  int randomLed = random(0, numLeds);
  digitalWrite(ledPins[randomLed], HIGH);
  delay(delayTime);
  digitalWrite(ledPins[randomLed], LOW);
  delay(delayTime);
}

// All LEDs on/off function
void allLedsOnOff(int duration) {
  for (int i = 0; i < numLeds; i++) {
    digitalWrite(ledPins[i], HIGH);
  }
  delay(duration);
  for (int i = 0; i < numLeds; i++) {
    digitalWrite(ledPins[i], LOW);
  }
  delay(duration);
}

// Loop function
void loop() {
  // Check for mode switches
  if (digitalRead(switchPins[0]) == LOW) {
    // Mode 1: Random LED blink
    lcd.clear();
    lcd.setCursor(0, 0);
    lcd.print("Mode 1: Random");
    delayTime = 500; // Default speed
    mode4Active = false; // Exit mode 4
  } else if (digitalRead(switchPins[1]) == LOW) {
    // Mode 2: Slow random blink
    lcd.clear();
    lcd.setCursor(0, 0);
    lcd.print("Mode 2: Slow");
    delayTime = 1000;
    mode4Active = false;
  } else if (digitalRead(switchPins[2]) == LOW) {
    // Mode 3: Fast random blink
    lcd.clear();