
Arduino UNO Based Automatic Temperature-Controlled Fan with DHT11 Sensor and I2C LCD Display
View and Edit Project In Cirkit Designer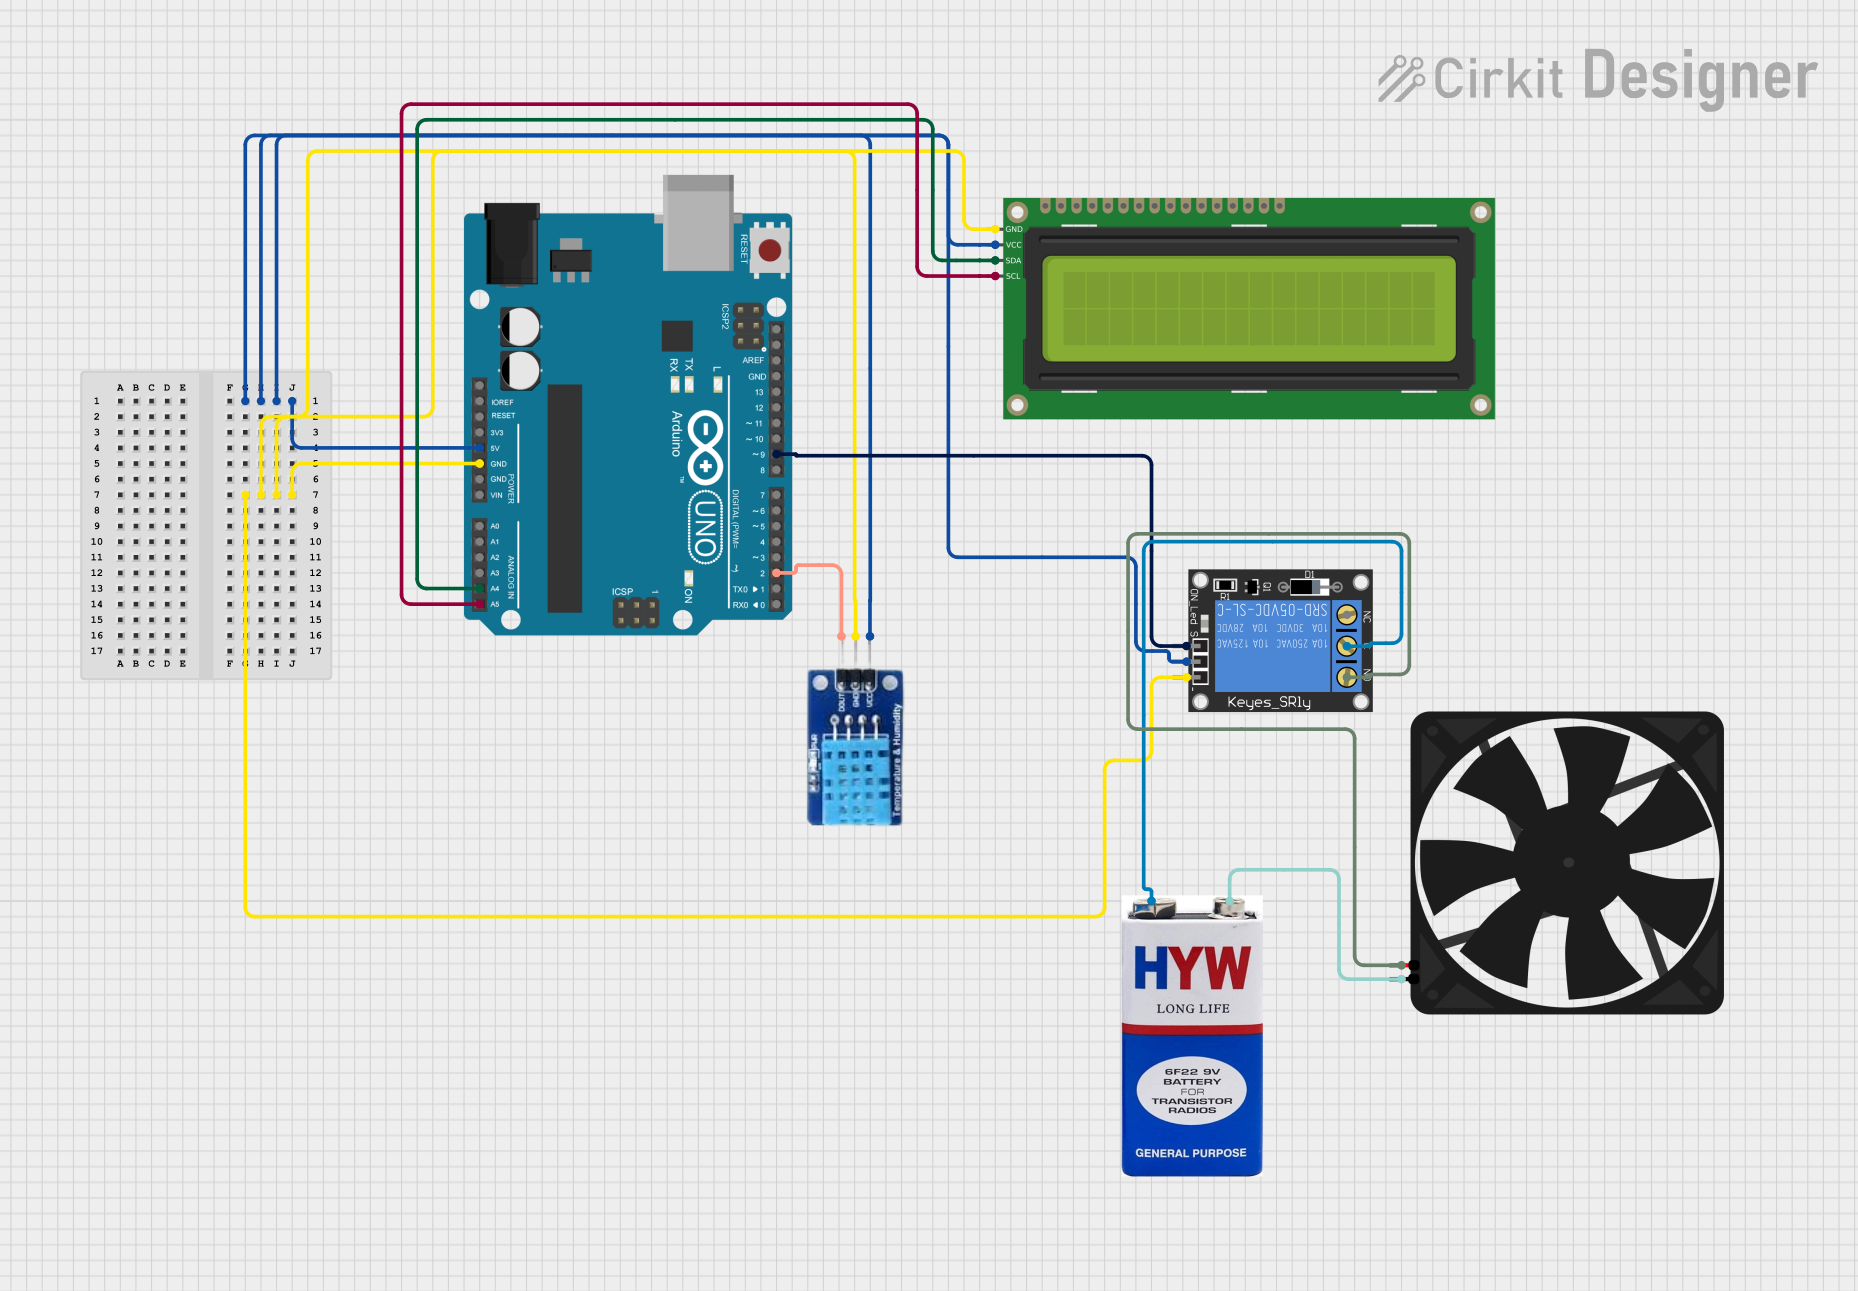
Circuit Documentation
Summary
This circuit is designed to monitor temperature using a DHT11 sensor and control a fan based on the temperature reading. It features an Arduino UNO as the central microcontroller, interfaced with a DHT11 temperature and humidity sensor, a 16x2 I2C LCD for displaying temperature and fan status, a 1-Channel Relay to control the fan, and a 9V battery to power the relay and fan. The Arduino UNO is programmed to read the temperature from the DHT11 sensor and turn the fan on or off depending on whether the temperature exceeds a predefined threshold.
Component List
Arduino UNO
- Microcontroller board based on the ATmega328P
- Features digital and analog I/O pins
- Provides 5V and 3.3V power outputs
DHT11
- Digital temperature and humidity sensor
- Provides a digital signal output
16x2 I2C LCD
- Alphanumeric liquid crystal display
- I2C communication interface
- Displays two lines of 16 characters each
1-Channel Relay (5V 10A)
- Electromechanical switch with one normally open (NO) and one normally closed (NC) contact
- Controlled by a digital signal
Fan
- Electric fan powered by 5V
- Used for cooling based on temperature readings
9V Battery
- Provides power to the relay and fan
Wiring Details
Arduino UNO
5Vconnected to VCC of DHT11, 16x2 I2C LCD, and 1-Channel RelayGNDconnected to GND of DHT11, 16x2 I2C LCD, and 1-Channel RelayA4 (SDA)connected to SDA of 16x2 I2C LCDA5 (SCL)connected to SCL of 16x2 I2C LCDD9connected to signal of 1-Channel RelayD2connected to DATA of DHT11
DHT11
DATAconnected to D2 of Arduino UNOVCCconnected to 5V of Arduino UNOGNDconnected to GND of Arduino UNO
16x2 I2C LCD
SDAconnected to A4 (SDA) of Arduino UNOSCLconnected to A5 (SCL) of Arduino UNOVCCconnected to 5V of Arduino UNOGNDconnected to GND of Arduino UNO
1-Channel Relay (5V 10A)
signalconnected to D9 of Arduino UNOpowerconnected to 5V of Arduino UNOgroundconnected to GND of Arduino UNOCconnected to + of 9V BatteryNOconnected to 5V of Fan
Fan
5Vconnected to NO of 1-Channel RelayGNDconnected to - of 9V Battery
9V Battery
+connected to C of 1-Channel Relay-connected to GND of Fan
Documented Code
#include <DHT.h>
#include <Wire.h>
#include <LiquidCrystal_I2C.h>

// Settings for DHT11
#define DHTPIN 2          // DHT11 connected to digital pin 2
#define DHTTYPE DHT11     // DHT type is DHT11
DHT dht(DHTPIN, DHTTYPE); // Initialize DHT

// Settings for I2C LCD
LiquidCrystal_I2C lcd(0x27, 16, 2); // I2C address for 16x2 LCD

// Fan settings
#define FAN_PIN 9         // Fan connected to digital pin 9
int tempThreshold = 30;  // Temperature threshold to turn on the fan (e.g., 30°C)

void setup() {
  pinMode(FAN_PIN, OUTPUT);
  digitalWrite(FAN_PIN, LOW); // Turn off fan at startup
  dht.begin();                // Initialize DHT11
  lcd.begin(16, 2);           // Initialize 16x2 LCD
  lcd.backlight();            // Turn on LCD backlight
  lcd.setCursor(0, 0);
  lcd.print("Auto Fan Control");
  delay(2000);
  lcd.clear();
}

void loop() {
  float temp = dht.readTemperature(); // Read temperature in Celsius

  // If reading fails, stop
  if (isnan(temp)) {
    lcd.setCursor(0, 0);
    lcd.print("Temp Read Fail!");
    return;
  }

  // Display temperature on LCD
  lcd.setCursor(0, 0);
  lcd.print("Temp: ");
  lcd.print(temp);
  lcd.print((char)223); // Degree character
  lcd.print("C   ");

  // Logic to turn on or off the fan
  if (temp >= tempThreshold) {
    digitalWrite(FAN_PIN, HIGH); // Turn on fan if temp >= tempThreshold
    lcd.setCursor(0, 1);
    lcd.print("Fan: ON ");
  } else {
    digitalWrite(FAN_PIN, LOW);  // Turn off fan if temp < tempThreshold
    lcd.setCursor(0, 1);
    lcd.print("Fan: OFF");
  }

  delay(2000); // Update every 2 seconds
}
This code is designed to be uploaded to the Arduino UNO microcontroller. It initializes the DHT11 sensor and the I2C LCD, reads the temperature from the DHT11 sensor, and controls the fan via the relay based on the temperature reading. The LCD displays the current temperature and the status of the fan.