
Circuit Documentation
Summary
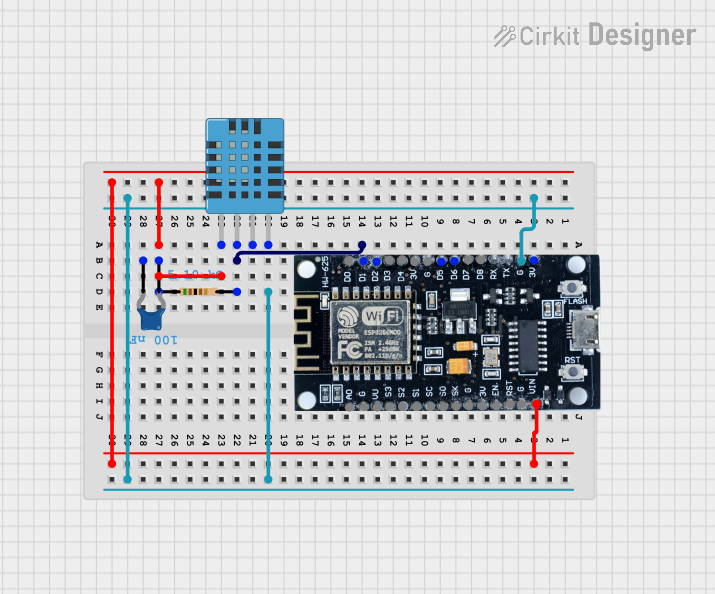
The circuit in question is designed to measure temperature and humidity using a DHT11 Humidity and Temperature Sensor interfaced with an ESP8266 microcontroller. The ESP8266 reads the sensor data and outputs the readings through its serial interface. A resistor and a ceramic capacitor are included in the circuit, likely for signal conditioning or power supply stabilization.
Component List
ESP8266
- Description: A popular Wi-Fi microcontroller module.
- Pins: 3V, G, D8, D7, D6, D5, D4, D3, D2, D1, D0, A0, S3, S2, S1, SC, S0, SK, EN, VIN, RST, VU
- Purpose: Acts as the main controller and Wi-Fi module for the circuit.
DHT11 Humidity and Temperature Sensor
- Description: A basic, low-cost digital temperature and humidity sensor.
- Pins: VDD, DATA, NULL, GND
- Purpose: Measures the ambient humidity and temperature.
Resistor
- Description: A passive two-terminal electrical component that implements electrical resistance as a circuit element.
- Pins: pin1, pin2
- Properties: Resistance - 5100 Ohms
- Purpose: Typically used for current limiting or voltage division; in this circuit, it may be used for pull-up on the data line of the DHT11 sensor.
Ceramic Capacitor
- Description: A fixed-value capacitor in which ceramic material acts as the dielectric.
- Pins: pin0, pin1
- Properties: Capacitance - 100 nF (1e-7 Farads)
- Purpose: Commonly used for filtering or noise reduction in power supply circuits.
Wiring Details
ESP8266
- G (Ground): Connected to the GND pin of the DHT11 Sensor.
- VIN: Connected to the VDD pin of the DHT11 Sensor, the pin1 of the Resistor, and the pin0 of the Ceramic Capacitor.
- D1 (Data 1): Connected to the DATA pin of the DHT11 Sensor and the pin2 of the Resistor.
DHT11 Humidity and Temperature Sensor
- VDD: Connected to the VIN pin of the ESP8266, the pin1 of the Resistor, and the pin0 of the Ceramic Capacitor.
- DATA: Connected to the D1 pin of the ESP8266 and the pin2 of the Resistor.
- GND: Connected to the G pin of the ESP8266.
Resistor
- pin1: Connected to the VIN pin of the ESP8266 and the VDD pin of the DHT11 Sensor.
- pin2: Connected to the D1 pin of the ESP8266 and the DATA pin of the DHT11 Sensor.
Ceramic Capacitor
- pin0: Connected to the VIN pin of the ESP8266 and the VDD pin of the DHT11 Sensor.
- pin1: Typically connected to ground, but not specified in the provided net list.
Documented Code
The following code is written for the ESP8266 microcontroller to interface with the DHT11 sensor. The code is written in C++ and is intended to be compiled and uploaded using the Arduino IDE.
#include <DHT.h>

#define DHTPIN D1      // Pin de données du DHT11 connectée à D4
#define DHTTYPE DHT11   // Type de capteur

DHT dht(DHTPIN, DHTTYPE);

void setup() {
    Serial.begin(115200);
    dht.begin();
}

void loop() {
    float humidity = dht.readHumidity();
    float temperature = dht.readTemperature();

    if (!isnan(humidity) && !isnan(temperature)) {
        Serial.print("Humidité : ");
        Serial.print(humidity);
        Serial.print(" %  |  Température : ");
        Serial.print(temperature);
        Serial.println(" °C");
    } else {
        Serial.println("Erreur de lecture du capteur !");
    }

    delay(2000);  // Attendre 2 secondes entre chaque lecture
}
Filename: sketch.ino
This code initializes the DHT library with the DHT sensor connected to pin D1 of the ESP8266. In the setup() function, it begins serial communication at 115200 baud and initializes the sensor. The loop() function reads the humidity and temperature from the sensor and prints it to the serial monitor. If the sensor fails to provide a reading, an error message is printed. There is a 2-second delay between readings.