
Arduino UNO-Based Smart Notification System with Flex Sensors and Bluetooth Connectivity
View and Edit Project In Cirkit Designer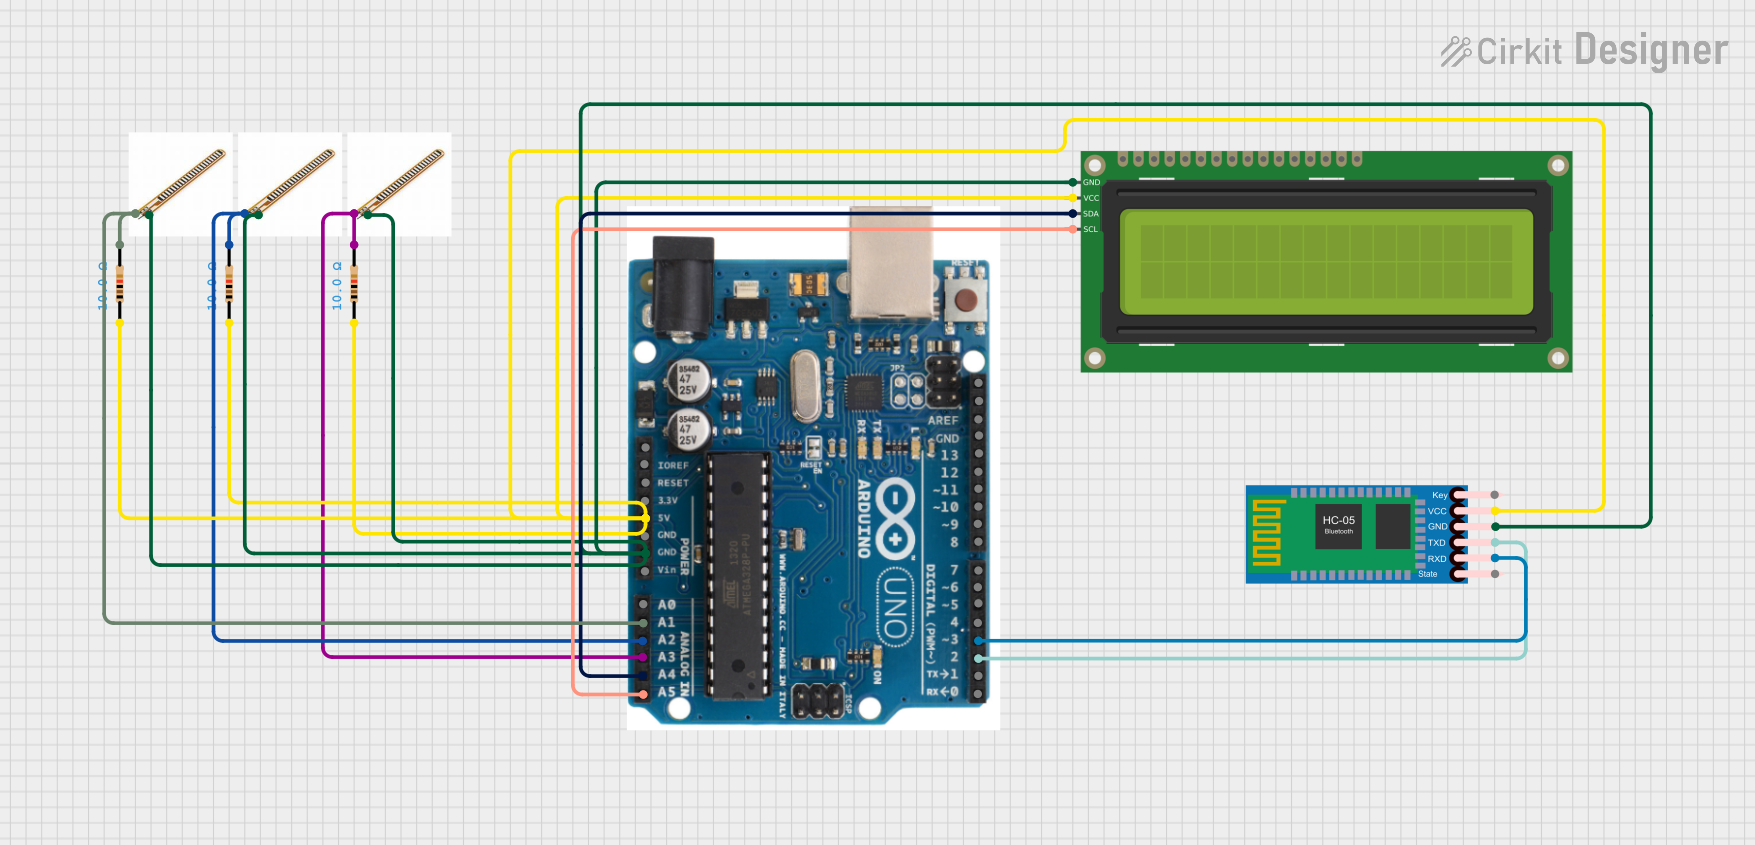
Circuit Documentation
Summary
This circuit involves an Arduino UNO microcontroller interfaced with a 16x2 I2C LCD, an HC-05 Bluetooth module, and multiple flex sensors. The circuit is designed to read analog values from the flex sensors and display messages on the LCD based on the sensor readings. Additionally, the circuit can communicate via Bluetooth to send messages.
Component List
16x2 I2C LCD
- Description: A 16x2 character LCD display with I2C interface.
- Pins: GND, VCC, SDA, SCL
Resistor
- Description: A resistor with a resistance of 10 Ohms.
- Pins: pin1, pin2
HC-05 Bluetooth Module
- Description: A Bluetooth module for wireless communication.
- Pins: Key, VCC, TXD, RXD, State, GND
Flex Sensor
- Description: A sensor that changes resistance when bent.
- Pins: terminal 1, Terminal 2
Arduino UNO
- Description: A microcontroller board based on the ATmega328P.
- Pins: SDA, AREF, GND, 13, 12, 11, 10, 9, 8, 7, 6, 5, 4, 3, 2, 1, 0, A5, A4, A3, A2, A1, A0, Vin, 5V, 3.3V, RESET, IOREF, SCL
Wiring Details
16x2 I2C LCD
GND connected to:
- Flex sensor (Terminal 2)
- HC-05 Bluetooth Module (GND)
- Arduino UNO (GND)
- Flex sensor (Terminal 2)
- Flex sensor (Terminal 2)
VCC connected to:
- Resistor (pin1)
- Resistor (pin1)
- HC-05 Bluetooth Module (VCC)
- Arduino UNO (5V)
- Resistor (pin1)
SDA connected to:
- Arduino UNO (A4)
SCL connected to:
- Arduino UNO (A5)
Resistor
pin1 connected to:
- 16x2 I2C LCD (VCC)
- Resistor (pin1)
- HC-05 Bluetooth Module (VCC)
- Arduino UNO (5V)
- Resistor (pin1)
pin2 connected to:
- Arduino UNO (A2)
- Flex sensor (terminal 1)
HC-05 Bluetooth Module
GND connected to:
- 16x2 I2C LCD (GND)
- Flex sensor (Terminal 2)
- Arduino UNO (GND)
- Flex sensor (Terminal 2)
- Flex sensor (Terminal 2)
VCC connected to:
- Resistor (pin1)
- Resistor (pin1)
- 16x2 I2C LCD (VCC)
- Arduino UNO (5V)
- Resistor (pin1)
TXD connected to:
- Arduino UNO (2)
RXD connected to:
- Arduino UNO (3)
Flex Sensor
terminal 1 connected to:
- Resistor (pin2)
- Arduino UNO (A3)
Terminal 2 connected to:
- 16x2 I2C LCD (GND)
- HC-05 Bluetooth Module (GND)
- Arduino UNO (GND)
- Flex sensor (Terminal 2)
- Flex sensor (Terminal 2)
Arduino UNO
GND connected to:
- 16x2 I2C LCD (GND)
- Flex sensor (Terminal 2)
- HC-05 Bluetooth Module (GND)
- Flex sensor (Terminal 2)
- Flex sensor (Terminal 2)
5V connected to:
- Resistor (pin1)
- Resistor (pin1)
- 16x2 I2C LCD (VCC)
- HC-05 Bluetooth Module (VCC)
- Resistor (pin1)
A4 connected to:
- 16x2 I2C LCD (SDA)
A5 connected to:
- 16x2 I2C LCD (SCL)
A2 connected to:
- Resistor (pin2)
- Flex sensor (terminal 1)
A1 connected to:
- Resistor (pin2)
- Flex sensor (terminal 1)
A3 connected to:
- Flex sensor (terminal 1)
- Resistor (pin2)
2 connected to:
- HC-05 Bluetooth Module (TXD)
3 connected to:
- HC-05 Bluetooth Module (RXD)
Documented Code
Arduino UNO Code
#include "SoftwareSerial.h"
#include <LiquidCrystal_I2C.h>

SoftwareSerial mySerial(3, 2);
LiquidCrystal_I2C lcd(0x27, 16, 2);

#define blue 2
#define green 3
#define red 4

unsigned int f;
unsigned int g;
unsigned int h;

void setup() {
  pinMode(blue, OUTPUT);
  pinMode(green, OUTPUT);
  pinMode(red, OUTPUT);
  Serial.begin(9600);
  mySerial.begin(9600);
  lcd.init();
  lcd.backlight();
  lcd.setCursor(0, 0);
  lcd.print("  Welcome To");
  lcd.setCursor(0, 1);
  lcd.print("JustDoElectronic");
  delay(3000); // Add delay before clearing the LCD
  lcd.clear();
}

void loop() {
  f = analogRead(1);
  g = analogRead(2);
  h = analogRead(3);

  if (f <= 722) {
    digitalWrite(blue, HIGH);
    digitalWrite(green, LOW);
    digitalWrite(red, LOW);
    mySerial.println("Plz Give Me Water");
    lcd.clear();
    lcd.setCursor(0, 0);
    lcd.print("  Plz Give Me");
    lcd.setCursor(0, 1);
    lcd.print("     Water   ");
    delay(3000);
    lcd.clear();
    lcd.setCursor(0, 0);
    lcd.print(" If Anything");
    lcd.setCursor(0, 1);
    lcd.print("  You Want ");
  } else if (g <= 670) {
    digitalWrite(green, HIGH);
    digitalWrite(blue, LOW);
    digitalWrite(red, LOW);
    mySerial.println("Plz Give Me Food");
    lcd.clear();
    lcd.setCursor(0, 0);
    lcd.print("  Plz Give Me ");
    lcd.setCursor(0, 1);
    lcd.print("     Food   ");
    delay(3000);
    lcd.clear();
    lcd.setCursor(0, 0);
    lcd.print(" If Anything");
    lcd.setCursor(0, 1);
    lcd.print("  You Want ");
  } else if (h <= 675) {
    digitalWrite(green, HIGH);
    digitalWrite(blue, LOW);
    digitalWrite(red, LOW);
    mySerial.println("Plz Give Me Tea");
    lcd.clear();
    lcd.setCursor(0, 0);
    lcd.print("  Plz Give Me");
    lcd.setCursor(0, 1);
    lcd.print("     Tea   ");
    delay(3000);
    lcd.clear();
    lcd.setCursor(0, 0);
    lcd.print(" If Anything");
    lcd.setCursor(0, 1);
    lcd.print("  You Want ");
  }
  delay(200);
}
This code initializes the LCD and Bluetooth module, reads analog values from the flex sensors, and displays messages on the LCD based on the sensor readings. It also sends messages via Bluetooth.