
ESP8266 NodeMCU Controlled RFID Attendance System with I2C LCD Display
View and Edit Project In Cirkit Designer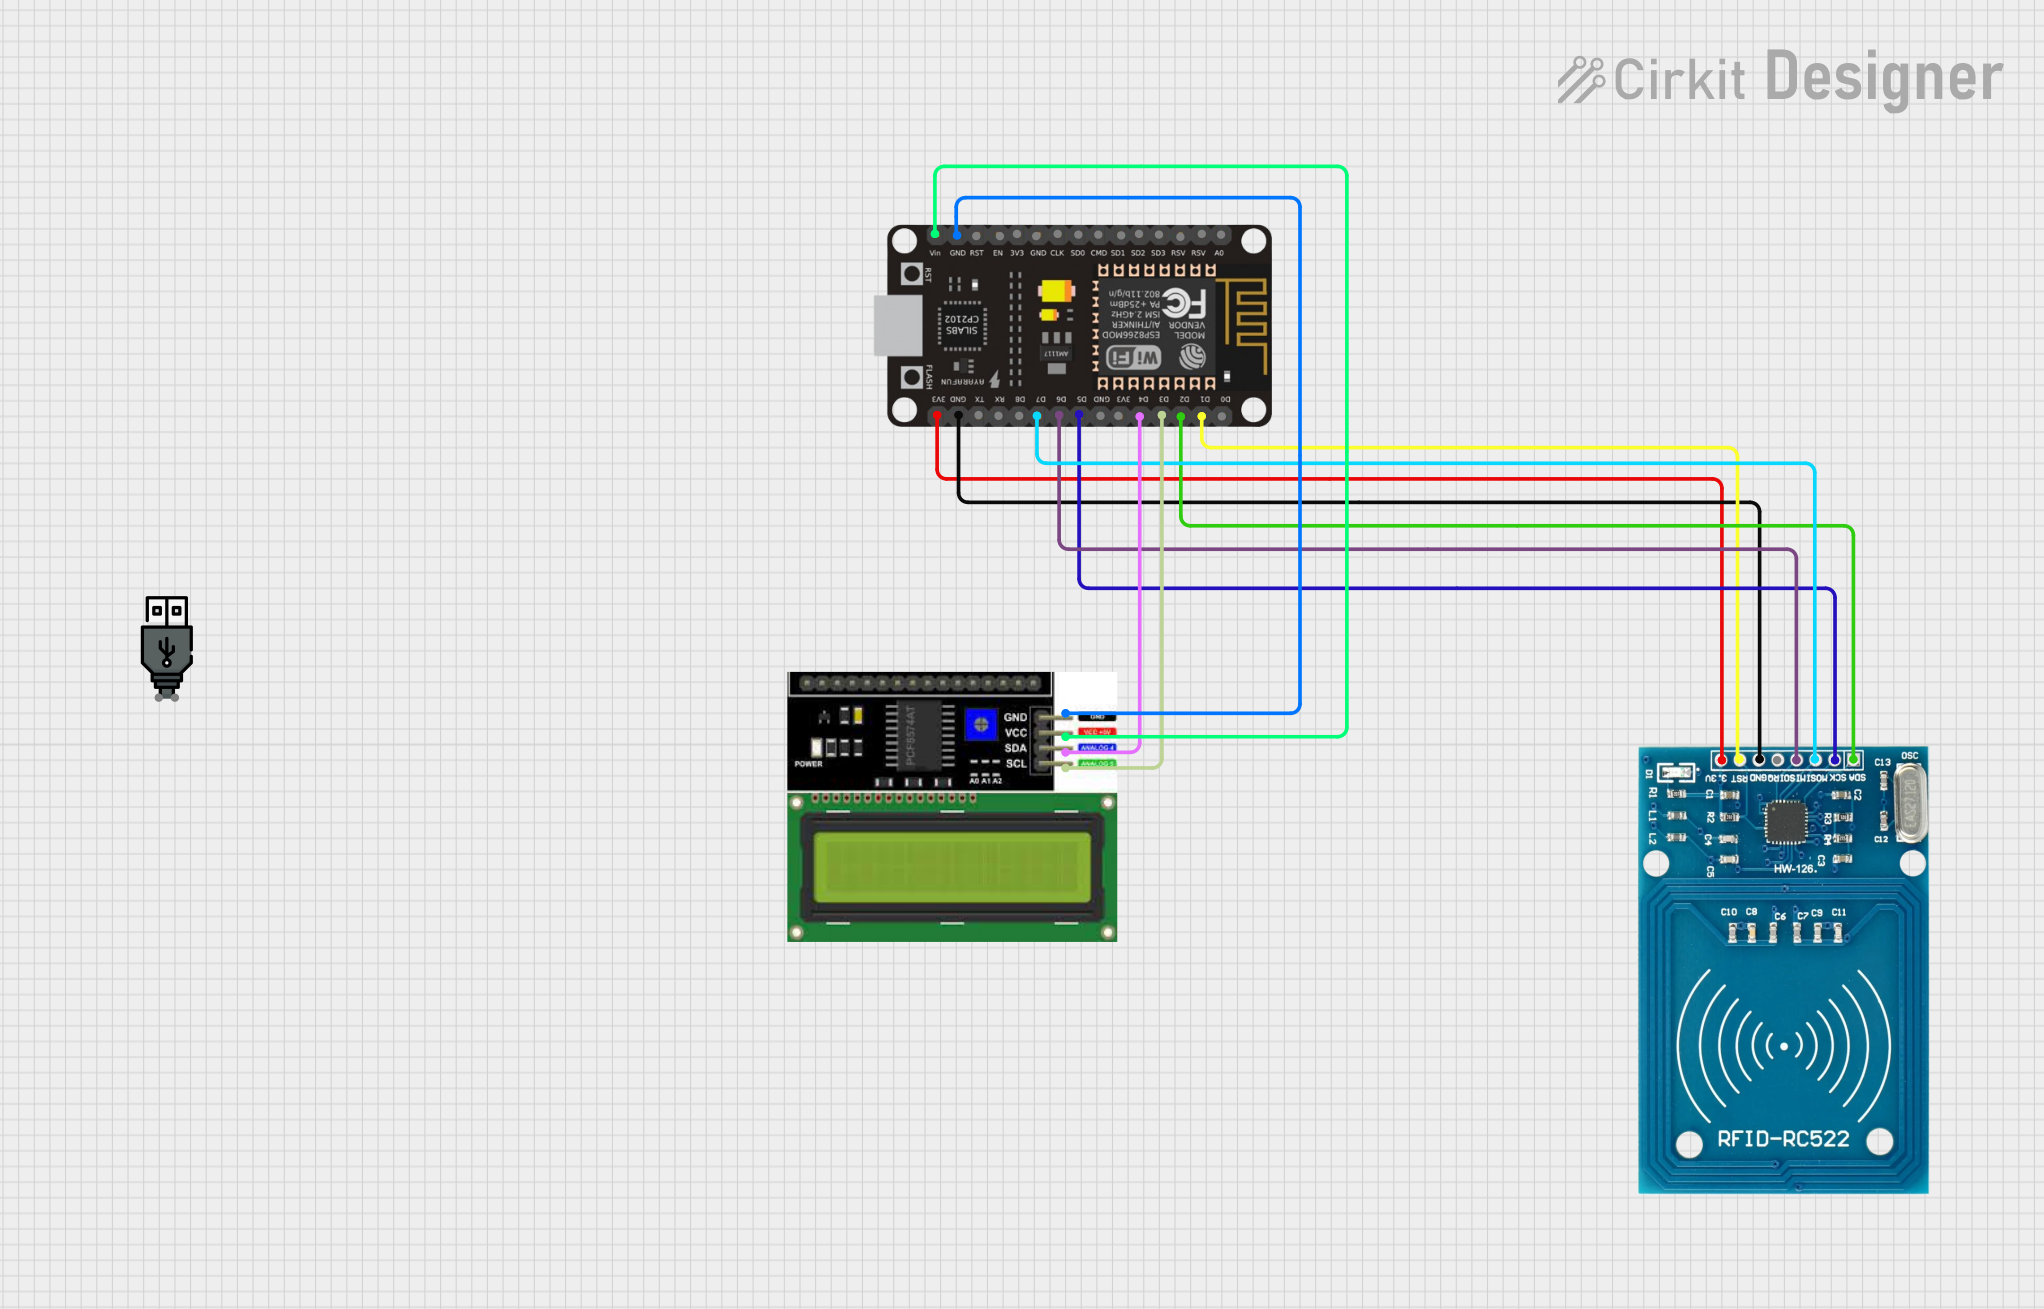
Circuit Documentation
Summary
The circuit in question is designed to interface an ESP8266 NodeMCU microcontroller with an RFID-RC522 module and an LCD I2C display. The ESP8266 NodeMCU is responsible for controlling the RFID reader to scan RFID tags and display relevant information on the LCD screen. Additionally, the NodeMCU is equipped with Wi-Fi capabilities, allowing it to send scanned RFID data to a server. The RFID-RC522 module reads RFID tags and communicates with the NodeMCU via SPI, while the LCD display uses the I2C protocol for displaying messages.
Component List
ESP8266 NodeMCU
- Description: A Wi-Fi enabled microcontroller module based on the ESP8266 chip.
- Pins: D0, D1, D2, D3, D4, 3V3, GND, D5, D6, D7, D8, RX, TX, A0, RSV, SD3, SD2, SD1, CMD, SD0, CLK, EN, RST, VIN
LCD I2C Display
- Description: A liquid crystal display that communicates over the I2C bus.
- Pins: GND, VCC, SDA, SCL
RFID-RC522
- Description: An RFID reader/writer module that operates at 13.56 MHz.
- Pins: VCC (3.3V), RST, GND, IRQ, MISO, MOSI, SCK, SDA
USB Power
- Description: A USB power supply module.
- Pins: +, -
Wiring Details
ESP8266 NodeMCU
- D1 connected to RFID-RC522 RST
- D2 connected to RFID-RC522 SDA
- D3 connected to LCD I2C Display SCL
- D4 connected to LCD I2C Display SDA
- D5 connected to RFID-RC522 SCK
- D6 connected to RFID-RC522 MISO
- D7 connected to RFID-RC522 MOSI
- GND connected to RFID-RC522 GND and LCD I2C Display GND
- 3V3 connected to RFID-RC522 VCC (3.3V)
- VIN connected to LCD I2C Display VCC
LCD I2C Display
- GND connected to ESP8266 NodeMCU GND
- VCC connected to ESP8266 NodeMCU VIN
- SDA connected to ESP8266 NodeMCU D4
- SCL connected to ESP8266 NodeMCU D3
RFID-RC522
- RST connected to ESP8266 NodeMCU D1
- SDA connected to ESP8266 NodeMCU D2
- SCK connected to ESP8266 NodeMCU D5
- MISO connected to ESP8266 NodeMCU D6
- MOSI connected to ESP8266 NodeMCU D7
- GND connected to ESP8266 NodeMCU GND
- VCC (3.3V) connected to ESP8266 NodeMCU 3V3
Documented Code
Main Sketch (sketch.ino)
//*******************************libraries********************************
//RFID-----------------------------
#include <SPI.h>
#include <MFRC522.h>
//NodeMCU--------------------------
#include <ESP8266WiFi.h>
#include <ESP8266HTTPClient.h>
//LCD--------------------------
#include <LiquidCrystal_I2C.h>
#include <Wire.h>
LiquidCrystal_I2C lcd(0x27,16,2);  // CHANGE the "0x27" ADRESS FOR YOUR SCREEN CONFIGURATION
//************************************************************************
#define SS_PIN  D2  //D2
#define RST_PIN D1  //D1
//************************************************************************
MFRC522 mfrc522(SS_PIN, RST_PIN); // Create MFRC522 instance.
//************************************************************************
/* Set these to your desired credentials. */
const char *ssid = "IECEP";                   //GlobeAtHome_CB39A_5
const char *password = "Archaeopteryx";                       //M9bG4e8bF5a
const char* device_token  = "12d997f11fab6ae8";           //9e7d89ab07fd3ca9
//************************************************************************
String URL = "http://192.168.20.131/rfidattendance/getdata.php"; //computer IP or the server domain
String getData, Link;
String OldCardID = "";
unsigned long previousMillis = 0;

#include <WiFiClient.h>
WiFiClient wifiClient;
//************************************************************************
#include <Arduino_JSON.h>

void setup() {
  delay(1000);
  Serial.begin(9600);
  SPI.begin();  // Init SPI bus
  mfrc522.PCD_Init(); // Init MFRC522 card
  //---------------------------------------------
  //LCD
  Wire.begin(D4, D3); //  SCL > D3 | SDA > D6  | IF IT DOESN'T WORK TRY TO SWITCH TO SCL > D6 | SDA > D3... ( I observed differences with NODEMCU V2 & V3...
  lcd.init();                      // initialize the lcd
  lcd.clear();
  lcd.backlight();
  lcd.setCursor(0, 0);
}
//************************************************************************
void loop() {
  //check if there's a connection to Wi-Fi or not
  if(!WiFi.isConnected()){
    connectToWiFi();    //Retry to connect to Wi-Fi
  }
  //---------------------------------------------
  if (millis() - previousMillis >= 15000) {
    previousMillis = millis();
    OldCardID="";
  }
  delay(50);
  //---------------------------------------------

  //look for new card
  if ( ! mfrc522.PICC_IsNewCardPresent()) {
    return;//got to start of loop if there is no card present
  }
  // Select one of the cards
  if ( ! mfrc522.PICC_ReadCardSerial()) {
    return;//if read card serial(0) returns 1, the uid struct contians the ID of the read card.
  }
  String CardID ="";
  for (byte i = 0; i < mfrc522.uid.size; i++) {
    CardID += mfrc522.uid.uidByte[i];
  }
  Serial.println(CardID);
  //---------------------------------------------
  if( CardID == OldCardID ){
    return;
  }
  else{
    OldCardID = CardID;
    lcd.clear();
    lcd.setCursor(0, 0);
    lcd.print("TAP YOUR CARD:");
  };
  //---------------------------------------------
  Serial.println(CardID);
  SendCardID(CardID);
  delay(3000);
  lcd.clear();
  lcd.setCursor(0, 0);
  lcd.print("TAP YOUR CARD:");
}
//************send the Card UID to the website*************
void SendCardID( String Card_uid ){
  Serial.println("Sending the Card ID");
  if(WiFi.isConnected()){
    HTTPClient http;    //Declare object of class HTTPClient
    //GET Data
    getData = "?card_uid=" + String(Card_uid) + "&device_token=" + String(device_token); // Add the Card ID to the GET array in order to send it
    //GET method
    Link = URL + getData;
    http.begin(wifiClient, Link); //initiate HTTP request   //Specify content-type header

    int httpCode = http.GET();   //Send the request
    String payload = http.getString();    //Get the response payload

    Serial.println(Link);   //Print HTTP return code
    Serial.println(httpCode);   //Print HTTP return code
    Serial.println(Card_uid);     //Print Card ID
    Serial.println(payload);    //Print request response payload
    lcd.setCursor(0, 1);
    lcd.print(payload);
    delay(3000);

    if (httpCode == 200) {
      if (payload.substring(0, 5) == "login successful") {
        String user_name = payload.substring(5);
      Serial.println(user_name);

      }
      else if (payload.substring(0, 6) == "logout successful") {
        String user_name = payload.substring(6);
      Serial.println(user_name);

      }
      else if (payload == "succesful") {

      }
      else if (payload == "available") {

      }
      delay(100);
      http.end();  //Close connection
    }
  }
}
//********************connect to the WiFi******************
void connectToWiFi(){
    WiFi.mode(WIFI_OFF);        //Prevents reconnection issue (taking too long to connect)
    delay(1000);
    WiFi.mode(WIFI_STA);
    lcd.setCursor(0, 0);
    lcd.print("Connecting to ");
    Serial.println("Connecting to ");
    Serial.println(ssid);
    lcd.setCursor(0, 1);
    lcd.print(ssid);
    WiFi.begin(ssid, password);
    while (WiFi.status() != WL_CONNECTED) {
      delay(500);
      Serial.print(".");
    }
    Serial.println("");
    Serial.println("Connected");
    lcd.clear();
    lcd.setCursor(0, 0);
    lcd.print("CONNECTED");
    lcd.setCursor(0,