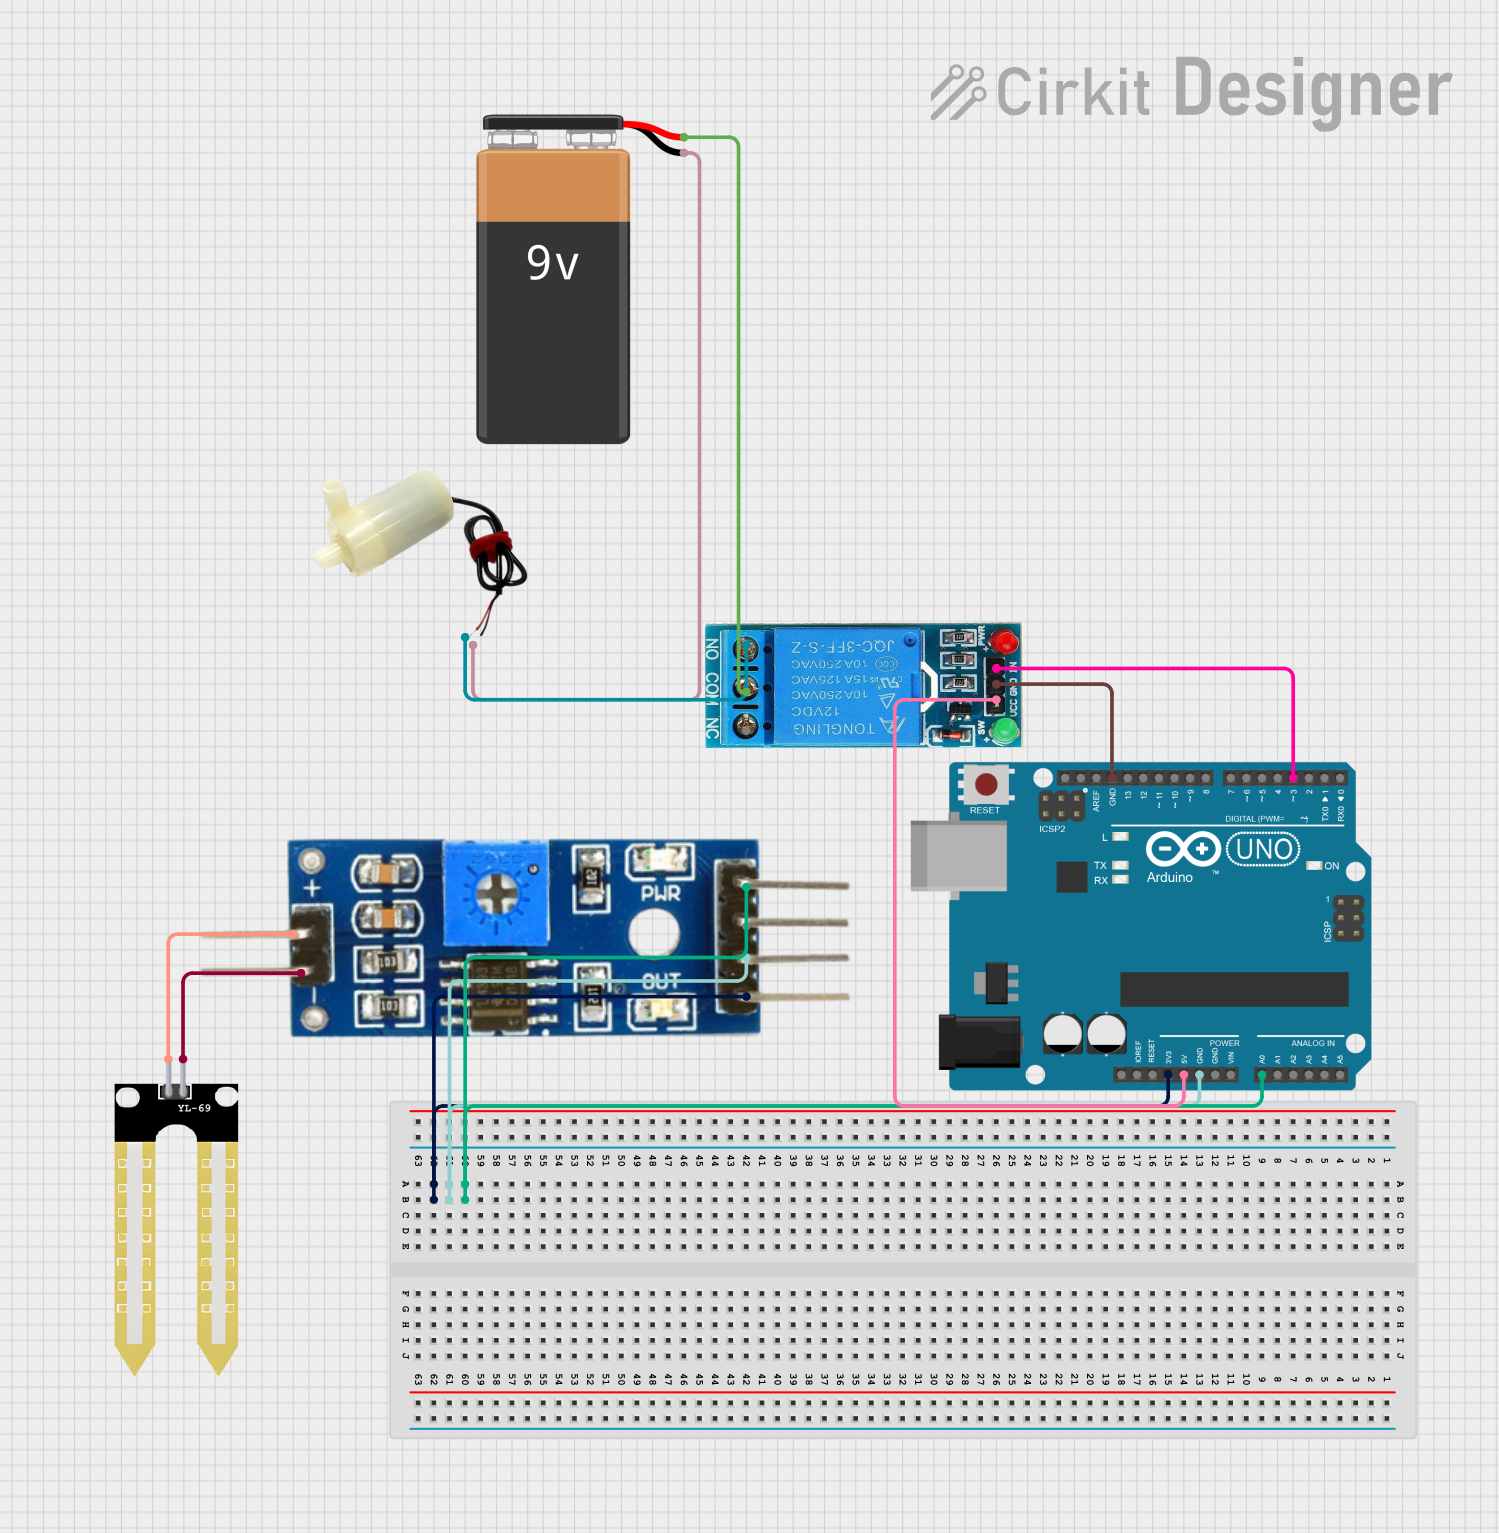
Arduino UNO-Based Smart Irrigation System with Soil Moisture Sensing and Relay-Controlled Water Pump

Smart Irrigation System Circuit Documentation
Summary
The Smart Irrigation System is designed to monitor soil moisture levels and automatically irrigate when the soil becomes too dry. The system uses an Arduino UNO as the main controller, which reads the soil moisture level through a Soil Moisture Module connected to its analog input. A 12V single-channel relay is used to control a 5V mini water pump, which is activated when the soil moisture falls below a predefined threshold. The relay is powered by the Arduino and triggered by one of its digital outputs. The Soil Moisture Module is interfaced with a YL-69 Sonda probe that measures the moisture in the soil. The system is powered by a 9V battery connected to the relay and the water pump.
Component List
Arduino UNO
- Microcontroller board based on the ATmega328P
- It has 14 digital input/output pins, 6 analog inputs, a 16 MHz quartz crystal, a USB connection, a power jack, an ICSP header, and a reset button.
12V Single Channel Relay
- An electromechanical switch used to control a high power circuit with a low power signal.
- It has a normally closed (NC), common (COM), and normally open (NO) terminal for switching, as well as an input (IN), ground (GND), and VCC for control.
5V Mini Water Pump
- A small pump used for moving water, typically used in small-scale irrigation or water feature projects.
Soil Moisture Module
- An electronic device that measures the volumetric water content of the soil.
- It has an analog output, digital output, ground (Ground), and VCC for power.
YL-69 Sonda
- A soil moisture probe that works in conjunction with the Soil Moisture Module to detect the moisture level in the soil.
9V Battery
- A standard 9V battery used to provide power to the circuit.
Wiring Details
Arduino UNO
- A0 connected to Soil Moisture Module (Analog)
- GND connected to Soil Moisture Module (Ground) and 12V Single Channel Relay (GND)
- 3.3V connected to Soil Moisture Module (VCC)
- 5V connected to 12V Single Channel Relay (VCC)
- D3 connected to 12V Single Channel Relay (IN)
12V Single Channel Relay
- VCC connected to Arduino UNO (5V)
- GND connected to Arduino UNO (GND)
- IN connected to Arduino UNO (D3)
- COM connected to 9V Battery (+)
- NO connected to 5V Mini Water Pump (positive pin)
5V Mini Water Pump
- Positive pin connected to 12V Single Channel Relay (NO)
- Negative pin connected to 9V Battery (-)
Soil Moisture Module
- Analog connected to Arduino UNO (A0)
- Ground connected to Arduino UNO (GND)
- VCC connected to Arduino UNO (3.3V)
- Positive connected to YL-69 Sonda (+)
- Negative connected to YL-69 Sonda (-)
YL-69 Sonda
- connected to Soil Moisture Module (positive)
- connected to Soil Moisture Module (negative)
9V Battery
- connected to 12V Single Channel Relay (COM)
- connected to 5V Mini Water Pump (negative pin)
Documented Code
/*
 * Smart Irrigation System
 * This Arduino sketch reads soil moisture levels using a soil moisture sensor.
 * If the soil is too dry, it activates a relay to turn on a water pump.
 */

const int soilMoisturePin = A0; // Analog pin connected to soil moisture sensor
const int relayPin = 3;         // Digital pin connected to relay module
const int threshold = 500;      // Threshold value for soil moisture

void setup() {
  pinMode(relayPin, OUTPUT);    // Set relay pin as output
  digitalWrite(relayPin, LOW);  // Ensure relay is off initially
  Serial.begin(9600);           // Initialize serial communication
}

void loop() {
  int soilMoistureValue = analogRead(soilMoisturePin); // Read soil moisture
  Serial.print("Soil Moisture: ");
  Serial.println(soilMoistureValue); // Print soil moisture value

  if (soilMoistureValue < threshold) {
    digitalWrite(relayPin, HIGH); // Turn on water pump
  } else {
    digitalWrite(relayPin, LOW);  // Turn off water pump
  }

  delay(1000); // Wait for 1 second before next reading
}
The code is written for the Arduino UNO microcontroller. It initializes the relay pin as an output and the serial communication for debugging purposes. In the main loop, it reads the soil moisture value from the sensor and prints it to the serial monitor. If the moisture level is below the threshold, it activates the relay to turn on the water pump; otherwise, it turns the pump off. The system pauses for one second before taking the next reading.