
Circuit Documentation
Summary
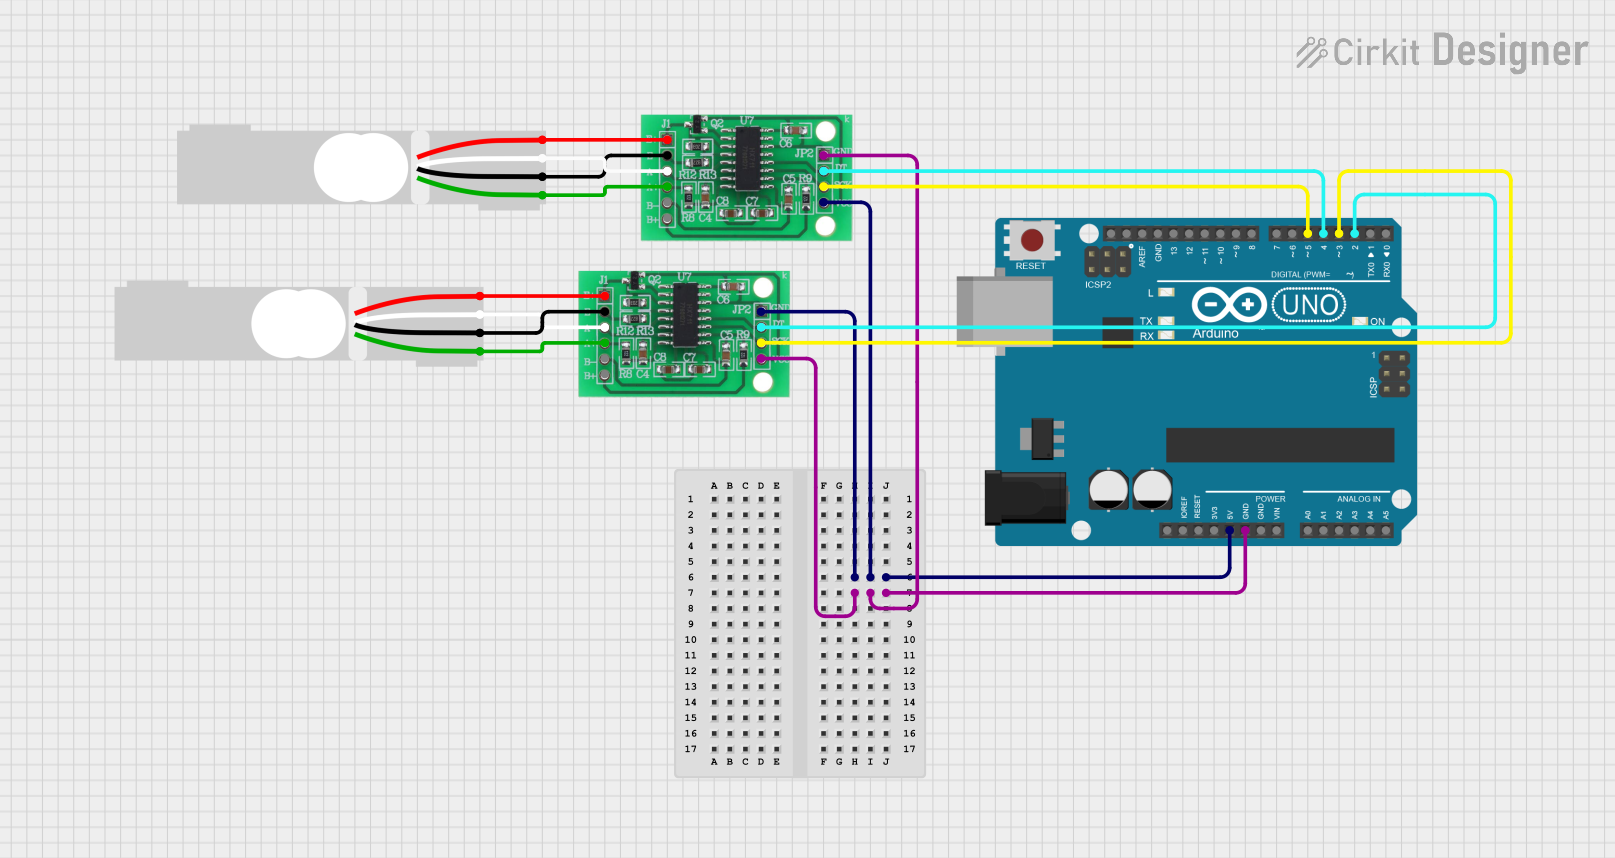
This circuit involves an Arduino UNO microcontroller interfacing with two HX711 bridge sensor interfaces, each connected to a load cell. The purpose of this setup is to measure the output from the load cells and process the data using the Arduino UNO.
Component List
Arduino UNO
- Description: A microcontroller board based on the ATmega328P.
- Pins: UNUSED, IOREF, Reset, 3.3V, 5V, GND, Vin, A0, A1, A2, A3, A4, A5, SCL, SDA, AREF, D13, D12, D11, D10, D9, D8, D7, D6, D5, D4, D3, D2, D1, D0
HX711 - Bridge Sensor Interface (1)
- Description: A precision 24-bit analog-to-digital converter (ADC) designed for weigh scales and industrial control applications.
- Pins: E+, E-, A-, A+, B-, B+, GND - GROUND, DATA (OUT), SCK - CLOCK (IN), 3.3/3.5V Supply
Load Cell - Red/white/black/green (1)
- Description: A sensor used to measure force or weight.
- Pins: E+, A-, E-, A+
HX711 - Bridge Sensor Interface (2)
- Description: A precision 24-bit analog-to-digital converter (ADC) designed for weigh scales and industrial control applications.
- Pins: E+, E-, A-, A+, B-, B+, GND - GROUND, DATA (OUT), SCK - CLOCK (IN), 3.3/3.5V Supply
Load Cell - Red/white/black/green (2)
- Description: A sensor used to measure force or weight.
- Pins: E+, A-, E-, A+
Wiring Details
Arduino UNO
- 5V connected to 3.3/3.5V Supply of HX711 (1)
- GND connected to GND - GROUND of HX711 (1)
- D5 connected to SCK - CLOCK (IN) of HX711 (1)
- D4 connected to DATA (OUT) of HX711 (1)
- D3 connected to SCK - CLOCK (IN) of HX711 (2)
- D2 connected to DATA (OUT) of HX711 (2)
HX711 - Bridge Sensor Interface (1)
- 3.3/3.5V Supply connected to 5V of Arduino UNO
- GND - GROUND connected to GND of Arduino UNO
- SCK - CLOCK (IN) connected to D5 of Arduino UNO
- DATA (OUT) connected to D4 of Arduino UNO
- E+ connected to E+ of Load Cell (1)
- E- connected to E- of Load Cell (1)
- A- connected to A- of Load Cell (1)
- A+ connected to A+ of Load Cell (1)
Load Cell - Red/white/black/green (1)
- E+ connected to E+ of HX711 (1)
- E- connected to E- of HX711 (1)
- A- connected to A- of HX711 (1)
- A+ connected to A+ of HX711 (1)
HX711 - Bridge Sensor Interface (2)
- 3.3/3.5V Supply connected to 5V of Arduino UNO
- GND - GROUND connected to GND of Arduino UNO
- SCK - CLOCK (IN) connected to D3 of Arduino UNO
- DATA (OUT) connected to D2 of Arduino UNO
- E+ connected to E+ of Load Cell (2)
- E- connected to E- of Load Cell (2)
- A- connected to A- of Load Cell (2)
- A+ connected to A+ of Load Cell (2)
Load Cell - Red/white/black/green (2)
- E+ connected to E+ of HX711 (2)
- E- connected to E- of HX711 (2)
- A- connected to A- of HX711 (2)
- A+ connected to A+ of HX711 (2)
Documented Code
Arduino UNO Code
void setup() {
  // put your setup code here, to run once:

}

void loop() {
  // put your main code here, to run repeatedly:

}
Additional Documentation
This documentation provides a comprehensive overview of the circuit, including a summary, detailed component list, wiring details, and the code used in the Arduino UNO microcontroller.