
Arduino Nano-Controlled Robotic Vehicle with Ultrasonic Sensor
View and Edit Project In Cirkit Designer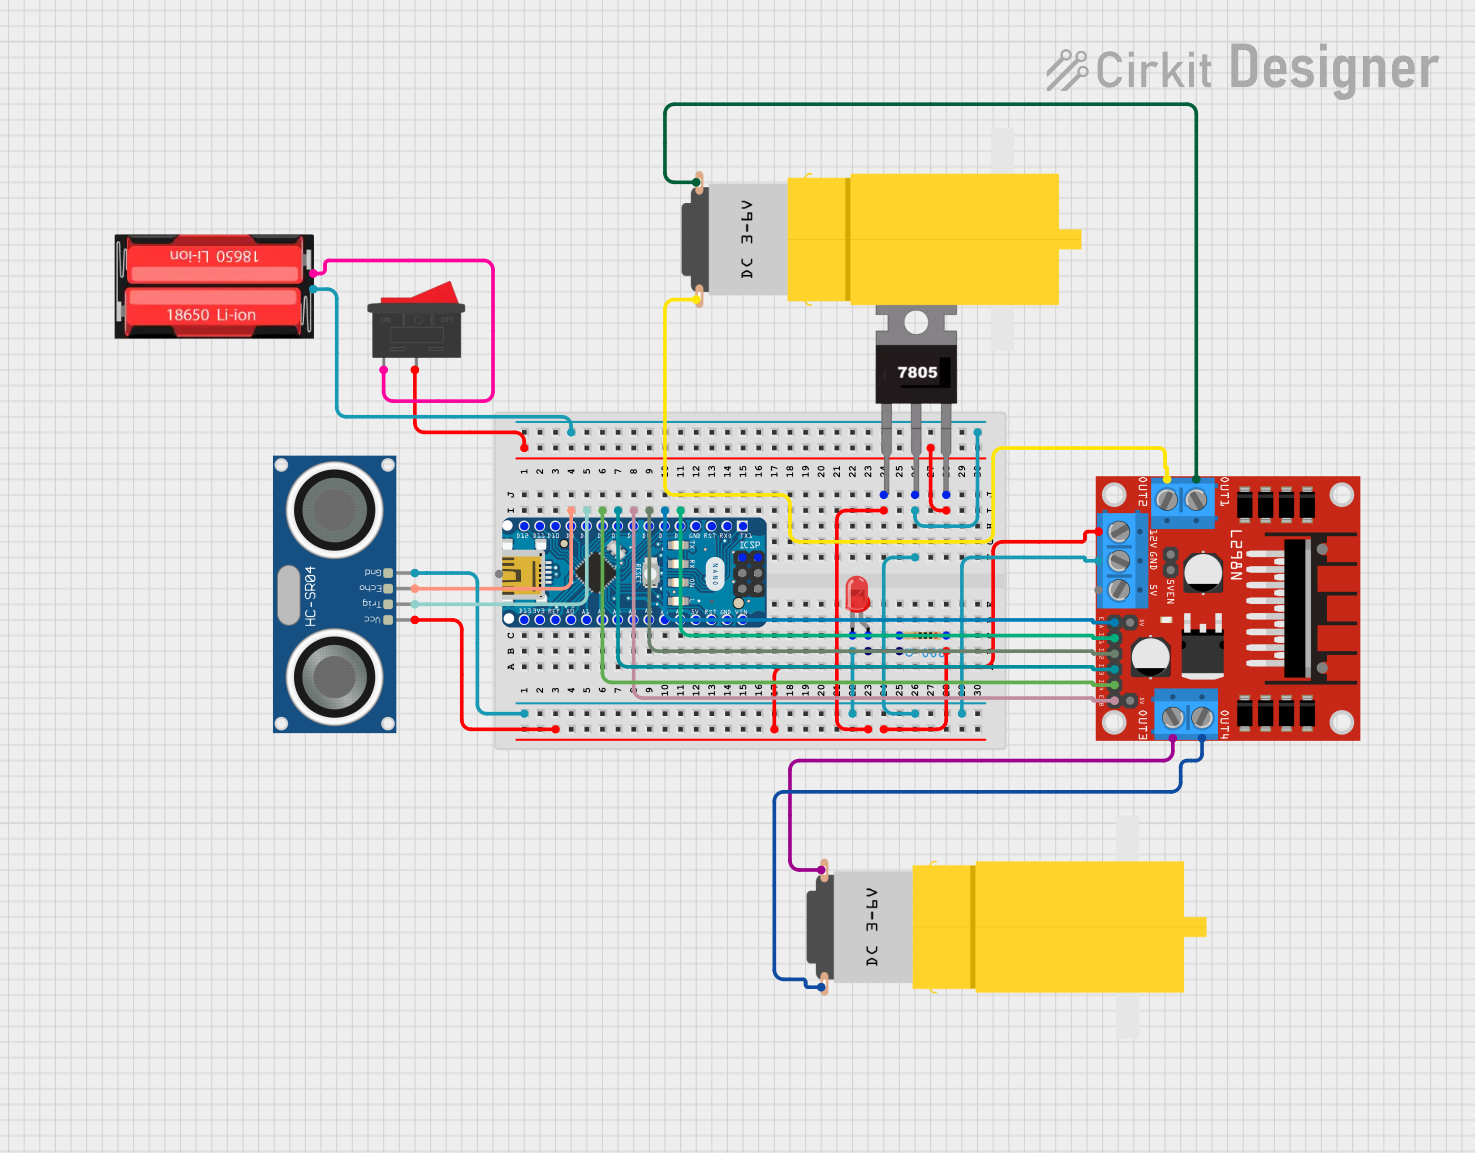
Circuit Documentation
Summary
This circuit is designed to control two hobby motors using an L298N DC motor driver, interfaced with an Arduino Nano microcontroller. The circuit includes an ultrasonic sensor (HC-SR04) for distance measurement, a red LED indicator, and a voltage regulator (7805) to ensure stable 5V supply. A rocker switch is used to control the power supply from a 18650 Li-Ion battery. The Arduino Nano is programmed to interact with the motor driver and the ultrasonic sensor, potentially for a robotic application where distance sensing is required to navigate.
Component List
Resistor
- Description: A resistor with a resistance value of 200 Ohms.
- Purpose: Typically used for current limiting or voltage dropping, possibly for the LED in this circuit.
LED: Two Pin (red)
- Description: A red light-emitting diode with two pins: anode and cathode.
- Purpose: Acts as an indicator light in the circuit.
L298N DC Motor Driver
- Description: A motor driver capable of driving a pair of DC motors.
- Purpose: Controls the speed and direction of the two hobby motors.
7805 Voltage Regulator
- Description: A voltage regulator that outputs a stable 5V from a higher voltage input.
- Purpose: Provides regulated power to components requiring 5V.
Arduino Nano
- Description: A small, complete, and breadboard-friendly board based on the ATmega328.
- Purpose: Acts as the central controller for the circuit, interfacing with the motor driver and sensors.
Motor Amarillo Motorreductor Hobby (x2)
- Description: A yellow hobby gear motor.
- Purpose: Provides mechanical motion for the application.
HC-SR04 Ultrasonic Sensor
- Description: An ultrasonic distance sensor.
- Purpose: Measures distances by emitting ultrasonic waves and timing their return.
Rocker Switch
- Description: A simple on-off switch.
- Purpose: Controls the power supply to the circuit.
18650 Li-Ion Battery
- Description: A rechargeable lithium-ion battery cell.
- Purpose: Provides power to the circuit.
Wiring Details
Resistor
- Connected between the anode of the red LED and a voltage supply line.
LED: Two Pin (red)
- Anode connected to a resistor.
- Cathode connected to the common ground.
L298N DC Motor Driver
- OUT1 and OUT2 connected to the first hobby motor.
- OUT3 and OUT4 connected to the second hobby motor.
- 12V input connected to the voltage supply line.
- GND connected to the common ground.
- Control pins (ENA, IN1, IN2, ENB, IN3, IN4) connected to the Arduino Nano for motor control.
7805 Voltage Regulator
- Vin connected to the voltage supply line.
- Gnd connected to the common ground.
- Vout connected to the 5V power line in the circuit.
Arduino Nano
- Digital pins (D2 to D9) connected to the L298N motor driver and HC-SR04 ultrasonic sensor for control and data acquisition.
- GND pin connected to the common ground.
- 5V pin potentially used for power distribution.
Motor Amarillo Motorreductor Hobby
- Two instances, each connected to the L298N motor driver outputs.
HC-SR04 Ultrasonic Sensor
- VCC connected to the 5V power line.
- TRIG and ECHO pins connected to the Arduino Nano for triggering and receiving distance measurements.
- GND connected to the common ground.
Rocker Switch
- One terminal connected to the positive terminal of the 18650 Li-Ion battery.
- The other terminal connected to the voltage input line of the circuit.
18650 Li-Ion Battery
- Positive terminal connected to the rocker switch.
- Negative terminal connected to the common ground.
Documented Code
void setup() {
  // put your setup code here, to run once:

}

void loop() {
  // put your main code here, to run repeatedly:

}
File: sketch.ino
The provided code is a template with empty setup() and loop() functions, which are the entry points for Arduino code. The setup() function is called once when the microcontroller is powered on or reset, and the loop() function is called repeatedly, allowing the microcontroller to perform operations based on the logic defined within it. The actual implementation details would be added to these functions to control the motors and read from the ultrasonic sensor.