
Arduino UNO Controlled Ultrasonic Sensor and Servo Motor System
View and Edit Project In Cirkit Designer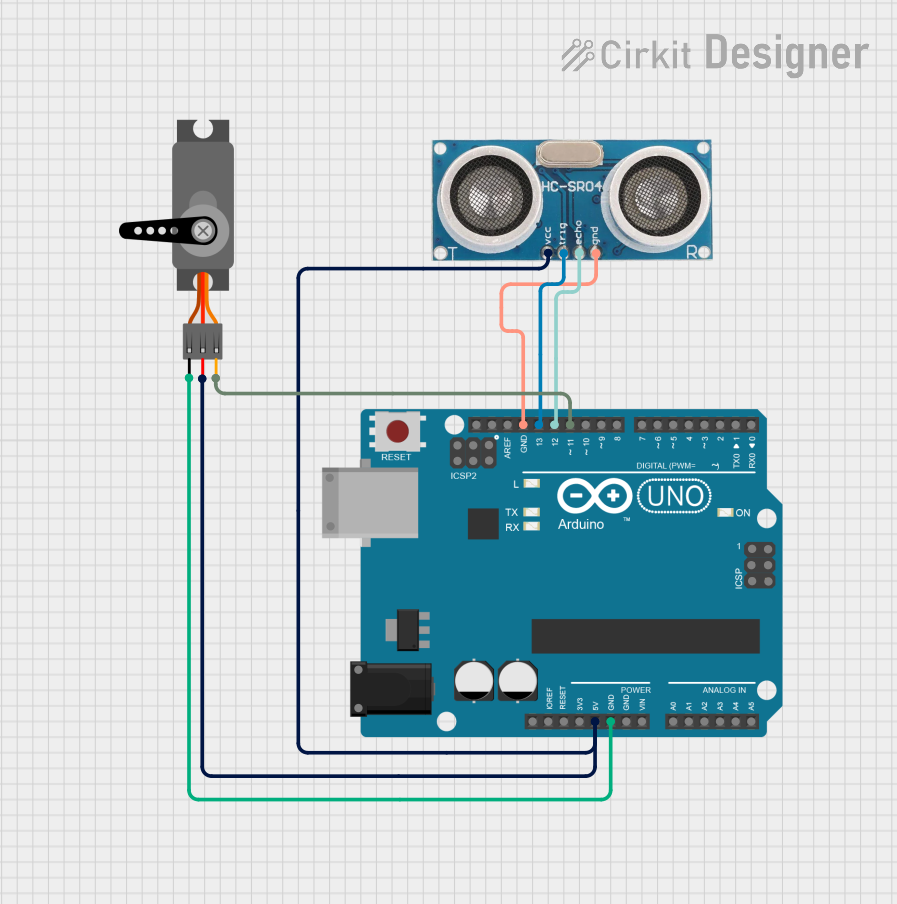
Circuit Documentation
Summary of the Circuit
This circuit integrates an Arduino UNO microcontroller with an ultrasonic sensor and a servo motor. The primary function of this circuit is to detect the presence of an object within a 10 cm range using the ultrasonic sensor. Upon detection, the servo motor is instructed to rotate to a 90-degree position. The circuit is powered by the 5V output from the Arduino UNO, and ground connections are shared among the components to complete the circuit.
Component List
Arduino UNO
- Description: A microcontroller board based on the ATmega328P.
- Purpose: Acts as the central processing unit for the circuit, controlling the ultrasonic sensor and the servo motor.
- Pins: UNUSED, IOREF, Reset, 3.3V, 5V, GND, Vin, A0-A5, SCL, SDA, AREF, D0-D13, +, -
Ultrasonic Sensor
- Description: A sensor that measures distance by emitting ultrasonic waves and detecting their reflection.
- Purpose: Detects the presence of objects within a certain range.
- Pins: +VCC, Trigger, Echo, GND
Servo
- Description: An actuator that can rotate to a specified position.
- Purpose: Rotates to a 90-degree position when an object is detected within 10 cm by the ultrasonic sensor.
- Pins: GND, VCC, PWM
Wiring Details
Arduino UNO
- 5V connected to Servo VCC and Ultrasonic Sensor +VCC
- GND connected to Servo GND and Ultrasonic Sensor GND
- D13 connected to Ultrasonic Sensor Trigger
- D12 connected to Ultrasonic Sensor Echo
- D11 connected to Servo PWM
Ultrasonic Sensor
- +VCC connected to Arduino UNO 5V
- Trigger connected to Arduino UNO D13
- Echo connected to Arduino UNO D12
- GND connected to Arduino UNO GND
Servo
- VCC connected to Arduino UNO 5V
- GND connected to Arduino UNO GND
- PWM connected to Arduino UNO D11
Documented Code
/*
 * This Arduino sketch interfaces with an ultrasonic sensor and a servo motor.
 * When the ultrasonic sensor detects an object within 10 cm, the servo motor
 * will rotate to 90 degrees.
 */

#include <Servo.h>

// Pin definitions
const int trigPin = 13;
const int echoPin = 12;
const int servoPin = 11;

Servo myServo;

void setup() {
  // Initialize serial communication
  Serial.begin(9600);

  // Set up the ultrasonic sensor pins
  pinMode(trigPin, OUTPUT);
  pinMode(echoPin, INPUT);

  // Attach the servo motor to the servo pin
  myServo.attach(servoPin);

  // Initialize the servo to 0 degrees
  myServo.write(0);
}

void loop() {
  // Send a 10us pulse to trigger the ultrasonic sensor
  digitalWrite(trigPin, LOW);
  delayMicroseconds(2);
  digitalWrite(trigPin, HIGH);
  delayMicroseconds(10);
  digitalWrite(trigPin, LOW);

  // Read the echo pin and calculate the distance
  long duration = pulseIn(echoPin, HIGH);
  int distance = duration * 0.034 / 2;

  // Print the distance to the serial monitor
  Serial.print("Distance: ");
  Serial.print(distance);
  Serial.println(" cm");

  // Check if the distance is less than 10 cm
  if (distance < 10) {
    // Move the servo to 90 degrees
    myServo.write(90);
  } else {
    // Move the servo back to 0 degrees
    myServo.write(0);
  }

  // Wait for a short period before the next loop
  delay(100);
}
This code is designed to be uploaded to the Arduino UNO microcontroller. It initializes the ultrasonic sensor and the servo motor, then continuously checks the distance measured by the sensor. If an object is detected within 10 cm, the servo motor is commanded to rotate to 90 degrees; otherwise, it returns to 0 degrees. The distance is also printed to the serial monitor for debugging purposes.