ESP8266 NodeMCU Controlled LED Switch
Circuit Documentation
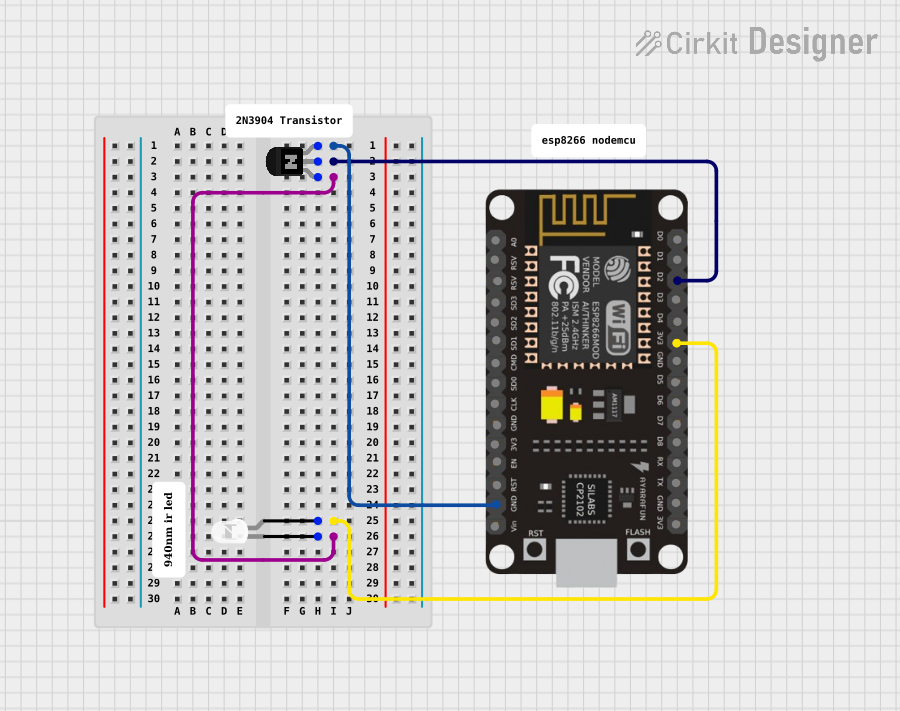
Summary of the Circuit
This circuit is designed to control an LED using an ESP8266 NodeMCU microcontroller and an NPN transistor as a switch. The ESP8266 NodeMCU is programmed to output a signal from one of its digital pins (D2) to control the base of the NPN transistor. When the microcontroller outputs a high signal, the transistor allows current to flow from its collector to emitter, thus lighting up the LED. The LED is connected to a 3.3V power supply from the NodeMCU and its cathode is connected to the emitter of the transistor. The collector of the transistor is connected to the ground (GND) of the NodeMCU to complete the circuit.
Component List
ESP8266 NodeMCU
- Description: A Wi-Fi capable microcontroller module based on the ESP8266 chip.
- Pins: D0, D1, D2, D3, D4, 3V3, GND, D5, D6, D7, D8, RX, TX, A0, RSV, SD3, SD2, SD1, CMD, SD0, CLK, EN, RST, VIN
NPN Transistor (EBC)
- Description: A bipolar junction transistor with emitter (E), base (B), and collector (C) pins.
- Pins: emitter, base, collector
LED: Two Pin (white)
- Description: A standard white light-emitting diode with two pins: anode and cathode.
- Pins: cathode, anode
Wiring Details
ESP8266 NodeMCU
- D2: Connected to the base of the NPN Transistor.
- 3V3: Connected to the anode of the LED.
- GND: Connected to the collector of the NPN Transistor.
NPN Transistor (EBC)
- Base: Connected to D2 of the ESP8266 NodeMCU.
- Emitter: Connected to the cathode of the LED.
- Collector: Connected to GND of the ESP8266 NodeMCU.
LED: Two Pin (white)
- Anode: Connected to 3V3 of the ESP8266 NodeMCU.
- Cathode: Connected to the emitter of the NPN Transistor.
Documented Code
Since no code was provided for the ESP8266 NodeMCU, we will assume a simple example where the microcontroller toggles the LED on and off. Below is a pseudo-code representation of what the embedded code might look like:
// Pseudo-code for ESP8266 NodeMCU to control an LED through an NPN transistor

void setup() {
  pinMode(D2, OUTPUT); // Set D2 as an output pin
}

void loop() {
  digitalWrite(D2, HIGH); // Turn on the LED
  delay(1000);           // Wait for 1 second
  digitalWrite(D2, LOW);  // Turn off the LED
  delay(1000);           // Wait for 1 second
}
Please note that actual implementation would require the actual embedded C/C++ code to be uploaded to the ESP8266 NodeMCU.