
Arduino Nano-Based Bluetooth-Controlled Robotic Car with Ultrasonic Sensor and Servo
View and Edit Project In Cirkit Designer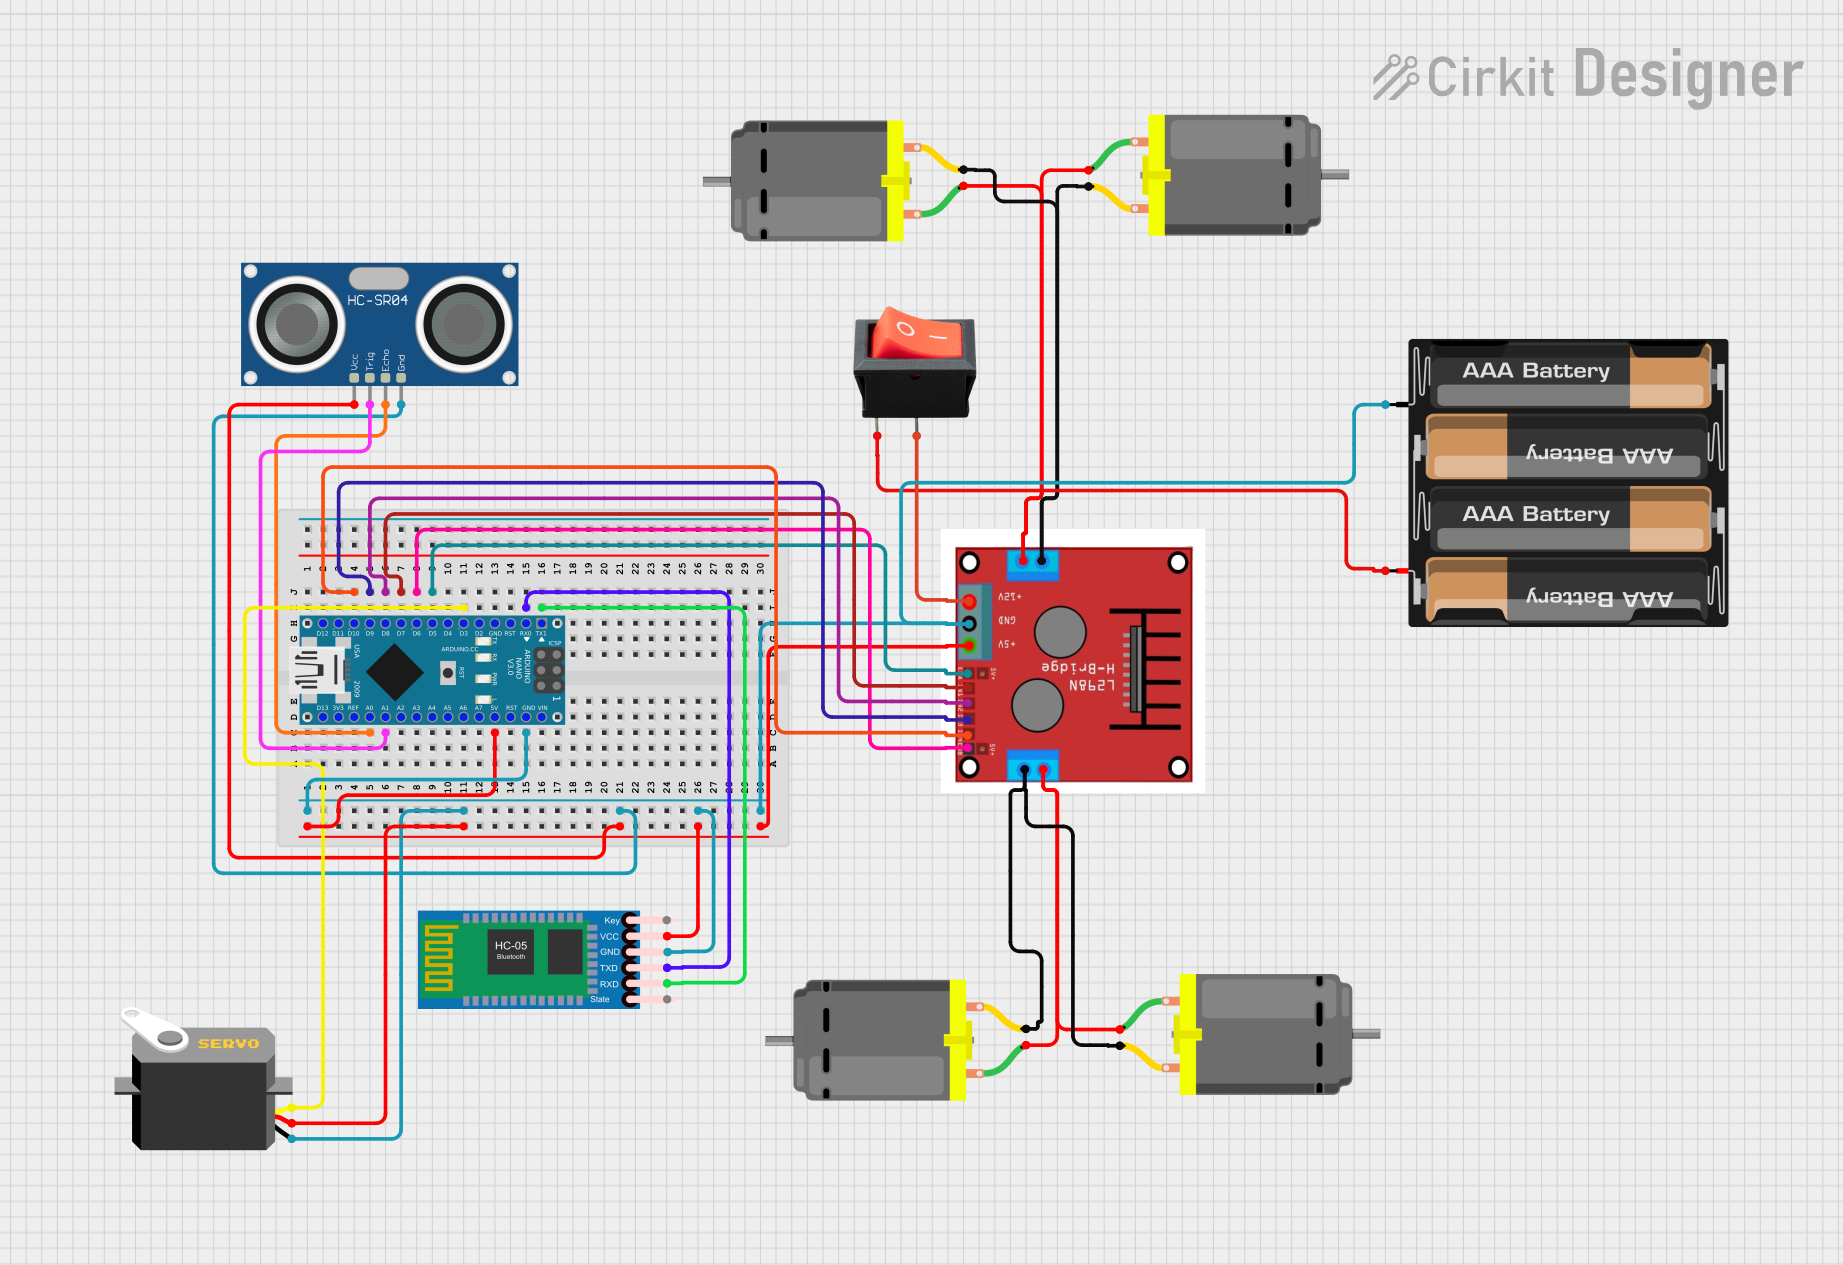
Circuit Documentation
Summary
This document provides a detailed overview of a circuit that includes an Arduino Nano, a servo motor, an ultrasonic sensor, a Bluetooth module, a motor driver, multiple DC motors, a battery mount, and a rocker switch. The circuit is designed to control the motors and servo based on inputs from the ultrasonic sensor and commands received via Bluetooth.
Component List
Arduino Nano
- Description: A small, complete, and breadboard-friendly board based on the ATmega328P.
- Pins: D1/TX, D0/RX, RESET, GND, D2, D3, D4, D5, D6, D7, D8, D9, D10, D11/MOSI, D12/MISO, VIN, 5V, A7, A6, A5, A4, A3, A2, A1, A0, AREF, 3V3, D13/SCK
Servo
- Description: A motor that can be positioned at various angles.
- Pins: gnd, vcc, pulse
HC-SR04 Ultrasonic Sensor
- Description: A sensor used to measure distance by using ultrasonic waves.
- Pins: VCC, TRIG, ECHO, GND
4 x AAA Battery Mount
- Description: A battery holder for four AAA batteries.
- Pins: -, +
Motor Driver (L298N)
- Description: A dual H-Bridge motor driver that allows control of two DC motors.
- Pins: OUT 1, OUT 2, OUT 3, OUT 4, +12V INPUT, GND, +5V OUTPUT, ENA, IN 1, IN 2, IN 3, IN 4, ENB
DC Motor
- Description: A motor that runs on direct current (DC).
- Pins: pin 1, pin 2
HC-05 Bluetooth Module
- Description: A module used for wireless communication via Bluetooth.
- Pins: Key, VCC, TXD, RXD, State, GND
Rocker Switch
- Description: A switch that can be toggled between two positions.
- Pins: output, input
Wiring Details
Arduino Nano
- 5V: Connected to vcc of Servo, VCC of HC-SR04 Ultrasonic Sensor, VCC of HC-05 Bluetooth Module, and +5V OUTPUT of Motor Driver (L298N)
- GND: Connected to gnd of Servo, GND of HC-SR04 Ultrasonic Sensor, GND of HC-05 Bluetooth Module, - of 4 x AAA Battery Mount, and GND of Motor Driver (L298N)
- D10: Connected to IN 4 of Motor Driver (L298N)
- A0: Connected to ECHO of HC-SR04 Ultrasonic Sensor
- D9: Connected to IN 3 of Motor Driver (L298N)
- A1: Connected to TRIG of HC-SR04 Ultrasonic Sensor
- D8: Connected to IN 2 of Motor Driver (L298N)
- D7: Connected to IN 1 of Motor Driver (L298N)
- D6: Connected to ENB of Motor Driver (L298N)
- D5: Connected to ENA of Motor Driver (L298N)
- D3: Connected to pulse of Servo
- D0/RX: Connected to TXD of HC-05 Bluetooth Module
- D1/TX: Connected to RXD of HC-05 Bluetooth Module
Servo
- gnd: Connected to GND of Arduino Nano
- vcc: Connected to 5V of Arduino Nano
- pulse: Connected to D3 of Arduino Nano
HC-SR04 Ultrasonic Sensor
- VCC: Connected to 5V of Arduino Nano
- TRIG: Connected to A1 of Arduino Nano
- ECHO: Connected to A0 of Arduino Nano
- GND: Connected to GND of Arduino Nano
4 x AAA Battery Mount
- -: Connected to GND of Arduino Nano
- +: Connected to input of Rocker Switch
Motor Driver (L298N)
- OUT 1: Connected to pin 2 of two DC Motors
- OUT 2: Connected to pin 1 of two DC Motors
- OUT 3: Connected to pin 1 of two DC Motors
- OUT 4: Connected to pin 2 of two DC Motors
- +12V INPUT: Connected to output of Rocker Switch
- GND: Connected to GND of Arduino Nano
- +5V OUTPUT: Connected to 5V of Arduino Nano
- ENA: Connected to D5 of Arduino Nano
- IN 1: Connected to D7 of Arduino Nano
- IN 2: Connected to D8 of Arduino Nano
- IN 3: Connected to D9 of Arduino Nano
- IN 4: Connected to D10 of Arduino Nano
- ENB: Connected to D6 of Arduino Nano
DC Motor
- pin 1: Connected to OUT 2 or OUT 3 of Motor Driver (L298N)
- pin 2: Connected to OUT 1 or OUT 4 of Motor Driver (L298N)
HC-05 Bluetooth Module
- VCC: Connected to 5V of Arduino Nano
- TXD: Connected to D0/RX of Arduino Nano
- RXD: Connected to D1/TX of Arduino Nano
- GND: Connected to GND of Arduino Nano
Rocker Switch
- input: Connected to + of 4 x AAA Battery Mount
- output: Connected to +12V INPUT of Motor Driver (L298N)
Documented Code
Arduino Nano Code
void setup() {
  // put your setup code here, to run once:

}

void loop() {
  // put your main code here, to run repeatedly:

}
This code is a basic template for the Arduino Nano. The setup function is where you initialize your components and settings, and the loop function is where the main logic of your program runs repeatedly.