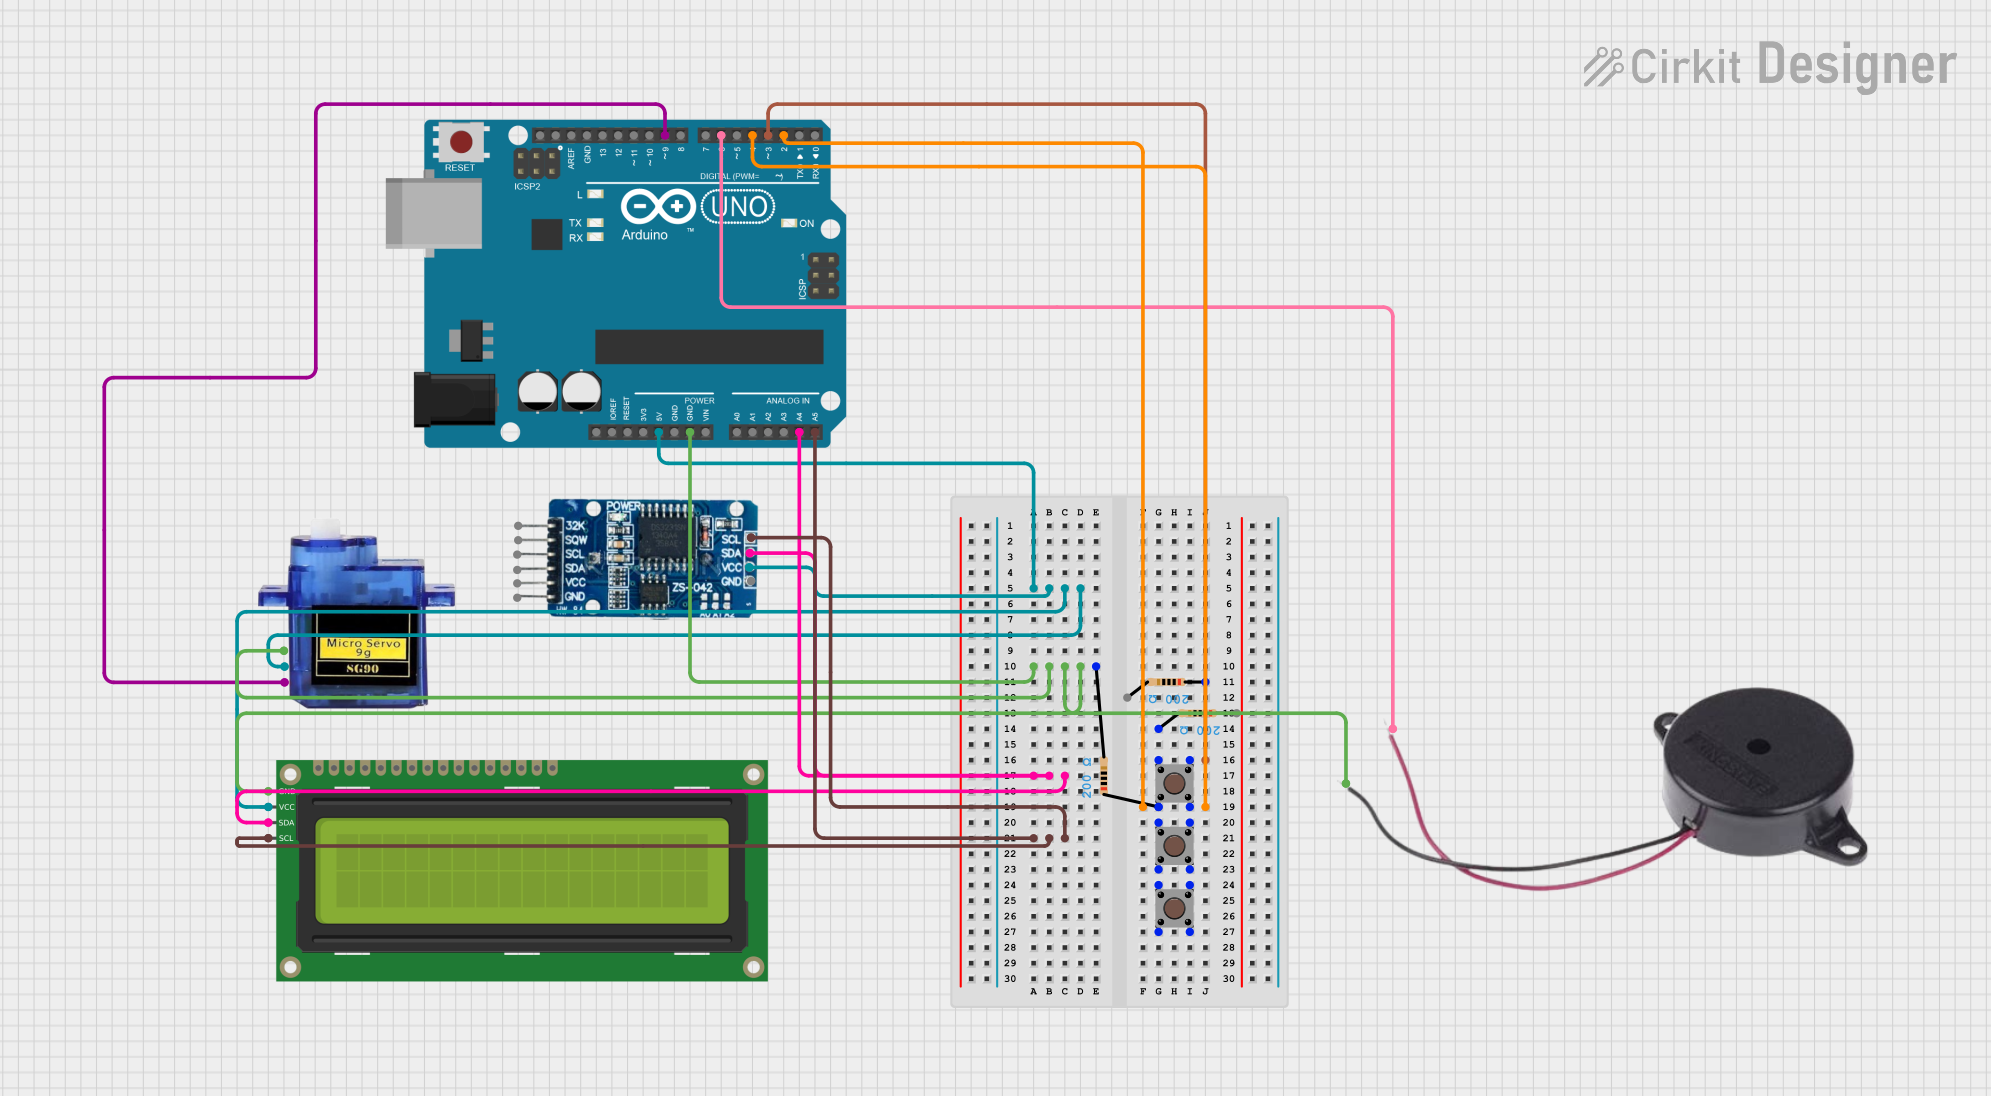
Arduino UNO Based Smart Pill Dispenser with Servo, RTC, and LCD Interface

Smart Pill Dispenser Circuit Documentation
Summary
The Smart Pill Dispenser circuit is designed to automate the dispensing of pills at a set time. It utilizes an Arduino UNO as the central microcontroller to manage the timing, user inputs, and control of peripheral devices such as a servo motor, buzzer, and an LCD display. The circuit includes buttons for setting the dispensing time, a real-time clock (RTC) module for accurate timekeeping, and a micro servo for the mechanical action of dispensing pills.
Component List
Arduino UNO
- Microcontroller board based on the ATmega328P
- It has 14 digital input/output pins, 6 analog inputs, a 16 MHz quartz crystal, a USB connection, a power jack, an ICSP header, and a reset button.
Micro servo 9G
- A small and lightweight servo motor suitable for projects that require simple motion.
RTC DS3231
- A highly accurate real-time clock module with an integrated temperature-compensated crystal oscillator (TCXO) and crystal.
16x2 I2C LCD
- A liquid crystal display capable of displaying 16 characters per line in 2 lines.
- Uses I2C communication to minimize pin usage on the Arduino.
Pushbutton (x3)
- A simple switch mechanism for controlling a device or process.
Buzzer
- An electronic device that produces a tone or sound when electrically energized.
Resistor (x3)
- A passive two-terminal electrical component that implements electrical resistance as a circuit element.
- Each resistor in this circuit has a resistance of 200 Ohms.
Wiring Details
Arduino UNO
5VandGNDare used to power the 16x2 I2C LCD, Micro servo 9G, and RTC DS3231.A4 (SDA)andA5 (SCL)are connected to the I2C bus for communication with the 16x2 I2C LCD and RTC DS3231.D2,D3, andD4are connected to pushbuttons for user input.D6is connected to the buzzer.D9is connected to the PWM input of the Micro servo 9G.
Micro servo 9G
GNDand+5Vfor power supply.PWMinput is connected toD9on the Arduino UNO for control signals.
RTC DS3231
GNDandVCCfor power supply.SCLandSDAfor I2C communication, connected toA5 (SCL)andA4 (SDA)on the Arduino UNO.
16x2 I2C LCD
GNDandVCCfor power supply.SDAandSCLfor I2C communication, connected toA4 (SDA)andA5 (SCL)on the Arduino UNO.
Pushbuttons (x3)
- Each pushbutton has one side connected to the Arduino UNO's digital input pins (
D2,D3,D4) and the other side toGNDthrough a 200 Ohm resistor.
Buzzer
POSITIVEconnected toD6on the Arduino UNO.NEGATIVEconnected toGND.
Resistors (x3)
- Each 200 Ohm resistor is connected in series with a pushbutton to
GND.
Documented Code
#include <Wire.h>
#include <LiquidCrystal_I2C.h>
#include <RTClib.h>
#include <Servo.h>

LiquidCrystal_I2C lcd(0x27, 16, 2);  // LCD with I2C address 0x27
RTC_DS3231 rtc;
Servo dispenserServo;

const int buttonSetHour = 2;
const int buttonSetMinute = 3;
const int buttonConfirmTime = 4;
const int buzzerPin = 6;
const int servoPin = 9;

int setHour = 8;  // Default hour for pill dispensing
int setMinute = 0; // Default minute for pill dispensing
bool alarmSet = false;

void setup() {
  lcd.begin();
  rtc.begin();
  dispenserServo.attach(servoPin);
  pinMode(buzzerPin, OUTPUT);
  pinMode(buttonSetHour, INPUT_PULLUP);
  pinMode(buttonSetMinute, INPUT_PULLUP);
  pinMode(buttonConfirmTime, INPUT_PULLUP);

  lcd.print("Smart Pill Dispenser");
  delay(2000);
  lcd.clear();
}

void loop() {
  DateTime now = rtc.now();

  // Display current time
  lcd.setCursor(0, 0);
  lcd.print("Time: ");
  lcd.print(now.hour());
  lcd.print(":");
  lcd.print(now.minute());
  lcd.print(":");
  lcd.print(now.second());

  // Check if it's time to dispense pill
  if (now.hour() == setHour && now.minute() == setMinute && !alarmSet) {
    dispensePill();
    alarmSet = true;  // Prevents re-triggering within the same minute
  }

  if (now.minute() != setMinute) alarmSet = false;  // Reset alarm after a minute

  // Setting time with buttons
  if (digitalRead(buttonSetHour) == LOW) {
    setHour = (setHour + 1) % 24;
    delay(200);  // Debounce delay
  }
  if (digitalRead(buttonSetMinute) == LOW) {
    setMinute = (setMinute + 1) % 60;
    delay(200);
  }
  if (digitalRead(buttonConfirmTime) == LOW) {
    lcd.setCursor(0, 1);
    lcd.print("Set: ");
    lcd.print(setHour);
    lcd.print(":");
    lcd.print(setMinute);
    delay(500);
  }
}

void dispensePill() {
  lcd.setCursor(0, 1);
  lcd.print("Dispensing Pill!");
  tone(buzzerPin, 1000);  // Sound buzzer
  dispenserServo.write(90);  // Move servo to release pills
  delay(1000);  // Wait for pill to drop
  dispenserServo.write(0);  // Return servo to original position
  noTone(buzzerPin);
}
This code is responsible for controlling the Smart Pill Dispenser. It initializes the LCD, RTC, and servo, and sets up the button inputs. The main loop checks the current time against the set dispensing time and activates the servo to dispense a pill when the time matches. It also allows the user to set the dispensing time using buttons.