
Arduino UNO-Based RFID Access Control System with LCD Display and Keypad
View and Edit Project In Cirkit Designer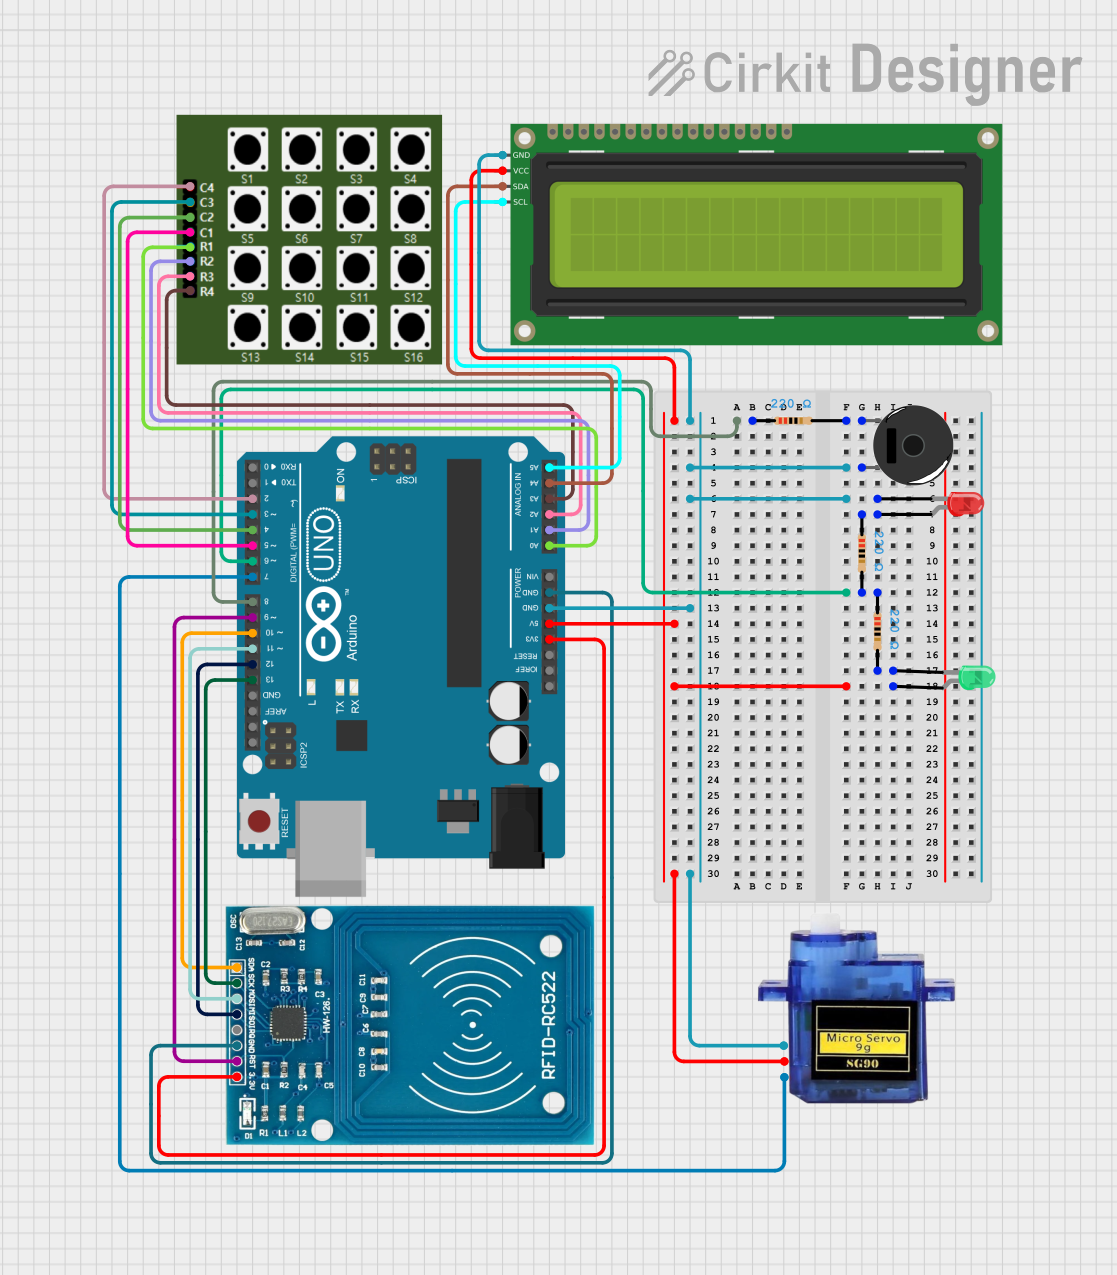
Circuit Documentation
Summary
This circuit involves an Arduino UNO microcontroller interfacing with various components including LEDs, a 4×4 Keypad, a 16x2 I2C LCD, a Micro servo, an RFID-RC522 module, and a Piezo Buzzer. The circuit is designed to demonstrate basic input and output operations, including reading from a keypad, displaying information on an LCD, controlling a servo motor, and using an RFID reader.
Component List
Arduino UNO
- Description: A microcontroller board based on the ATmega328P.
- Pins: UNUSED, IOREF, Reset, 3.3V, 5V, GND, Vin, A0, A1, A2, A3, A4, A5, SCL, SDA, AREF, D13, D12, D11, D10, D9, D8, D7, D6, D5, D4, D3, D2, D1, D0
LED: Two Pin (red)
- Description: A red LED with two pins: cathode and anode.
- Pins: cathode, anode
LED: Two Pin (green)
- Description: A green LED with two pins: cathode and anode.
- Pins: cathode, anode
4×4 Keypad
- Description: A keypad with 4 rows and 4 columns.
- Pins: C3, C2, C4, C1, R1, R2, R3, R4
16x2 I2C LCD
- Description: A 16x2 character LCD with I2C interface.
- Pins: GND, VCC, SDA, SCL
Micro servo 9G
- Description: A small servo motor.
- Pins: GND, +5V, PWM
Resistor (220 Ohms)
- Description: A resistor with a resistance of 220 Ohms.
- Pins: pin1, pin2
RFID-RC522
- Description: An RFID reader module.
- Pins: VCC (3.3V), RST, GND, IRQ, MISO, MOSI, SCK, SDA
Piezo Buzzer
- Description: A piezoelectric buzzer.
- Pins: pin 1, pin 2
Wiring Details
Arduino UNO
- D8 connected to Resistor (pin1)
- 5V connected to 16x2 I2C LCD (VCC), LED: Two Pin (green) (anode), Micro servo 9G (+5V)
- GND connected to 16x2 I2C LCD (GND), Piezo Buzzer (pin 2), LED: Two Pin (red) (cathode), Micro servo 9G (GND), RFID-RC522 (GND)
- D6 connected to Resistor (pin2), Resistor (pin1)
- 3.3V connected to RFID-RC522 (VCC (3.3V))
- A0 connected to 4×4 Keypad (R1)
- A1 connected to 4×4 Keypad (R2)
- A2 connected to 4×4 Keypad (R3)
- A3 connected to 4×4 Keypad (R4)
- A4 connected to 16x2 I2C LCD (SDA)
- A5 connected to 16x2 I2C LCD (SCL)
- D13 connected to RFID-RC522 (SCK)
- D12 connected to RFID-RC522 (MISO)
- D11 connected to RFID-RC522 (MOSI)
- D10 connected to RFID-RC522 (SDA)
- D9 connected to RFID-RC522 (RST)
- D7 connected to Micro servo 9G (PWM)
- D5 connected to 4×4 Keypad (C1)
- D4 connected to 4×4 Keypad (C2)
- D3 connected to 4×4 Keypad (C3)
- D2 connected to 4×4 Keypad (C4)
LED: Two Pin (red)
- anode connected to Resistor (pin1)
- cathode connected to Arduino UNO (GND)
LED: Two Pin (green)
- anode connected to Arduino UNO (5V)
- cathode connected to Resistor (pin2)
4×4 Keypad
- R1 connected to Arduino UNO (A0)
- R2 connected to Arduino UNO (A1)
- R3 connected to Arduino UNO (A2)
- R4 connected to Arduino UNO (A3)
- C1 connected to Arduino UNO (D5)
- C2 connected to Arduino UNO (D4)
- C3 connected to Arduino UNO (D3)
- C4 connected to Arduino UNO (D2)
16x2 I2C LCD
- VCC connected to Arduino UNO (5V)
- GND connected to Arduino UNO (GND)
- SDA connected to Arduino UNO (A4)
- SCL connected to Arduino UNO (A5)
Micro servo 9G
- GND connected to Arduino UNO (GND)
- +5V connected to Arduino UNO (5V)
- PWM connected to Arduino UNO (D7)
Resistor (220 Ohms)
- pin1 connected to Arduino UNO (D8), LED: Two Pin (red) (anode)
- pin2 connected to Resistor (pin1), Arduino UNO (D6), LED: Two Pin (green) (cathode)
RFID-RC522
- VCC (3.3V) connected to Arduino UNO (3.3V)
- GND connected to Arduino UNO (GND)
- SCK connected to Arduino UNO (D13)
- MISO connected to Arduino UNO (D12)
- MOSI connected to Arduino UNO (D11)
- SDA connected to Arduino UNO (D10)
- RST connected to Arduino UNO (D9)
Piezo Buzzer
- pin 1 connected to Resistor (pin2)
- pin 2 connected to Arduino UNO (GND)
Documented Code
Arduino UNO Code (sketch.ino)
void setup() {
  // put your setup code here, to run once:

}

void loop() {
  // put your main code here, to run repeatedly:

}
Documentation (documentation.txt)