
Arduino UNO Based Ultrasonic Distance Measurement with LED Indicator
View and Edit Project In Cirkit Designer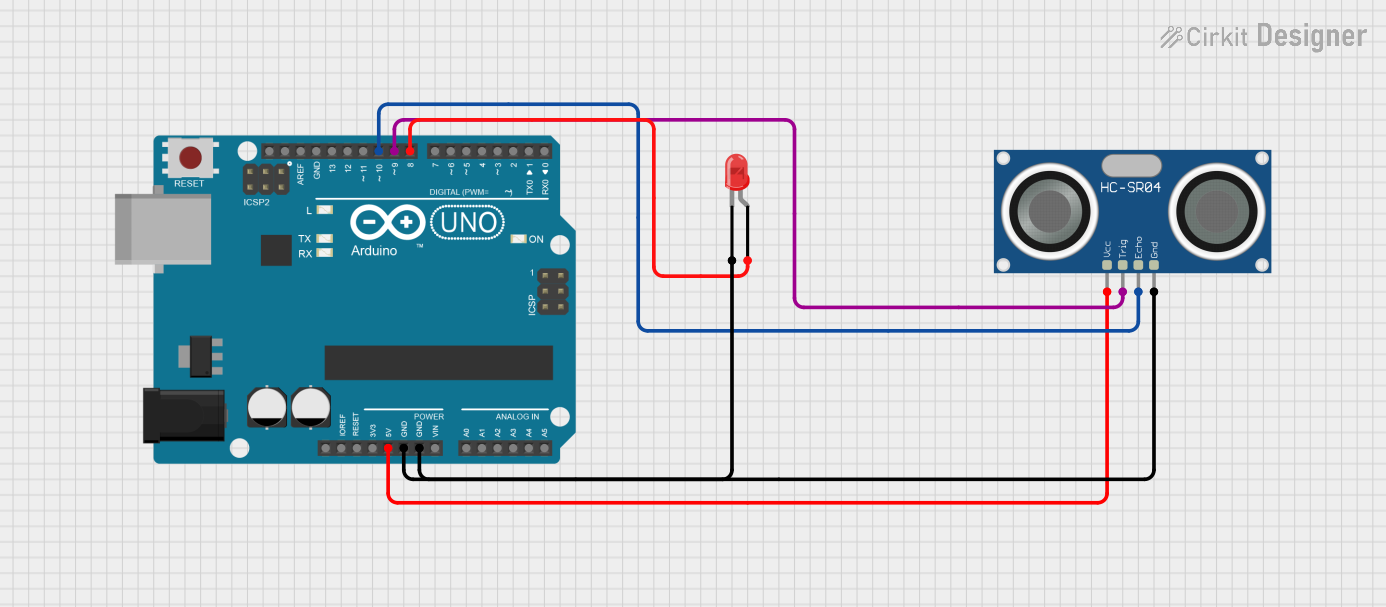
Circuit Documentation
Summary
The circuit consists of an Arduino UNO microcontroller, an HC-SR04 Ultrasonic Sensor, and a red two-pin LED. The Arduino UNO is used as the central processing unit, controlling the LED and interfacing with the ultrasonic sensor to measure distances. The HC-SR04 sensor is powered by the Arduino and is responsible for sending ultrasonic waves and receiving the echo to determine the distance to an object. The LED serves as an indicator, which can be controlled by the Arduino to signal events or statuses based on the program logic.
Component List
Arduino UNO
- Description: A microcontroller board based on the ATmega328P.
- Pins: UNUSED, IOREF, Reset, 3.3V, 5V, GND, Vin, A0-A5, SCL, SDA, AREF, D0-D13.
- Purpose: Acts as the central processing unit for the circuit, controlling the sensor and the LED.
HC-SR04 Ultrasonic Sensor
- Description: An ultrasonic distance sensor capable of measuring distances by emitting and receiving ultrasonic waves.
- Pins: VCC, TRIG, ECHO, GND.
- Purpose: Measures the distance to objects by emitting and receiving ultrasonic pulses.
LED: Two Pin (red)
- Description: A basic red LED with an anode and cathode.
- Pins: cathode, anode.
- Purpose: Serves as an indicator light that can be controlled by the Arduino.
Wiring Details
Arduino UNO
- 5V connected to HC-SR04 Ultrasonic Sensor VCC.
- GND connected to HC-SR04 Ultrasonic Sensor GND and LED cathode.
- D10 connected to HC-SR04 Ultrasonic Sensor ECHO.
- D9 connected to HC-SR04 Ultrasonic Sensor TRIG.
- D8 connected to LED anode.
HC-SR04 Ultrasonic Sensor
- VCC connected to Arduino UNO 5V.
- TRIG connected to Arduino UNO D9.
- ECHO connected to Arduino UNO D10.
- GND connected to Arduino UNO GND.
LED: Two Pin (red)
- cathode connected to Arduino UNO GND.
- anode connected to Arduino UNO D8.
Documented Code
Arduino UNO Code (sketch.ino)
void setup() {
  // put your setup code here, to run once:

}

void loop() {
  // put your main code here, to run repeatedly:

}
Note: The provided code is a template and does not contain any functional logic to control the HC-SR04 Ultrasonic Sensor or the LED. The user is expected to fill in the setup and loop functions with the desired behavior.
Additional Files
- documentation.txt: This file is mentioned but no content was provided. It is likely intended for additional notes or manual documentation.