
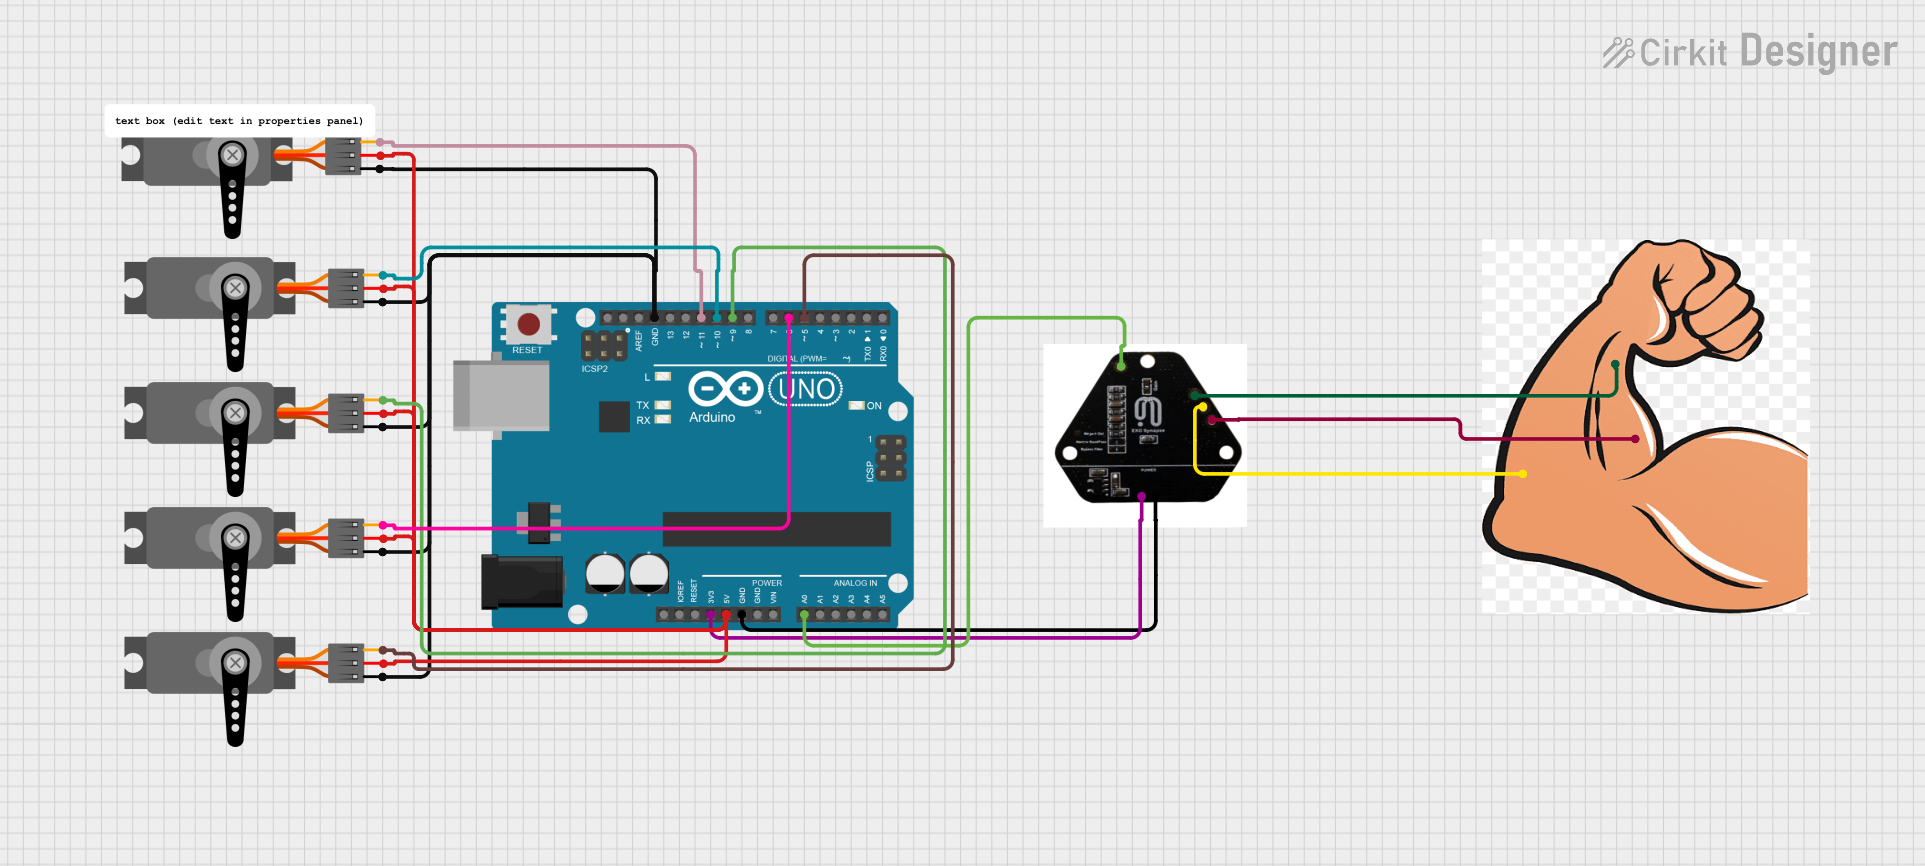
Circuit Documentation
Summary
This circuit is designed to read ECG signals using an EXG sensor and control five servos based on the sensor data. The core of the circuit is an Arduino UNO microcontroller, which processes the ECG signals and drives the servos accordingly. The circuit includes an EXG sensor, a hand model with input pins, and five servos for actuation.
Component List
EXG Sensor
- Component Name: EXG Sensor
- Description: Sensor for measuring ECG signals.
- Pins: -IN, DRL, +IN, OUT, GND, +3.3V
Arduino UNO
- Component Name: Arduino UNO
- Description: Microcontroller for processing sensor data and controlling servos.
- Pins: UNUSED, IOREF, Reset, 3.3V, 5V, GND, Vin, A0, A1, A2, A3, A4, A5, SCL, SDA, AREF, D13, D12, D11, D10, D9, D8, D7, D6, D5, D4, D3, D2, D1, D0
Hand Model
- Component Name: Hand
- Description: Model hand with input pins for ECG signals.
- Pins: DNL, +IN, -IN
Servo Motors
- Component Name: Servo
- Description: Servo motor for actuation.
- Pins: GND, VCC, PWM
Wiring Details
EXG Sensor
- -IN: Connected to Hand -IN
- DRL: Connected to Hand DNL
- +IN: Connected to Hand +IN
- OUT: Connected to Arduino UNO A0
- GND: Connected to Arduino UNO GND
- +3.3V: Connected to Arduino UNO 3.3V
Arduino UNO
- A0: Connected to EXG Sensor OUT
- GND: Connected to EXG Sensor GND and Servo GNDs
- 3.3V: Connected to EXG Sensor +3.3V
- 5V: Connected to Servo VCCs
- D5: Connected to Servo PWM
- D6: Connected to Servo PWM
- D9: Connected to Servo PWM
- D10: Connected to Servo PWM
- D11: Connected to Servo PWM
Hand Model
- -IN: Connected to EXG Sensor -IN
- DNL: Connected to EXG Sensor DRL
- +IN: Connected to EXG Sensor +IN
Servo Motors
- GND: Connected to Arduino UNO GND
- VCC: Connected to Arduino UNO 5V
- PWM:
- Servo 1: Connected to Arduino UNO D11
- Servo 2: Connected to Arduino UNO D10
- Servo 3: Connected to Arduino UNO D9
- Servo 4: Connected to Arduino UNO D6
- Servo 5: Connected to Arduino UNO D5
Code Documentation
Arduino UNO Code
#include <Servo.h>

#define ECG_PIN A0   // Analog pin for AD8232 output
#define SERVO_PIN_1 9  // Pin for Servo 1 (e.g., thumb)
#define SERVO_PIN_2 10 // Pin for Servo 2 (e.g., index)
#define SERVO_PIN_3 11 // Pin for Servo 3 (e.g., middle)
#define SERVO_PIN_4 12 // Pin for Servo 4 (e.g., ring)
#define SERVO_PIN_5 13 // Pin for Servo 5 (e.g., pinky)

Servo servo1, servo2, servo3, servo4, servo5;

int sensorValue = 0;  // Variable to store ECG sensor data
int mappedValue = 0;  // Mapped value for servo movement

void setup() {
  // Attach the servos to the respective pins
  servo1.attach(SERVO_PIN_1);
  servo2.attach(SERVO_PIN_2);
  servo3.attach(SERVO_PIN_3);
  servo4.attach(SERVO_PIN_4);
  servo5.attach(SERVO_PIN_5);

  // Initialize the servos at a neutral position (0°)
  servo1.write(90);
  servo2.write(90);
  servo3.write(90);
  // servo4.write(90);
  servo5.write(90);

  // Start serial communication for debugging
  Serial.begin(9600);
}

void loop() {
  // Read the value from the AD8232 ECG sensor
  sensorValue = analogRead(ECG_PIN);

  // Map the sensor value to a suitable range for servo movement (e.g., 0-180 degrees)
  mappedValue = map(sensorValue, 0, 1023, 0, 180);

  // Move each servo based on the sensor data (you can adjust logic as needed)
  servo1.write(mappedValue);  // Move the first finger
  servo2.write(mappedValue);  // Move the second finger
  servo3.write(mappedValue);  // Move the third finger
  servo4.write(mappedValue);  // Move the fourth finger
  servo5.write(mappedValue);  // Move the fifth finger

  // Print the sensor value and mapped servo position for debugging
  Serial.print("Sensor Value: ");
  Serial.print(sensorValue);
  Serial.print(" Mapped Value: ");
  Serial.println(mappedValue);

  // Add a small delay to allow the servos to move
  delay(100);
}
This code reads the ECG signal from the EXG sensor and maps the sensor value to control the positions of five servos. The servos are attached to specific pins on the Arduino UNO and are moved based on the mapped sensor values. The code also includes serial communication for debugging purposes.