
ESP32-Based IoT Temperature and Humidity Controller with OLED Display and Wi-Fi Connectivity
View and Edit Project In Cirkit Designer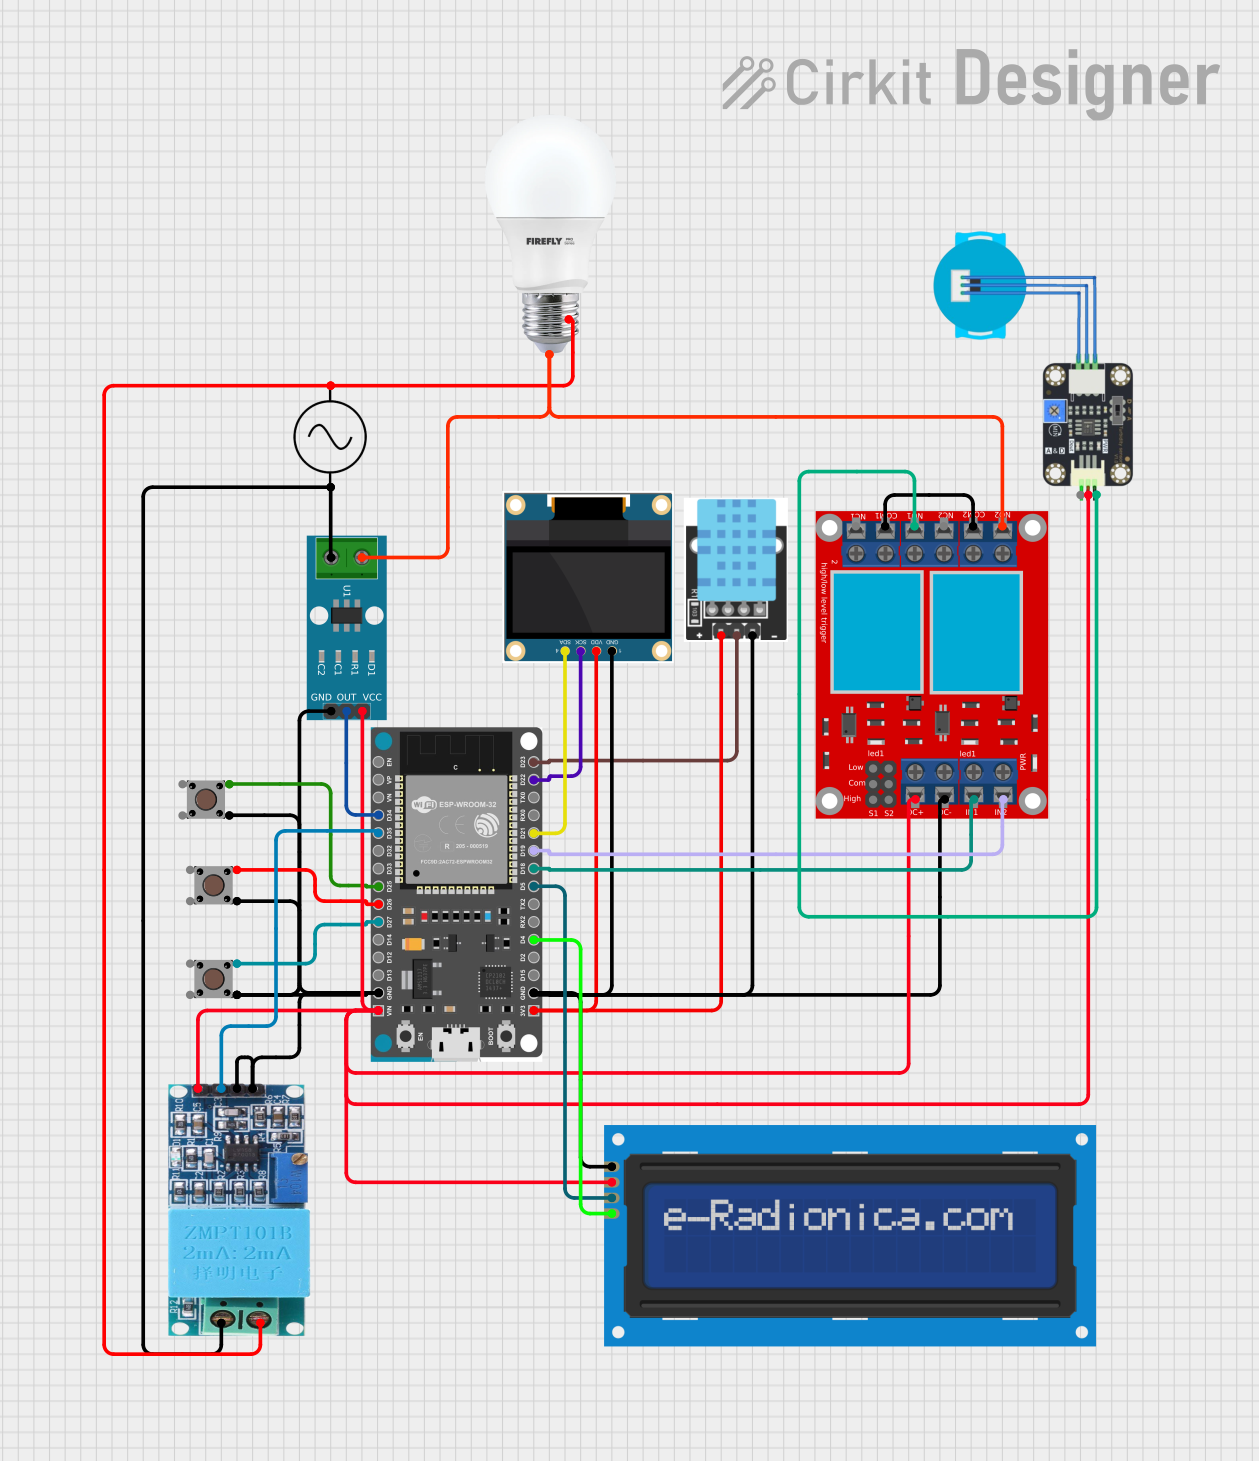
Circuit Documentation
Summary
This document provides a detailed overview of a circuit designed using an ESP32 Devkit V1 microcontroller. The circuit includes various sensors, relays, and display modules to create an IoT-based temperature and humidity controller. The system uses Blynk for remote monitoring and control, and it includes components such as pushbuttons, a DHT11 temperature-humidity sensor, an OLED display, a relay module, a turbidity sensor, a current sensor, an AC supply, and an LCD screen.
Component List
ESP32 Devkit V1
- Description: Microcontroller with WiFi and Bluetooth capabilities.
- Pins: 3V3, GND, D15, D2, D4, RX2, TX2, D5, D18, D19, D21, RX0, TX0, D22, D23, EN, VP, VN, D34, D35, D32, D33, D25, D26, D27, D14, D12, D13, VIN
Pushbutton
- Description: Simple pushbutton switch.
- Pins: Pin 3 (out), Pin 4 (out), Pin 1 (in), Pin 2 (in)
KY-015 DHT11 Temperature-Humidity Sensor Module
- Description: Sensor module for measuring temperature and humidity.
- Pins: VCC, GND, DOUT
0.96" OLED
- Description: Small OLED display for visual output.
- Pins: GND, VDD, SCK, SDA
2 Channel Relay Module
- Description: Relay module for controlling high-power devices.
- Pins: N.O. 2, COM 2, N.C. 2, N.O. 1, COM 1, N.C. 1, pin 7, pin 8, pin 9, pin 10, pin 11, pin 12, VCC+, VCC- (GND), IN 1, IN 2
Turbidity Sensor
- Description: Sensor for measuring water turbidity.
- Pins: OUT, VCC, GND
BULB
- Description: Simple light bulb.
- Pins: +, -
ACS712 Current Sensor 5A 20A 30A
- Description: Current sensor for measuring AC or DC current.
- Pins: 1, 2, GND, OUT, VCC
AC Supply
- Description: AC power supply.
- Pins: +ve, -ve
LCD Screen 16x2 I2C
- Description: 16x2 character LCD with I2C interface.
- Pins: SCL, SDA, VCC, GND
ZMPT101B
- Description: Voltage sensor module.
- Pins: OUT, GND, VCC, NEUTRO, FASE
Wiring Details
ESP32 Devkit V1
- 3V3: Connected to VDD of OLED, VCC of DHT11
- GND: Connected to GND of OLED, GND of DHT11, GND of LCD, VCC- (GND) of Relay Module, GND of ACS712, GND of ZMPT101B
- D4: Connected to SCL of LCD
- D5: Connected to SDA of LCD
- D18: Connected to IN 1 of Relay Module
- D19: Connected to IN 2 of Relay Module
- D21: Connected to SDA of OLED
- D22: Connected to SCK of OLED
- D23: Connected to DOUT of DHT11
- D25: Connected to Pin 4 (out) of Pushbutton
- D26: Connected to Pin 4 (out) of Pushbutton
- D27: Connected to Pin 4 (out) of Pushbutton
- D34: Connected to OUT of ACS712
- D35: Connected to OUT of ZMPT101B
- VIN: Connected to VCC of ACS712, VCC of LCD, VCC+ of Relay Module, VCC of ZMPT101B, VCC of Turbidity Sensor
Pushbutton
- Pin 4 (out): Connected to D25, D26, D27 of ESP32
- Pin 2 (in): Connected to GND of ESP32, GND of ACS712, GND of ZMPT101B
KY-015 DHT11 Temperature-Humidity Sensor Module
- VCC: Connected to 3V3 of ESP32
- GND: Connected to GND of ESP32
- DOUT: Connected to D23 of ESP32
0.96" OLED
- VDD: Connected to 3V3 of ESP32
- GND: Connected to GND of ESP32
- SCK: Connected to D22 of ESP32
- SDA: Connected to D21 of ESP32
2 Channel Relay Module
- IN 1: Connected to D18 of ESP32
- IN 2: Connected to D19 of ESP32
- VCC+: Connected to VIN of ESP32
- VCC- (GND): Connected to GND of ESP32
- N.O. 2: Connected to 1 of ACS712
- COM 2: Connected to COM 1 of Relay Module
- N.O. 1: Connected to GND of Turbidity Sensor
Turbidity Sensor
- VCC: Connected to VIN of ESP32
- GND: Connected to N.O. 1 of Relay Module
BULB
- +: Connected to N.O. 2 of Relay Module
- -: Connected to +ve of AC Supply
ACS712 Current Sensor 5A 20A 30A
- 1: Connected to + of BULB
- 2: Connected to -ve of AC Supply
- GND: Connected to GND of ESP32
- OUT: Connected to D34 of ESP32
- VCC: Connected to VIN of ESP32
AC Supply
- +ve: Connected to - of BULB
- -ve: Connected to 2 of ACS712
LCD Screen 16x2 I2C
- SCL: Connected to D4 of ESP32
- SDA: Connected to D5 of ESP32
- VCC: Connected to VIN of ESP32
- GND: Connected to GND of ESP32
ZMPT101B
- OUT: Connected to D35 of ESP32
- GND: Connected to GND of ESP32
- VCC: Connected to VIN of ESP32
- NEUTRO: Connected to -ve of AC Supply
- FASE: Connected to + of BULB
Documented Code
/* Fill-in your Template ID (only if using Blynk.Cloud) */
#define BLYNK_TEMPLATE_ID "1908-0050-0123"
#define BLYNK_DEVICE_NAME "xxxx-xxxx-xxxx"
#define BLYNK_AUTH_TOKEN "xxxx-xxxx-xxxx"

// Your WiFi credentials.
// Set password to "" for open networks.
char ssid[] = "xxxx-xxxx-xxxx";
char pass[] = "1234-4567-8900";

#include <WiFi.h>
#include <BlynkSimpleEsp32.h>
#include <DHT.h>
#include <Preferences.h>
#include <AceButton.h>
#include <SPI.h>
#include <Wire.h>
#include <Adafruit_GFX.h>
#include <Adafruit_SSD1306.h>

using namespace ace_button;
Preferences pref;

#define DHTPIN            23 //D23  pin connected with DHT
// Uncomment whatever type you're using!
#define DHTTYPE DHT11     // DHT 11
//#define DHTTYPE DHT22   // DHT 22, AM2302, AM2321
//#define DHTTYPE DHT21   // DHT 21, AM2301

#define SCREEN_WIDTH 128 // OLED display width, in pixels
#define SCREEN_HEIGHT 64 // OLED display height, in pixels
#define OLED_RESET     -1 // Reset pin # (or -1 if sharing Arduino reset pin)
#define SCREEN_ADDRESS 0x3C ///< See datasheet for Address; 0x3D for 128x64, 0x3C for 128x32
Adafruit_SSD1306 display(SCREEN_WIDTH, SCREEN_HEIGHT, &Wire, OLED_RESET);

// Setpoint and setHumi values (in degrees Celsius)
float setTemp = 0;
float setHumi = 0;
float currentTemp = 0;
float currentHumi = 0;

// define the GPIO connected with Relays and Buttons
#define RelayPin1 18  //D18
#define RelayPin2 19  //D