
Arduino UNO Controlled Seven Segment Display with Pushbutton Interaction
View and Edit Project In Cirkit Designer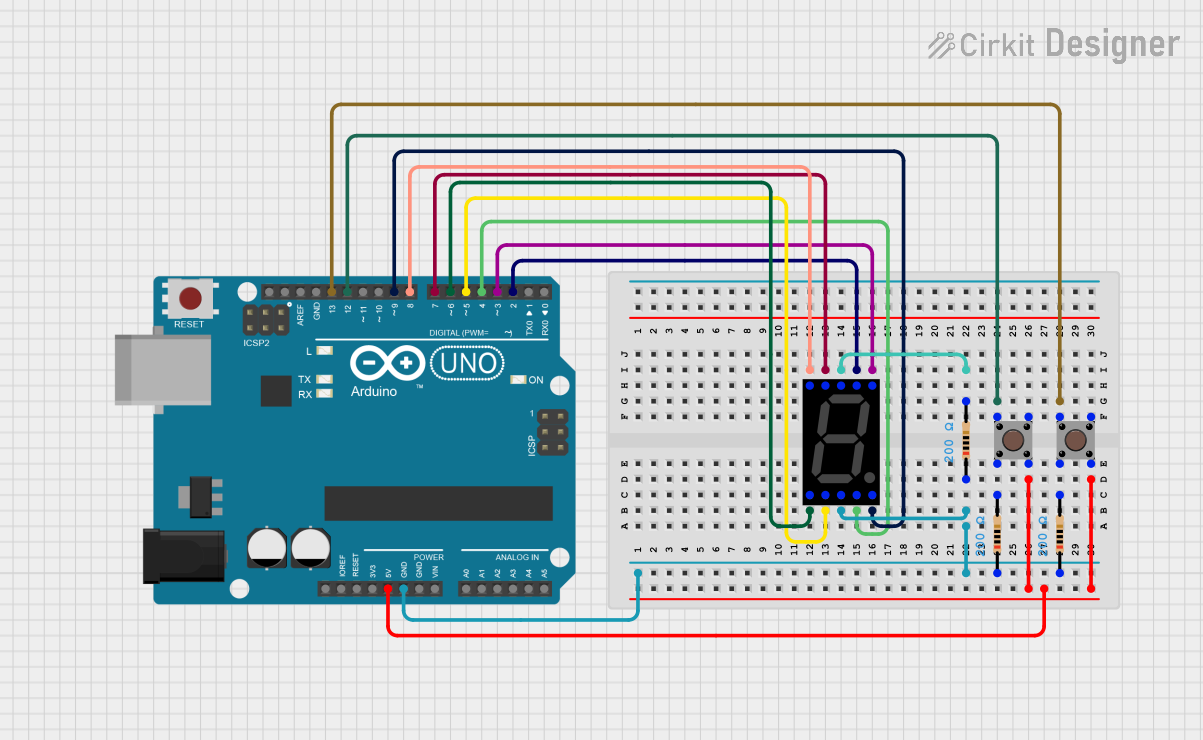
Circuit Documentation
Summary
This circuit is designed around an Arduino UNO microcontroller and includes a seven-segment display, multiple resistors, and pushbuttons. The Arduino UNO controls the seven-segment display to potentially show numbers or characters. The pushbuttons are likely used for user input to control the display or other functions within the circuit. The resistors are used to limit current, possibly for the protection of the LEDs in the seven-segment display and for the proper operation of the pushbuttons.
Component List
Arduino UNO
- Description: A microcontroller board based on the ATmega328P.
- Pins: UNUSED, IOREF, Reset, 3.3V, 5V, GND, Vin, A0-A5, SCL, SDA, AREF, D0-D13
Seven Segment Display (Wokwi Compatible)
- Description: An electronic display device for displaying decimal numerals.
- Pins: G, F, COM.2, B, A, E, D, COM.1, C, DP
Resistor (200 Ohms)
- Description: A passive two-terminal electrical component that implements electrical resistance as a circuit element.
- Resistance: 200 Ohms
Pushbutton
- Description: A simple switch mechanism for controlling some aspect of a machine or a process.
- Pins: Pin 3 (out), Pin 4 (out), Pin 1 (in), Pin 2 (in)
Wiring Details
Arduino UNO
- D2 connected to Seven Segment Display pin A
- D3 connected to Seven Segment Display pin B
- D4 connected to Seven Segment Display pin C
- D5 connected to Seven Segment Display pin D
- D6 connected to Seven Segment Display pin E
- D7 connected to Seven Segment Display pin F
- D8 connected to Seven Segment Display pin G
- D9 connected to Seven Segment Display pin DP
- D12 connected to Pushbutton 1 pin 1 (in)
- D13 connected to Pushbutton 2 pin 1 (in)
- GND connected to common ground via resistors
- 5V connected to Pushbutton 1 and 2 pin 4 (out)
Seven Segment Display (Wokwi Compatible)
- A, B, C, D, E, F, G, DP connected to corresponding Arduino UNO pins
- COM.1 connected to common ground via resistors
- COM.2 connected to Resistor (200 Ohms) pin 2
Resistor (200 Ohms)
- Three resistors each with one pin connected to Seven Segment Display COM.1 and the other pin to common ground
- One resistor with one pin connected to Seven Segment Display COM.2
Pushbutton 1
- Pin 1 (in) connected to Arduino UNO D12
- Pin 2 (in) connected to Resistor (200 Ohms)
- Pin 4 (out) connected to Arduino UNO 5V
Pushbutton 2
- Pin 1 (in) connected to Arduino UNO D13
- Pin 2 (in) connected to Resistor (200 Ohms)
- Pin 4 (out) connected to Arduino UNO 5V
Documented Code
Arduino UNO Code (sketch.ino)
void setup() {
  // put your setup code here, to run once:

}

void loop() {
  // put your main code here, to run repeatedly:

}
Note: The provided code is a template and does not include specific functionality. It needs to be filled in with the logic to control the seven-segment display and read the pushbuttons.