Cirkit Designer
Your all-in-one circuit design IDE
Home /
Project Documentation
Arduino UNO Based Ultrasonic Distance Measurement with Pushbutton Control
Circuit Documentation
Summary of the Circuit
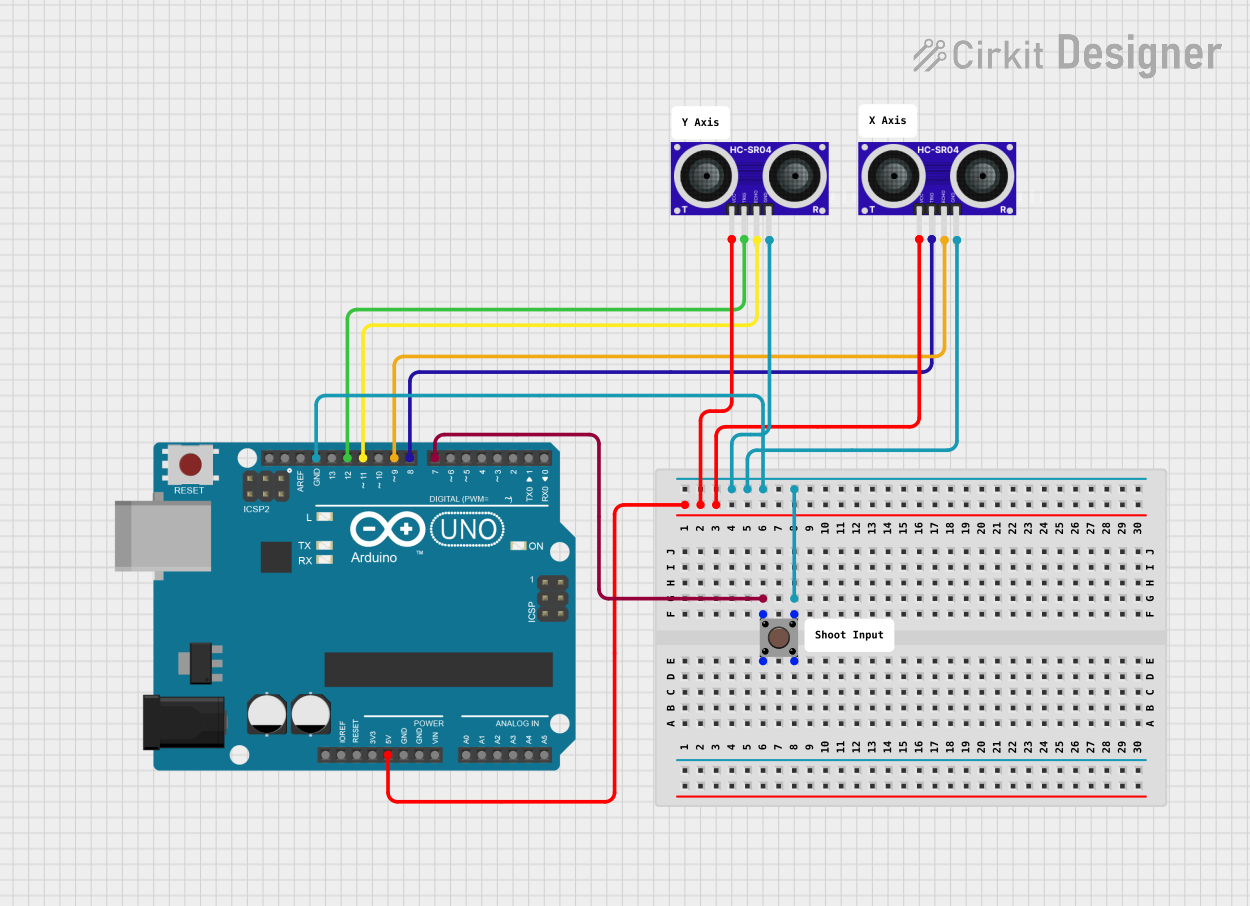
This circuit is designed around an Arduino UNO microcontroller and includes two HC-SR04 ultrasonic sensors and a pushbutton. The Arduino UNO is used to interface with the sensors and the pushbutton to perform specific tasks, which are defined in the embedded code. The HC-SR04 sensors are used for distance measurement, and the pushbutton serves as a user input device. The circuit is powered by the Arduino UNO's 5V output, and the ground connections are shared among all components.
Component List
Arduino UNO
- Description: A microcontroller board based on the ATmega328P.
- Pins: UNUSED, IOREF, Reset, 3.3V, 5V, GND, Vin, A0-A5, SCL, SDA, AREF, D0-D13.
HC-SR04 Ultrasonic Sensor (x2)
- Description: An ultrasonic distance sensor that measures distances by emitting ultrasonic waves and measuring the time taken for the echo to return.
- Pins: VCC, TRIG, ECHO, GND.
Pushbutton
- Description: A simple pushbutton acting as a digital input to trigger events.
- Pins: Pin 1 (in), Pin 2 (in), Pin 3 (out), Pin 4 (out).
Wiring Details
Arduino UNO
- 5V connected to VCC of both HC-SR04 sensors.
- GND connected to GND of both HC-SR04 sensors and Pin 3 (out) of the Pushbutton.
- D7 connected to Pin 1 (in) of the Pushbutton.
- D12 connected to TRIG of one HC-SR04 sensor.
- D11 connected to ECHO of the same HC-SR04 sensor.
- D9 connected to ECHO of the other HC-SR04 sensor.
- D8 connected to TRIG of the other HC-SR04 sensor.
HC-SR04 Ultrasonic Sensor
- VCC connected to 5V of Arduino UNO.
- GND connected to GND of Arduino UNO.
- TRIG connected to D12 or D8 of Arduino UNO (depending on the sensor).
- ECHO connected to D11 or D9 of Arduino UNO (depending on the sensor).
Pushbutton
- Pin 1 (in) connected to D7 of Arduino UNO.
- Pin 3 (out) connected to GND of Arduino UNO.
Documented Code
Arduino UNO Code (sketch.ino)
void setup() {
  // put your setup code here, to run once:

}

void loop() {
  // put your main code here, to run repeatedly:

}
Note: The provided code is a template and does not include specific functionality. It needs to be completed with the logic for interacting with the HC-SR04 sensors and the pushbutton.
Additional Files
- documentation.txt: This file is mentioned in the code input but contains no content. It is likely intended for additional notes or explanations related to the code or circuit operation.