
Arduino UNO Based Automated Soil Moisture Monitoring and Water Pump Control System
View and Edit Project In Cirkit Designer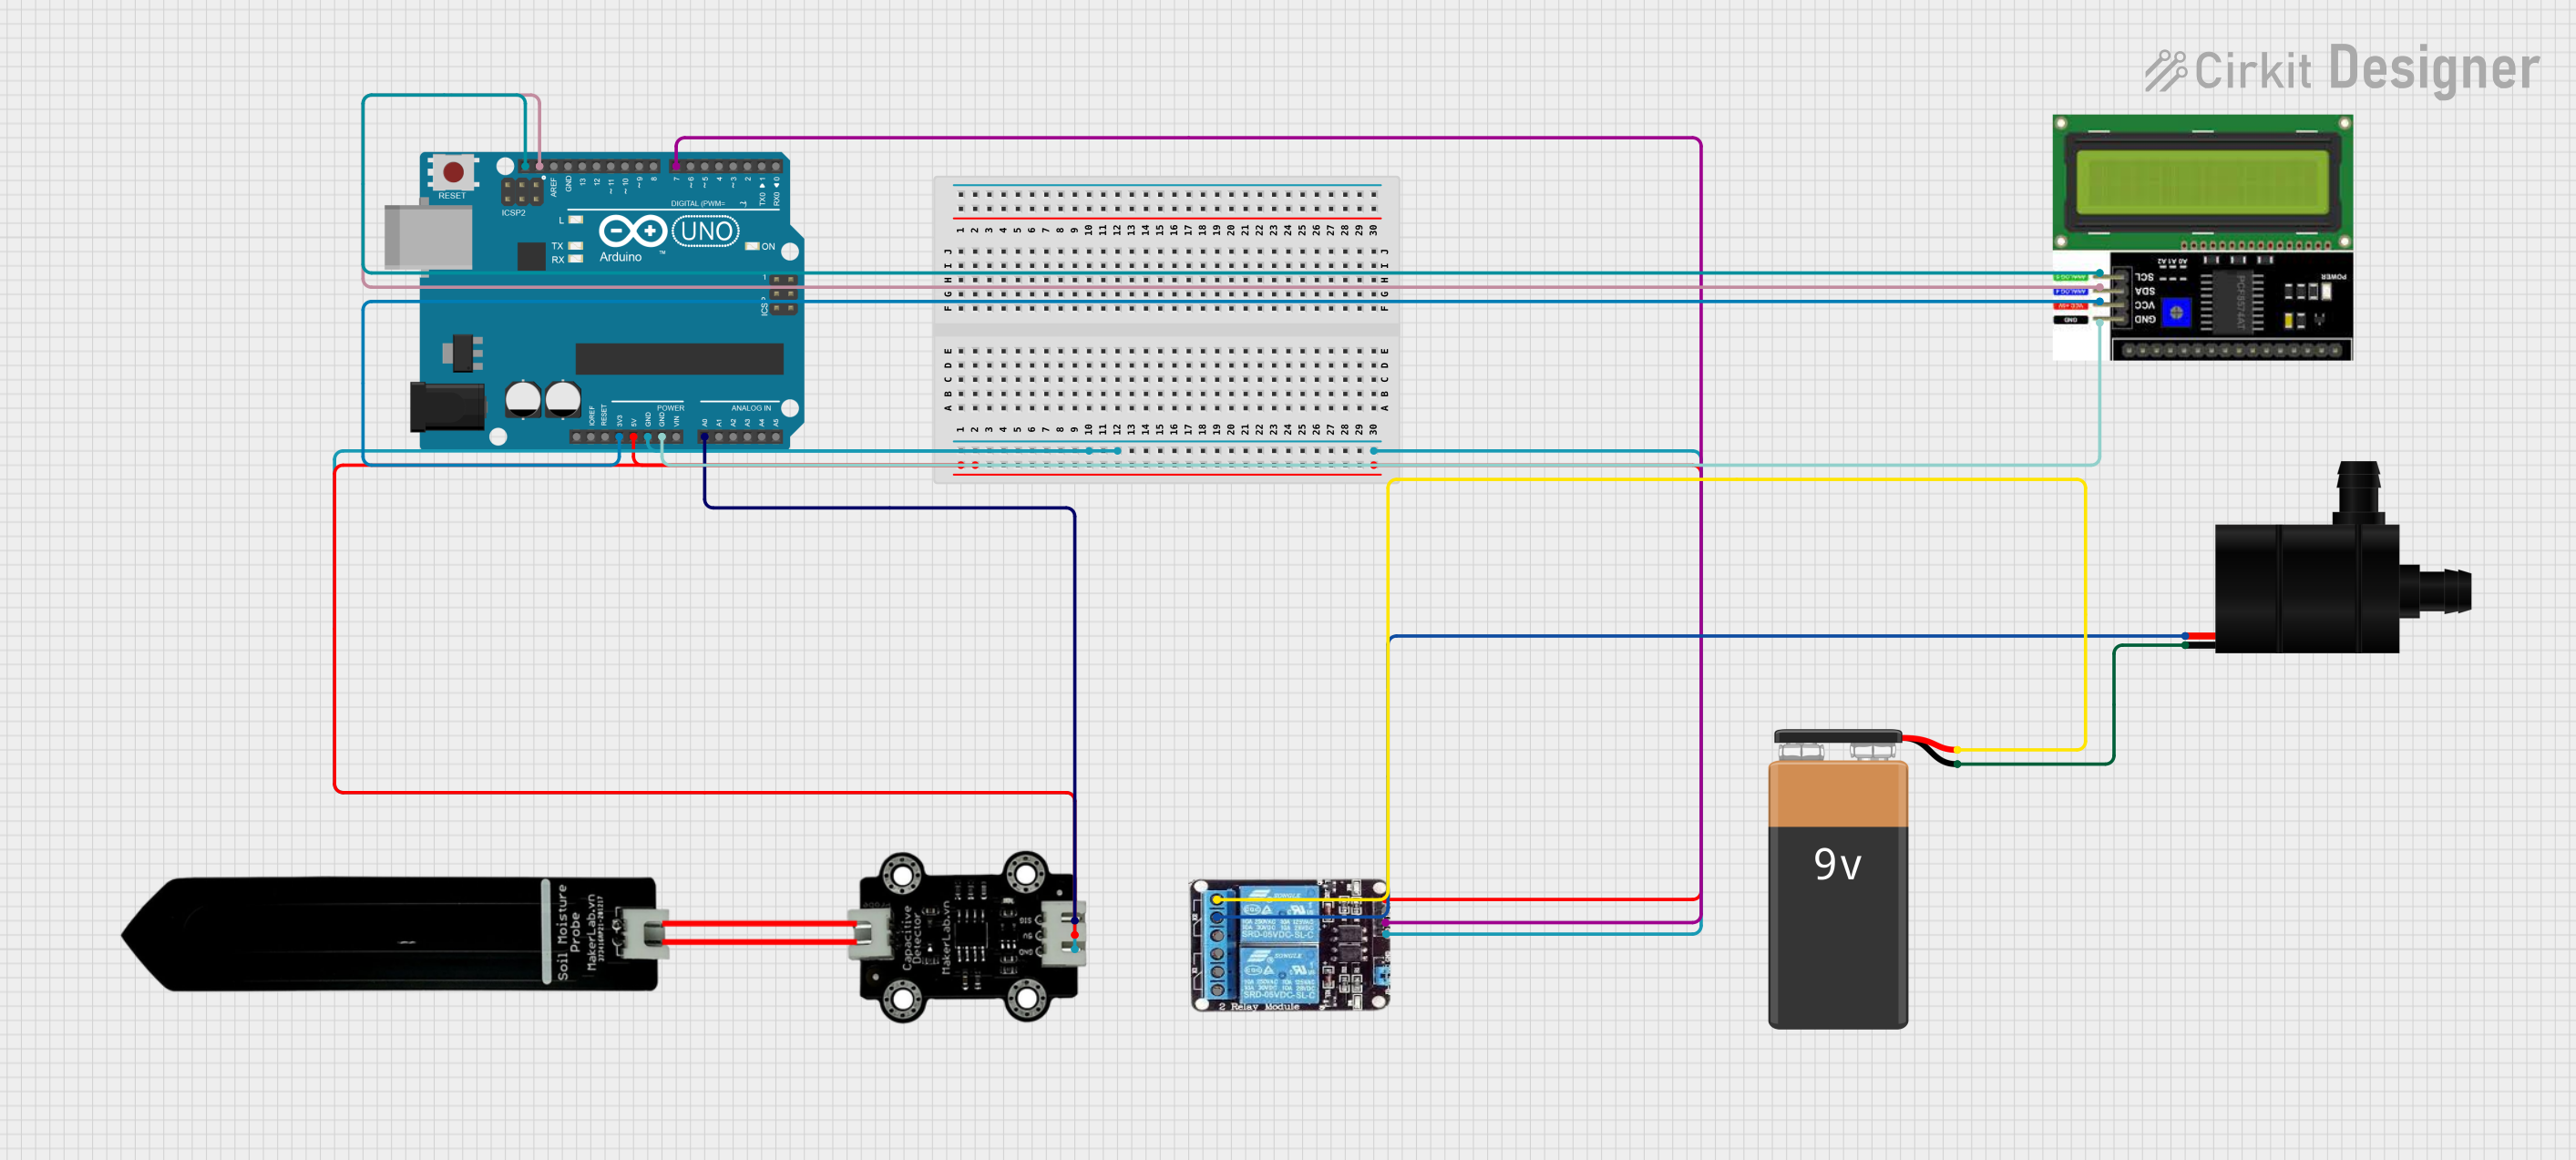
Automated Irrigation System Documentation
Summary
This document describes an automated irrigation system designed to monitor soil moisture levels and automatically water plants when the soil moisture falls below a predefined threshold. The system uses an Arduino UNO as the central processing unit, a soil moisture sensor to measure the moisture level, a 2-channel relay to control the water pump, and an LCD I2C display to provide a user interface. The system is powered by a 9V battery and controls the water pump based on the moisture readings.
Component List
Arduino UNO
- Microcontroller board based on the ATmega328P
- Provides digital and analog I/O pins
- Used for reading sensor data, controlling the relay, and communicating with the LCD display
MKE-S13 Soil Moisture Sensor
- Measures the moisture level in the soil
- Outputs an analog signal that is read by the Arduino UNO
2-Channel Relay
- Acts as an electrically operated switch
- Controls the power supply to the water pump
Water Pump
- Pumps water from a reservoir to the plants
- Controlled by the relay module
9V Battery
- Provides power to the relay and water pump
LCD I2C Display
- Displays the current soil moisture level and system status
- Uses I2C communication to interface with the Arduino UNO
Wiring Details
Arduino UNO
5Vpin connected to the5Vpins of the Soil Moisture Sensor and the 2-channel relayGNDpin connected to theGNDpins of the Soil Moisture Sensor, 2-channel relay, and LCD I2C Display3.3Vpin connected to theVCCpin of the LCD I2C DisplayA0pin connected to theSIGpin of the Soil Moisture SensorSCLpin connected to theSCLpin of the LCD I2C DisplaySDApin connected to theSDApin of the LCD I2C DisplayD7pin connected to theIN1pin of the 2-channel relay
MKE-S13 Soil Moisture Sensor
GNDpin connected to the Arduino UNOGND5Vpin connected to the Arduino UNO5VSIGpin connected to the Arduino UNOA0
2-Channel Relay
GNDpin connected to the Arduino UNOGNDVCCpin connected to the Arduino UNO5VIN1pin connected to the Arduino UNOD7COMpin connected to theVCCpin of the Water PumpNOpin connected to the+pin of the 9V Battery
Water Pump
VCCpin connected to theCOMpin of the 2-channel relayGNDpin connected to the-pin of the 9V Battery
9V Battery
+pin connected to theNOpin of the 2-channel relay-pin connected to theGNDpin of the Water Pump
LCD I2C Display
GNDpin connected to the Arduino UNOGNDVCCpin connected to the Arduino UNO3.3VSDApin connected to the Arduino UNOSDASCLpin connected to the Arduino UNOSCL
Documented Code
Arduino UNO Code
const int sensorPin = A0; // Pin sensor kelembapan tanah
const int relayPin = 7;   // Pin kontrol relay
const int threshold = 500; // Ambang batas kelembapan tanah

void setup() {
  pinMode(relayPin, OUTPUT);
  digitalWrite(relayPin, LOW); // Pastikan pompa mati saat startup
  Serial.begin(9600); // Untuk debugging
}

void loop() {
  int sensorValue = analogRead(sensorPin); // Baca nilai dari sensor kelembapan tanah

  Serial.print("Kelembapan Tanah: ");
  Serial.println(sensorValue); // Tampilkan nilai sensor ke serial monitor

  if (sensorValue < threshold) {
    digitalWrite(relayPin, HIGH); // Hidupkan pompa
    Serial.println("Pompa ON");
  } else {
    digitalWrite(relayPin, LOW); // Matikan pompa
    Serial.println("Pompa OFF");
  }

  delay(2000); // Tunggu 2 detik sebelum pembacaan berikutnya
}
This code is responsible for reading the soil moisture sensor data, comparing it to a predefined threshold, and controlling the relay to turn the water pump on or off accordingly. It also sends the soil moisture readings to the serial monitor for debugging purposes.
Relay Module Code
void setup() {
  // No setup code required for relay module
}

void loop() {
  // No loop code required for relay module
}
The relay module does not require any specific code as it is directly controlled by the Arduino UNO through one of its digital pins.
9V Battery Code
void setup() {
  // No setup code required for the battery
}

void loop() {
  // No loop code required for the battery
}
The 9V battery does not require any code as it is a power source.