Cirkit Designer
Your all-in-one circuit design IDE
Home /
Project Documentation
Arduino UNO 4-Digit Seven Segment Display Counter
Circuit Documentation
Summary
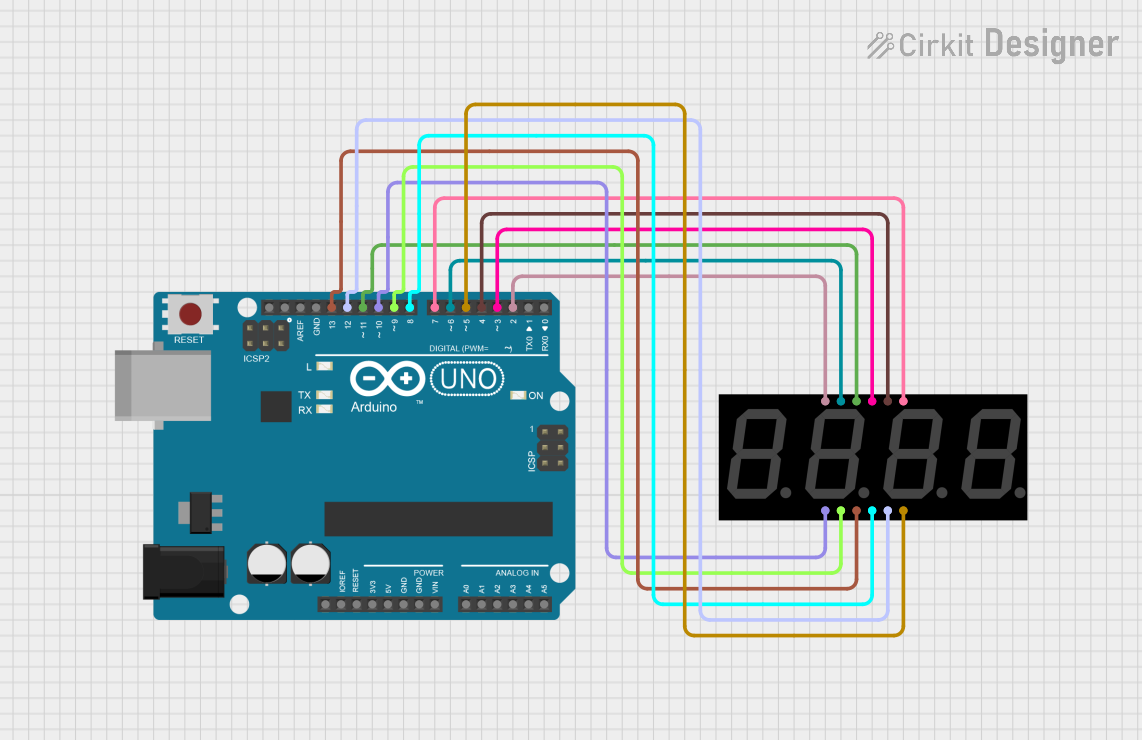
This circuit utilizes an Arduino UNO microcontroller to control a 4 Digit Seven Segment Display. The display is used to show a counter that increments every deci-second. The Arduino is programmed to manage the display and update the count accordingly.
Component List
Arduino UNO
- Description: A microcontroller board based on the ATmega328P. It is used for various electronic projects and is programmable via the Arduino IDE.
- Purpose: Acts as the main controller for the circuit, managing the logic and timing for the display.
4 Digit Seven Segment Display
- Description: A display module that consists of four 7-segment displays, allowing for the representation of decimal numbers.
- Purpose: Displays the counter value from the Arduino, showing the elapsed time in deci-seconds.
Wiring Details
Arduino UNO
- Pin D13 connected to DP of the 4 Digit Seven Segment Display
- Pin D12 connected to G of the 4 Digit Seven Segment Display
- Pin D11 connected to F of the 4 Digit Seven Segment Display
- Pin D10 connected to E of the 4 Digit Seven Segment Display
- Pin D9 connected to D of the 4 Digit Seven Segment Display
- Pin D8 connected to C of the 4 Digit Seven Segment Display
- Pin D7 connected to B of the 4 Digit Seven Segment Display
- Pin D6 connected to A of the 4 Digit Seven Segment Display
- Pin D5 connected to DIG4 of the 4 Digit Seven Segment Display
- Pin D4 connected to DIG3 of the 4 Digit Seven Segment Display
- Pin D3 connected to DIG2 of the 4 Digit Seven Segment Display
- Pin D2 connected to DIG1 of the 4 Digit Seven Segment Display
Documented Code
/* SevSeg Counter Example

 Copyright 2017 Dean Reading

 Licensed under the Apache License, Version 2.0 (the "License");
 you may not use this file except in compliance with the License.
 You may obtain a copy of the License at
 http://www.apache.org/licenses/LICENSE-2.0

 Unless required by applicable law or agreed to in writing, software
 distributed under the License is distributed on an "AS IS" BASIS,
 WITHOUT WARRANTIES OR CONDITIONS OF ANY KIND, either express or implied.
 See the License for the specific language governing permissions and
 limitations under the License.


 This example demonstrates a very simple use of the SevSeg library with a 4
 digit display. It displays a counter that counts up, showing deci-seconds.
 */

#include "SevSeg.h"
SevSeg sevseg; //Instantiate a seven segment controller object

void setup() {
  byte numDigits = 4;
  byte digitPins[] = {2, 3, 4, 5};
  byte segmentPins[] = {6, 7, 8, 9, 10, 11, 12, 13};
  bool resistorsOnSegments = false; // 'false' means resistors are on digit pins
  byte hardwareConfig = COMMON_ANODE; // See README.md for options
  bool updateWithDelays = false; // Default 'false' is Recommended
  bool leadingZeros = false; // Use 'true' if you'd like to keep the leading zeros
  bool disableDecPoint = false; // Use 'true' if your decimal point doesn't exist or isn't connected

  sevseg.begin(hardwareConfig, numDigits, digitPins, segmentPins, resistorsOnSegments,
  updateWithDelays, leadingZeros, disableDecPoint);
  sevseg.setBrightness(90);
}

void loop() {
  static unsigned long timer = millis();
  static int deciSeconds = 0;

  if (millis() - timer >= 100) {
    timer += 100;
    deciSeconds++; // 100 milliSeconds is equal to 1 deciSecond

    if (deciSeconds == 10000) { // Reset to 0 after counting for 1000 seconds.
      deciSeconds=0;
    }
    sevseg.setNumber(deciSeconds, 1);
  }

  sevseg.refreshDisplay(); // Must run repeatedly
}

/// END ///
This documentation provides a comprehensive overview of the circuit, detailing the components used, their connections, and the code that drives the functionality of the display.