
Bluetooth-Controlled Robotic Vehicle with Brushless Motor and Servo Steering
View and Edit Project In Cirkit Designer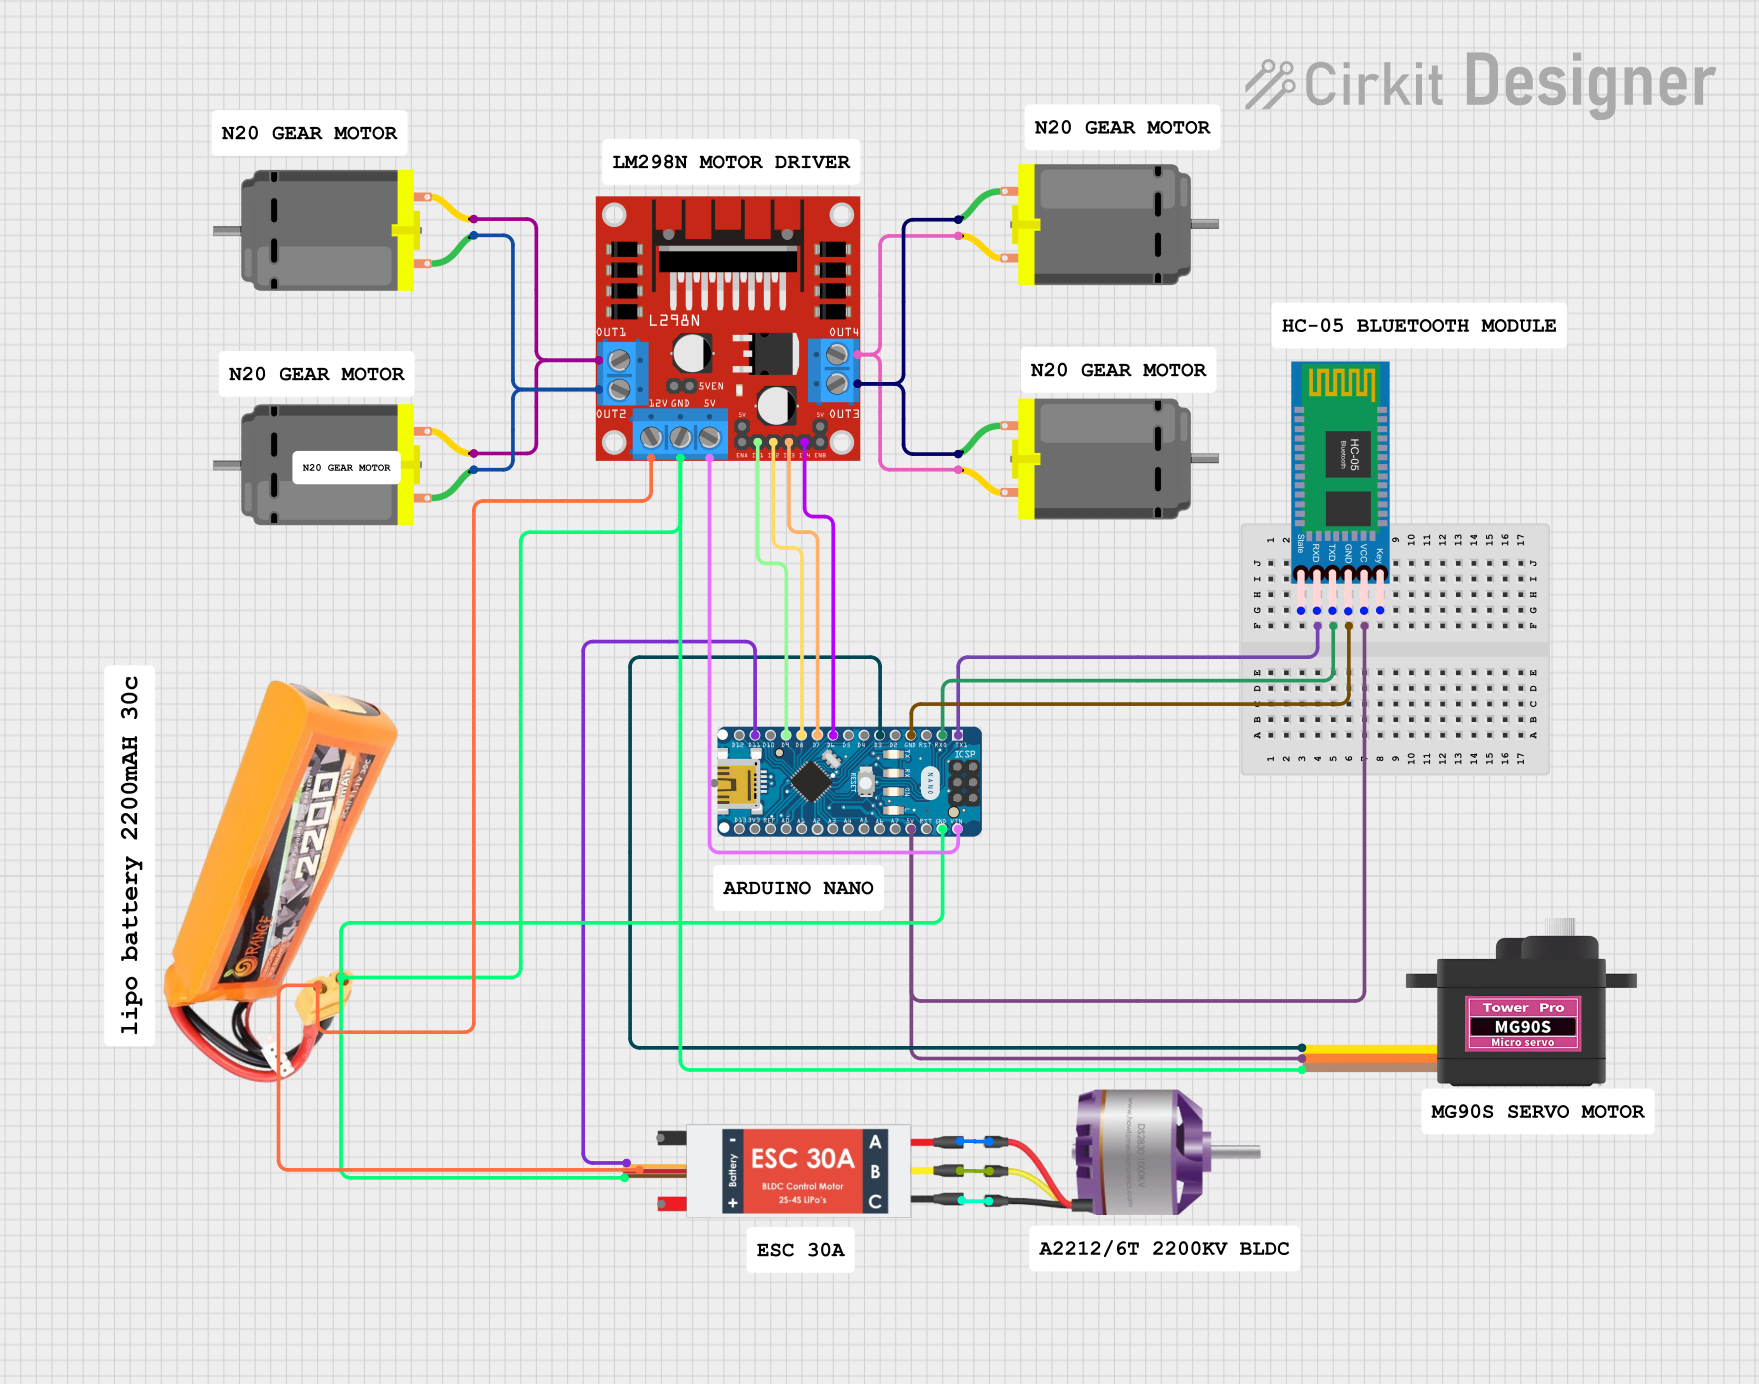
Circuit Documentation
Summary
The circuit in question is designed to control multiple DC motors, a brushless motor, and a servomotor using an Arduino Nano as the central microcontroller. It includes a Bluetooth module for wireless communication, an L298N motor driver to control the DC motors, an Electronic Speed Controller (ESC) for the brushless motor, and a LiPo battery as the power source. The circuit is intended for applications where precise motor control is required, such as in robotics or remote-controlled vehicles.
Component List
- DC Motors: Four DC motors are included for driving mechanisms that require rotational movement.
- LiPo Battery (2200mAh, 30C): Provides the power supply for the motors and the electronic components.
- Brushless Motor: A single brushless motor is used for applications that require high speed and efficiency.
- L298N DC Motor Driver: This component is responsible for controlling the direction and speed of the DC motors.
- Servomotor MG90S: A small and precise servomotor for controlling angular position.
- Electronic Speed Controller (ESC): Manages the speed of the brushless motor.
- HC-05 Bluetooth Module: Allows for wireless communication with the Arduino Nano.
- Arduino Nano: Acts as the central microcontroller, running the embedded code to control the entire circuit.
Wiring Details
DC Motors
- DC Motor 1 & 2: Connected in parallel to OUT1 and OUT2 of the L298N motor driver.
- DC Motor 3 & 4: Connected in parallel to OUT3 and OUT4 of the L298N motor driver.
LiPo Battery
- VCC: Connected to the 5v out of the ESC and 12V of the L298N motor driver.
- GND: Common ground with the Servomotor MG90S, ESC, L298N motor driver, and Arduino Nano.
Brushless Motor
- L1, L2, L3: Connected to M1, M2, M3 of the ESC, respectively.
L298N DC Motor Driver
- 12V: Powered by the LiPo battery.
- GND: Common ground.
- 5V: Connected to the VIN of the Arduino Nano.
- IN1, IN2, IN3, IN4: Controlled by D9, D8, D7, D6 of the Arduino Nano, respectively.
Servomotor MG90S
- SIG: Controlled by D3 of the Arduino Nano.
- VCC: Powered by the 5V output of the Arduino Nano.
- GND: Common ground.
Electronic Speed Controller (ESC)
- Battery VCC: Connected to the VCC of the LiPo battery.
- Battery GND: Common ground.
- Signal: Controlled by D11/MOSI of the Arduino Nano.
- 5v out: Powers the LiPo battery.
- GND out: Common ground.
HC-05 Bluetooth Module
- RXD: Connected to D1/TX of the Arduino Nano.
- TXD: Connected to D0/RX of the Arduino Nano.
- VCC: Powered by the 5V output of the Arduino Nano.
- GND: Common ground.
Arduino Nano
- D1/TX: Sends data to RXD of the HC-05 Bluetooth Module.
- D0/RX: Receives data from TXD of the HC-05 Bluetooth Module.
- 5V: Powers the HC-05 Bluetooth Module and Servomotor MG90S.
- GND: Common ground.
- VIN: Receives 5V from the L298N motor driver.
- D3, D6, D7, D8, D9, D11/MOSI: Control signals for the Servomotor MG90S, L298N motor driver, and ESC.
Documented Code
Arduino Nano Code
void setup() {
  // put your setup code here, to run once:

}

void loop() {
  // put your main code here, to run repeatedly:

}
This code is a placeholder and should be replaced with the actual logic to control the motors and communicate with the Bluetooth module.
Brushless Motor Control Code (Attached to ESC)
#include <Servo.h>

Servo esc; // Create a servo object to control the ESC

void setup() {
  esc.attach(9); // Attach the ESC on pin 9
  esc.writeMicroseconds(1000); // Send the minimum signal to the ESC
  delay(1000); // Wait for 1 second
}

void loop() {
  int throttle = 1500; // Set the throttle signal (microseconds)
  esc.writeMicroseconds(throttle); // Send the throttle signal to the ESC
  delay(10000); // Run the motor at the set throttle for 10 seconds

  esc.writeMicroseconds(1000); // Stop the motor by sending the minimum signal
  delay(5000); // Wait for 5 seconds before the next loop iteration
}
This code is designed to control the brushless motor via the ESC. It sets a throttle value and runs the motor for a specified time before stopping.
Servomotor MG90S Control Code
#include <Servo.h>

Servo myservo;  // create servo object to control the MG90S

void setup() {
  myservo.attach(9);  // attaches the servo on pin 9 to the servo object
}

void loop() {
  myservo.write(90);  // sets the servo position to 90°
  delay(1000);        // waits for a second
  myservo.write(0);   // sets the servo to position 0°
  delay(1000);        // waits for a second
}
This code is used to control the position of the Servomotor MG90S. It alternates the servo position between 0 and 90 degrees.
Note: The code provided for each microcontroller is specific to its function within the circuit. The Arduino Nano code is a template and should be completed with the appropriate logic for the desired application. The ESC and Servomotor codes are examples of how to control these components using the Arduino Nano.