
Arduino UNO-Based Object Detection System with OLED Display and OV7670 Camera Module
View and Edit Project In Cirkit Designer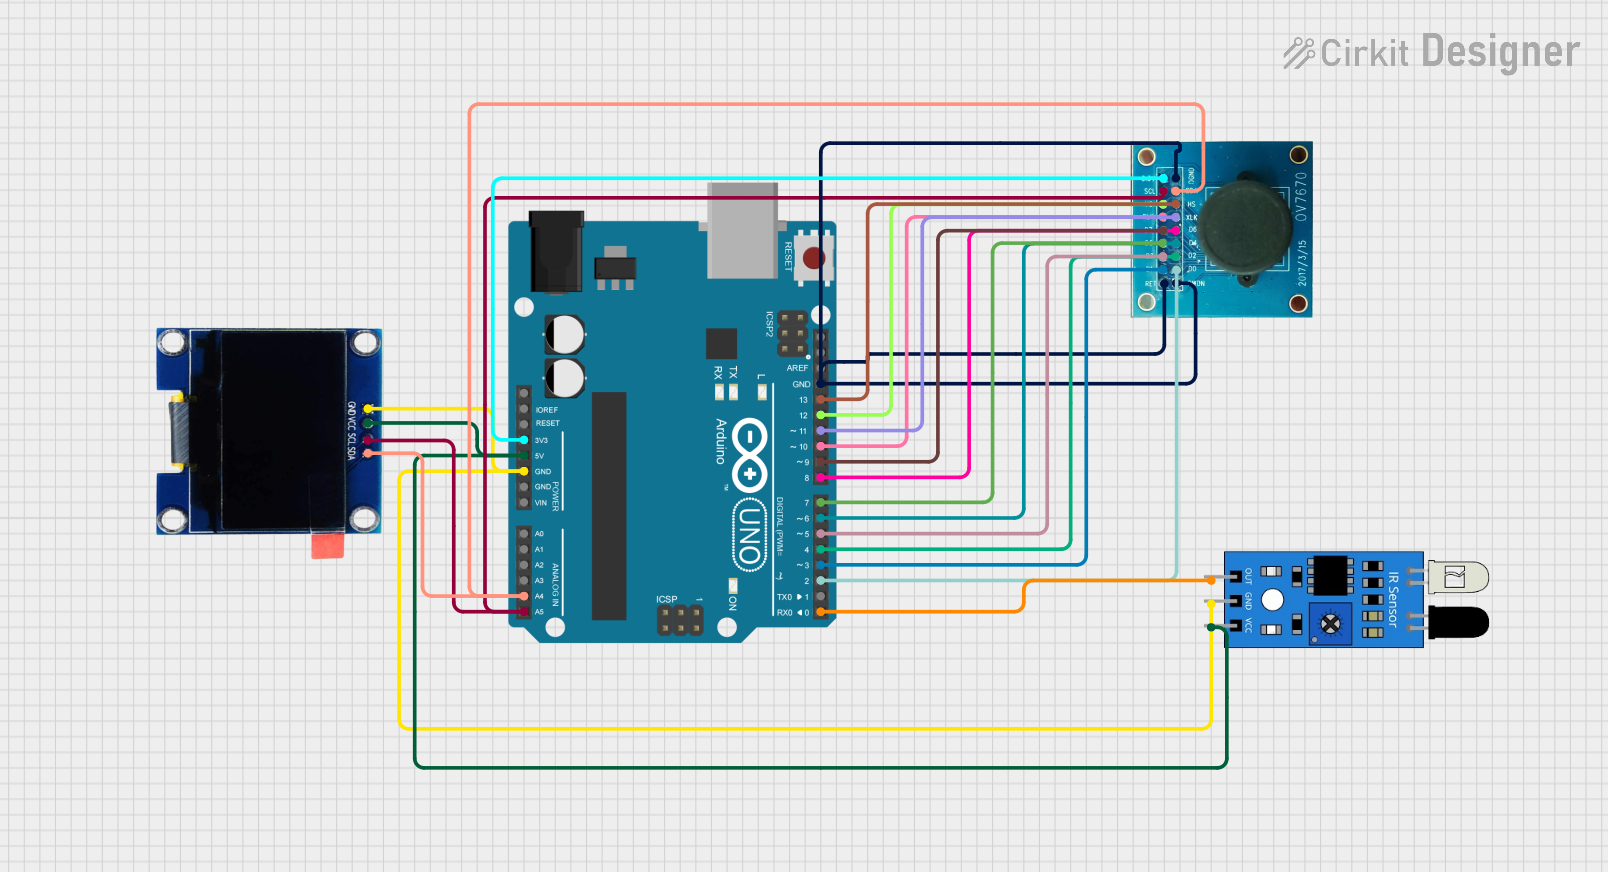
Circuit Documentation
Summary
The circuit in question is designed to interface an Arduino UNO microcontroller with an OLED display, an OV7670 camera module, and an infrared (IR) sensor. The Arduino UNO serves as the central processing unit, controlling the data flow and interactions between the sensor, the camera, and the display. The IR sensor is used to detect the presence of objects, triggering the camera to capture an image which is then displayed on the OLED screen.
Component List
Arduino UNO
- Description: A microcontroller board based on the ATmega328P.
- Purpose: Acts as the central controller for the circuit, interfacing with the OLED display, camera module, and IR sensor.
- Pins: IOREF, Reset, 3.3V, 5V, GND, Vin, A0-A5, SCL, SDA, AREF, D0-D13.
OLED 1.3"
- Description: A small graphics display screen with an I2C interface.
- Purpose: To display images or information captured by the camera module.
- Pins: GND, VCC, SCL, SDA.
OV7670 Camera Module
- Description: A low-cost image sensor that provides VGA resolution.
- Purpose: Captures images to be processed and displayed by the Arduino and OLED.
- Pins: RET, PWDN, D0-D7, PLK, XLK, VS, HS, SCL, SDA, 3.3V, DGND.
IR Sensor
- Description: A sensor that detects infrared light, often used in proximity sensors.
- Purpose: Detects the presence of objects, triggering the camera to capture an image.
- Pins: Out, GND, VCC.
Wiring Details
Arduino UNO
- GND connected to IR Sensor GND, OLED GND, OV7670 RET, PWDN, DGND.
- 5V connected to IR Sensor VCC, OLED VCC.
- A4 (SDA) connected to OLED SDA, OV7670 SDA.
- A5 (SCL) connected to OLED SCL, OV7670 SCL.
- 3.3V connected to OV7670 3.3V.
- D0 connected to IR Sensor Out.
- D2-D13 connected to OV7670 D0-D7, PLK, XLK, VS, HS respectively.
OLED 1.3"
- GND connected to Arduino GND.
- VCC connected to Arduino 5V.
- SCL connected to Arduino A5.
- SDA connected to Arduino A4.
OV7670 Camera Module
- RET, PWDN, DGND connected to Arduino GND.
- D0-D7 connected to Arduino D2-D9 respectively.
- PLK connected to Arduino D10.
- XLK connected to Arduino D11.
- VS connected to Arduino D12.
- HS connected to Arduino D13.
- SCL connected to Arduino A5.
- SDA connected to Arduino A4.
- 3.3V connected to Arduino 3.3V.
IR Sensor
- Out connected to Arduino D0.
- GND connected to Arduino GND.
- VCC connected to Arduino 5V.
Documented Code
#include <Wire.h>
#include <Adafruit_GFX.h>
#include <Adafruit_SSD1306.h>

#define SCREEN_WIDTH 128
#define SCREEN_HEIGHT 64
#define OLED_RESET    -1
Adafruit_SSD1306 display(SCREEN_WIDTH, SCREEN_HEIGHT, &Wire, OLED_RESET);

const int irSensorPin = 0; // IR sensor output connected to D0
const int cameraPins[] = {2, 3, 4, 5, 6, 7, 8, 9, 10, 11, 12, 13};

void setup() {
  // Initialize serial communication
  Serial.begin(9600);

  // Initialize IR sensor pin
  pinMode(irSensorPin, INPUT);

  // Initialize camera pins
  for (int i = 0; i < 12; i++) {
    pinMode(cameraPins[i], OUTPUT);
  }

  // Initialize OLED display
  if (!display.begin(0x3C)) { // Replaced SSD1306_I2C_ADDRESS with 0x3C
    Serial.println(F("SSD1306 allocation failed"));
    for (;;);
  }
  display.display();
  delay(2000);
  display.clearDisplay();
}

void loop() {
  // Check if IR sensor detects an object
  if (digitalRead(irSensorPin) == HIGH) {
    // Capture image from camera
    captureImage();

    // Display image on OLED
    displayImage();
  }
}

void captureImage() {
  // Placeholder function to simulate image capture
  Serial.println("Image captured");
}

void displayImage() {
  // Placeholder function to simulate image display
  display.clearDisplay();
  display.setTextSize(1);
  display.setTextColor(SSD1306_WHITE);
  display.setCursor(0, 0);
  display.println("Displaying Image");
  display.display();
}
This code is designed to run on the Arduino UNO microcontroller. It initializes the OLED display and sets up the IR sensor and camera pins. In the main loop, it checks for the presence of an object using the IR sensor. If an object is detected, it simulates capturing an image with the camera and displays a message on the OLED screen.