
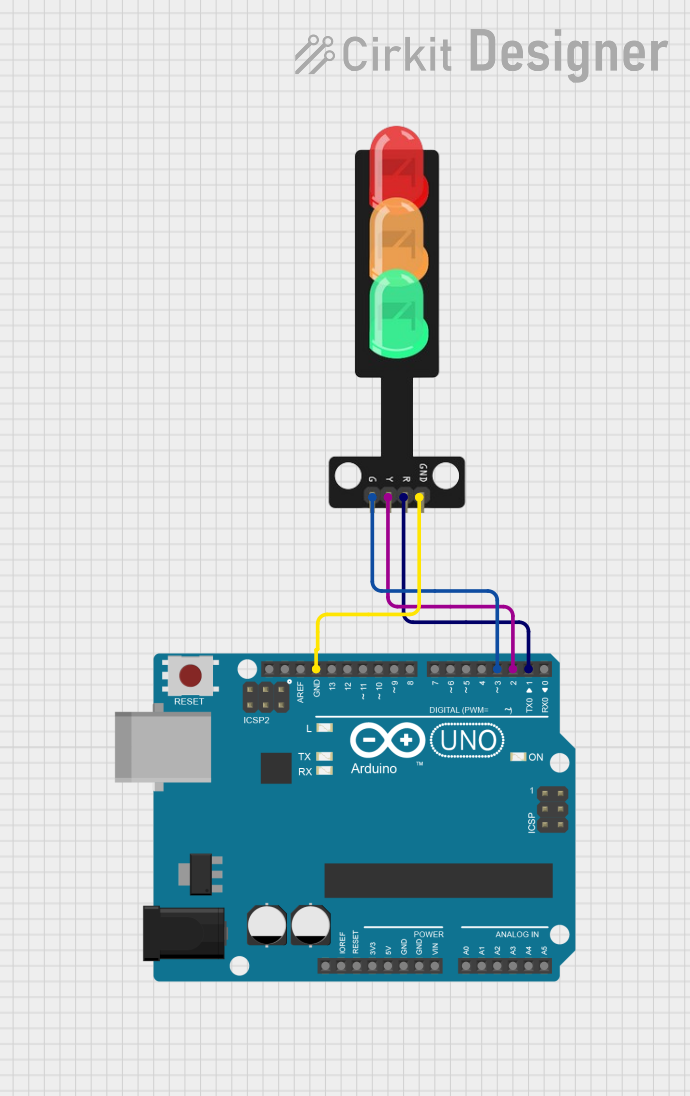
Traffic Light Control Circuit Documentation
Summary
This document describes a simple traffic light control system designed using an Arduino UNO microcontroller and a traffic light module with three LEDs (Green, Yellow, and Red). The system operates by cycling through the LEDs in a typical traffic light sequence: green light on for 5 seconds, followed by yellow light for 2 seconds, and then red light for 5 seconds. This sequence repeats indefinitely to simulate a traffic light control system.
Component List
Arduino UNO
- Description: A microcontroller board based on the ATmega328P.
- Purpose: Acts as the control unit for the traffic light system.
- Pins Used: D3, D2, D1, GND.
Traffic Light
- Description: A module with three LEDs representing a traffic light.
- Purpose: To display the traffic light sequence.
- Pins Used: Green, Yellow, Red, GND.
Wiring Details
Arduino UNO
- D3: Connected to the Green LED on the Traffic Light.
- D2: Connected to the Yellow LED on the Traffic Light.
- D1: Connected to the Red LED on the Traffic Light.
- GND: Connected to the GND pin on the Traffic Light.
Traffic Light
- Green: Connected to D3 on the Arduino UNO.
- Yellow: Connected to D2 on the Arduino UNO.
- Red: Connected to D1 on the Arduino UNO.
- GND: Connected to the GND pin on the Arduino UNO.
Documented Code
/*
 * This Arduino sketch controls a traffic light system.
 * The sequence is as follows:
 * - Green LED on for 5 seconds
 * - Yellow LED on for 2 seconds
 * - Red LED on for 5 seconds
 * The sequence repeats indefinitely.
 */

// Pin definitions
const int greenPin = 3; // Arduino UNO D3
const int yellowPin = 2; // Arduino UNO D2
const int redPin = 1; // Arduino UNO D1

void setup() {
  // Initialize the digital pins as outputs
  pinMode(greenPin, OUTPUT);
  pinMode(yellowPin, OUTPUT);
  pinMode(redPin, OUTPUT);
}

void loop() {
  // Green LED on for 5 seconds
  digitalWrite(greenPin, HIGH);
  delay(5000);
  digitalWrite(greenPin, LOW);

  // Yellow LED on for 2 seconds
  digitalWrite(yellowPin, HIGH);
  delay(2000);
  digitalWrite(yellowPin, LOW);

  // Red LED on for 5 seconds
  digitalWrite(redPin, HIGH);
  delay(5000);
  digitalWrite(redPin, LOW);
}
Filename: sketch.ino
This code is responsible for controlling the traffic light sequence. It initializes the digital pins connected to the LEDs as outputs and then sets each LED to high in turn, with appropriate delays to simulate a traffic light.