
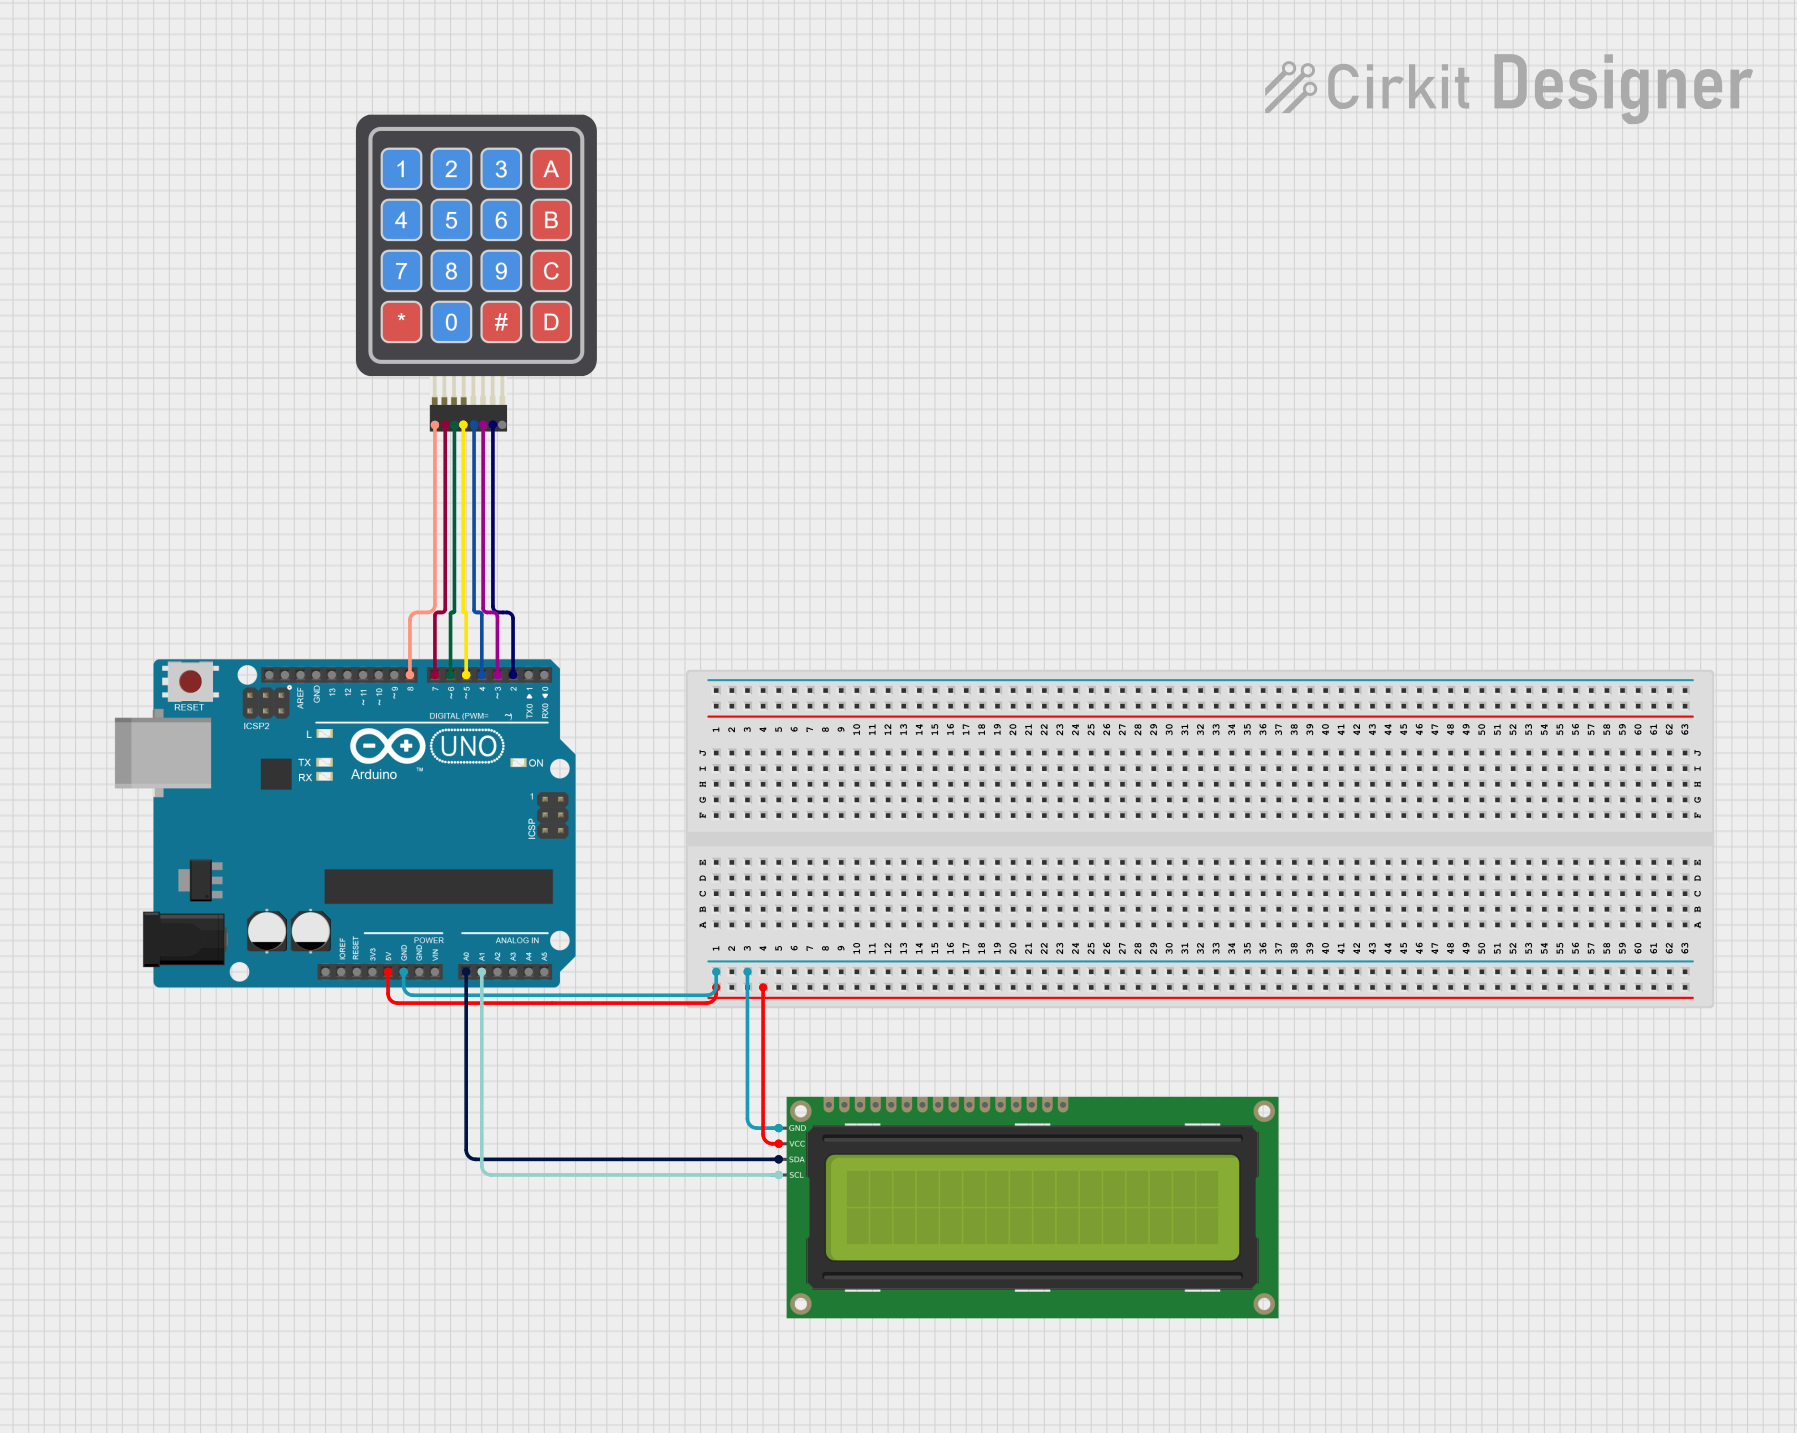
Circuit Documentation
Summary
This circuit consists of an Arduino UNO microcontroller, a 16x2 I2C LCD display, and a 4x4 Keypad. The Arduino UNO serves as the central controller, interfacing with the LCD to display messages and with the keypad to receive user input. The LCD is connected via I2C protocol, while the keypad is connected through digital I/O pins.
Component List
16x2 I2C LCD
- Description: A 16x2 character LCD display with I2C interface.
- Pins: GND, VCC, SDA, SCL
Arduino UNO
- Description: A microcontroller board based on the ATmega328P.
- Pins: UNUSED, IOREF, Reset, 3.3V, 5V, GND, Vin, A0, A1, A2, A3, A4, A5, SCL, SDA, AREF, D13, D12, D11, D10, D9, D8, D7, D6, D5, D4, D3, D2, D1, D0
4x4 Keypad (Simulator)
- Description: A 4x4 matrix keypad used for user input.
- Pins: R1, C4, R2, C2, R3, R4, C1, C3
Wiring Details
16x2 I2C LCD
- VCC: Connected to Arduino UNO 5V
- GND: Connected to Arduino UNO GND
- SDA: Connected to Arduino UNO A0
- SCL: Connected to Arduino UNO A1
Arduino UNO
- 5V: Connected to 16x2 I2C LCD VCC
- GND: Connected to 16x2 I2C LCD GND
- A0: Connected to 16x2 I2C LCD SDA
- A1: Connected to 16x2 I2C LCD SCL
- D8: Connected to 4x4 Keypad R1
- D7: Connected to 4x4 Keypad R2
- D6: Connected to 4x4 Keypad R3
- D5: Connected to 4x4 Keypad R4
- D4: Connected to 4x4 Keypad C1
- D3: Connected to 4x4 Keypad C2
- D2: Connected to 4x4 Keypad C3
4x4 Keypad (Simulator)
- R1: Connected to Arduino UNO D8
- R2: Connected to Arduino UNO D7
- R3: Connected to Arduino UNO D6
- R4: Connected to Arduino UNO D5
- C1: Connected to Arduino UNO D4
- C2: Connected to Arduino UNO D3
- C3: Connected to Arduino UNO D2
Code Documentation
#include <Wire.h>
#include <LiquidCrystal_I2C.h>
#include <Keypad.h>

// Configuração do display I2C
LiquidCrystal_I2C lcd(0x27, 16, 2); // Endereço I2C pode variar (0x27 ou 0x3F)

// Configuração do Keypad
const byte ROWS = 4; // Número de linhas
const byte COLS = 3; // Número de colunas utilizadas

// Mapeamento das teclas do keypad
char keys[ROWS][COLS] = {
  {'1', '2', '3'},
  {'4', '5', '6'},
  {'7', '8', '9'},
  {'*', '0', '#'}
};

// Pinos conectados às linhas e colunas do keypad
byte rowPins[ROWS] = {8, 7, 6, 5};    // Linhas (R1, R2, R3, R4)
byte colPins[COLS] = {4, 3, 2};       // Colunas (C1, C2, C3)

// Inicialização do Keypad
Keypad keypad = Keypad(makeKeymap(keys), rowPins, colPins, ROWS, COLS);

// Variáveis para armazenar o código digitado
String code = "";

void setup() {
  // Inicialização do display
  lcd.begin();
  lcd.backlight();
  lcd.setCursor(0, 0);
  lcd.print("Digite o codigo:");
}

void loop() {
  char key = keypad.getKey(); // Lê a tecla pressionada

  if (key) { // Se uma tecla foi pressionada
    if (key == '#') {
      // Confirmação do código
      lcd.clear();
      lcd.setCursor(0, 0);
      lcd.print("Codigo: " + code);
      delay(2000);

      // Limpa o display e reinicia o código
      lcd.clear();
      lcd.setCursor(0, 0);
      lcd.print("Digite o codigo:");
      code = "";
    } else if (key >= '0' && key <= '9') {
      // Adiciona o número ao código e exibe no display
      code += key;
      lcd.setCursor(0, 1);
      lcd.print(code);
    }
  }
}
This code initializes the I2C LCD and the keypad, then continuously reads input from the keypad. When a key is pressed, it updates the display accordingly. If the '#' key is pressed, it confirms the entered code, displays it, and then resets the display for a new input.