
Arduino UNO I2C LCD Display Tester with 12V Battery and Step-Down Converter
View and Edit Project In Cirkit Designer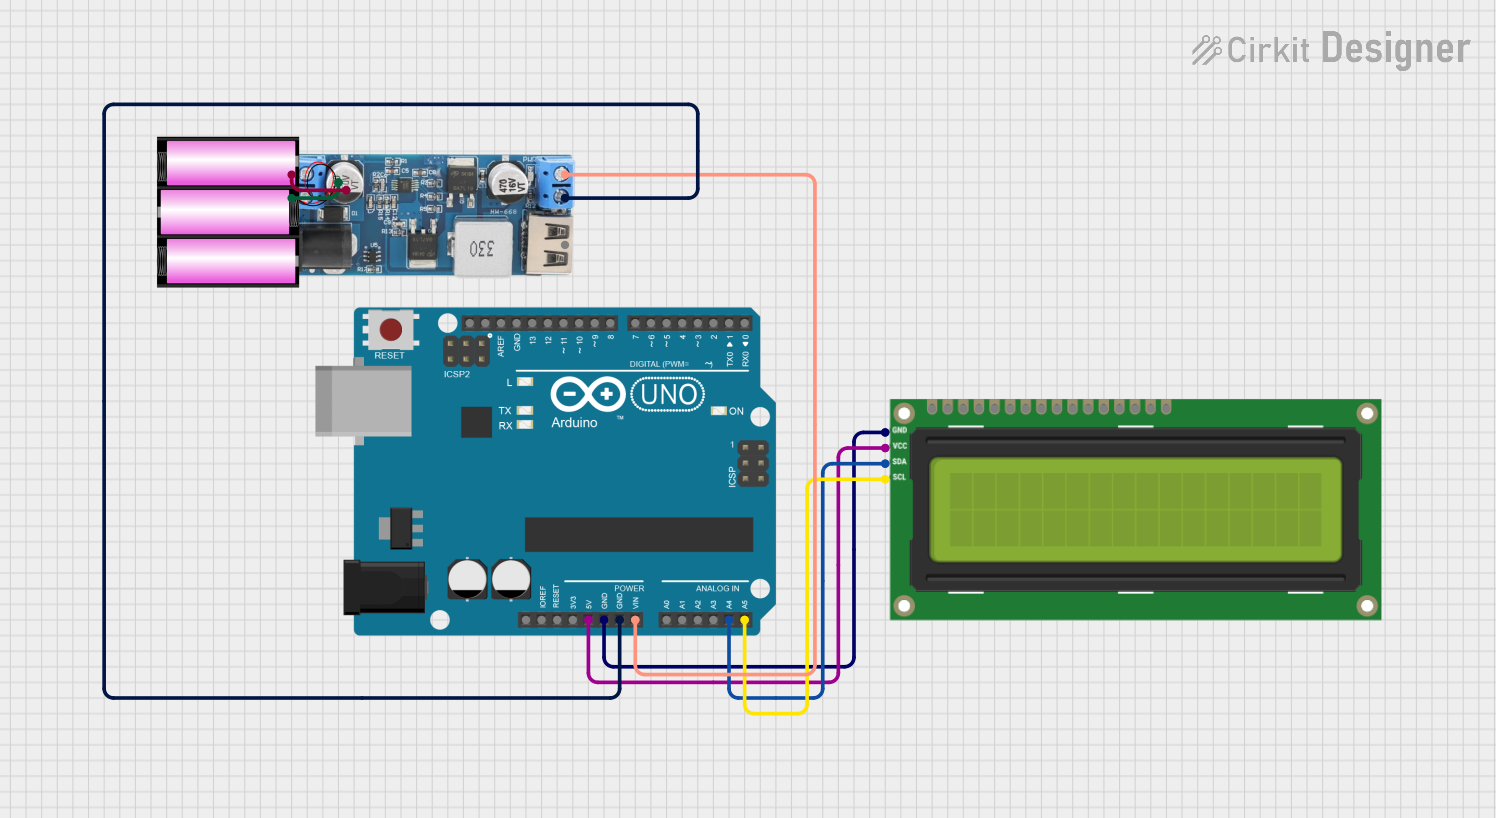
Circuit Documentation
Summary
This circuit consists of an Arduino UNO microcontroller, a 12V to 5V step-down power converter, a 12V battery, and an I2C LCD 16x2 screen. The Arduino UNO is the central processing unit of the circuit, interfacing with the LCD screen via the I2C communication protocol. The step-down converter is used to regulate the 12V battery voltage down to 5V, which powers the Arduino UNO and the LCD screen. The battery provides the power source for the entire circuit.
Component List
Arduino UNO
- Description: A microcontroller board based on the ATmega328P.
- Pins: UNUSED, IOREF, Reset, 3.3V, 5V, GND, Vin, A0-A5, SCL, SDA, AREF, D0-D13.
12V to 5V Step Down Power Converter
- Description: A voltage regulator that steps down input voltages from 9V-36V to a stable 5V output.
- Pins: VIN 9v-36v, VIN+, VIN-, USB OUTPUT 5V, 5v OUTPUT, GND.
Battery 12V
- Description: A 12V power source.
- Pins: +, -.
I2C LCD 16x2 Screen
- Description: A liquid crystal display that can show 16 characters per line and has 2 lines.
- Pins: SCL, SDA, VCC (5V), GND, VDD, VO, RS, RW, E, D0-D7, BLA, BLK.
Wiring Details
Arduino UNO
- 5V connected to I2C LCD 16x2 Screen VCC (5V)
- GND connected to I2C LCD 16x2 Screen GND and 12V to 5V Step Down Power Converter GND
- Vin connected to 12V to 5V Step Down Power Converter 5V OUTPUT
- A4 (SDA) connected to I2C LCD 16x2 Screen SDA
- A5 (SCL) connected to I2C LCD 16x2 Screen SCL
12V to 5V Step Down Power Converter
- VIN+ connected to Battery 12V +
- VIN- connected to Battery 12V -
- 5V OUTPUT connected to Arduino UNO Vin
- GND connected to Arduino UNO GND
Battery 12V
- + connected to 12V to 5V Step Down Power Converter VIN+
- - connected to 12V to 5V Step Down Power Converter VIN-
I2C LCD 16x2 Screen
- VCC (5V) connected to Arduino UNO 5V
- GND connected to Arduino UNO GND
- SDA connected to Arduino UNO A4 (SDA)
- SCL connected to Arduino UNO A5 (SCL)
Documented Code
Arduino UNO Code (sketch.ino)
#include <Wire.h>

void setup() {
  Wire.begin();
  Serial.begin(9600);
  Serial.println("I2C Scanner Scanning...");

  for (byte i = 1; i < 127; i++) {
    Wire.beginTransmission(i);
    if (Wire.endTransmission() == 0) {
      Serial.print("I2C device found at address 0x");
      if (i < 16) Serial.print("0");
      Serial.println(i, HEX);
    }
  }
}

void loop() {
  // No need to repeat anything in the loop for this example
}
This code is used to scan for I2C devices connected to the Arduino UNO. It initializes the I2C communication and serial communication, then iterates through possible I2C addresses to find connected devices, printing the addresses of those found to the serial monitor.