
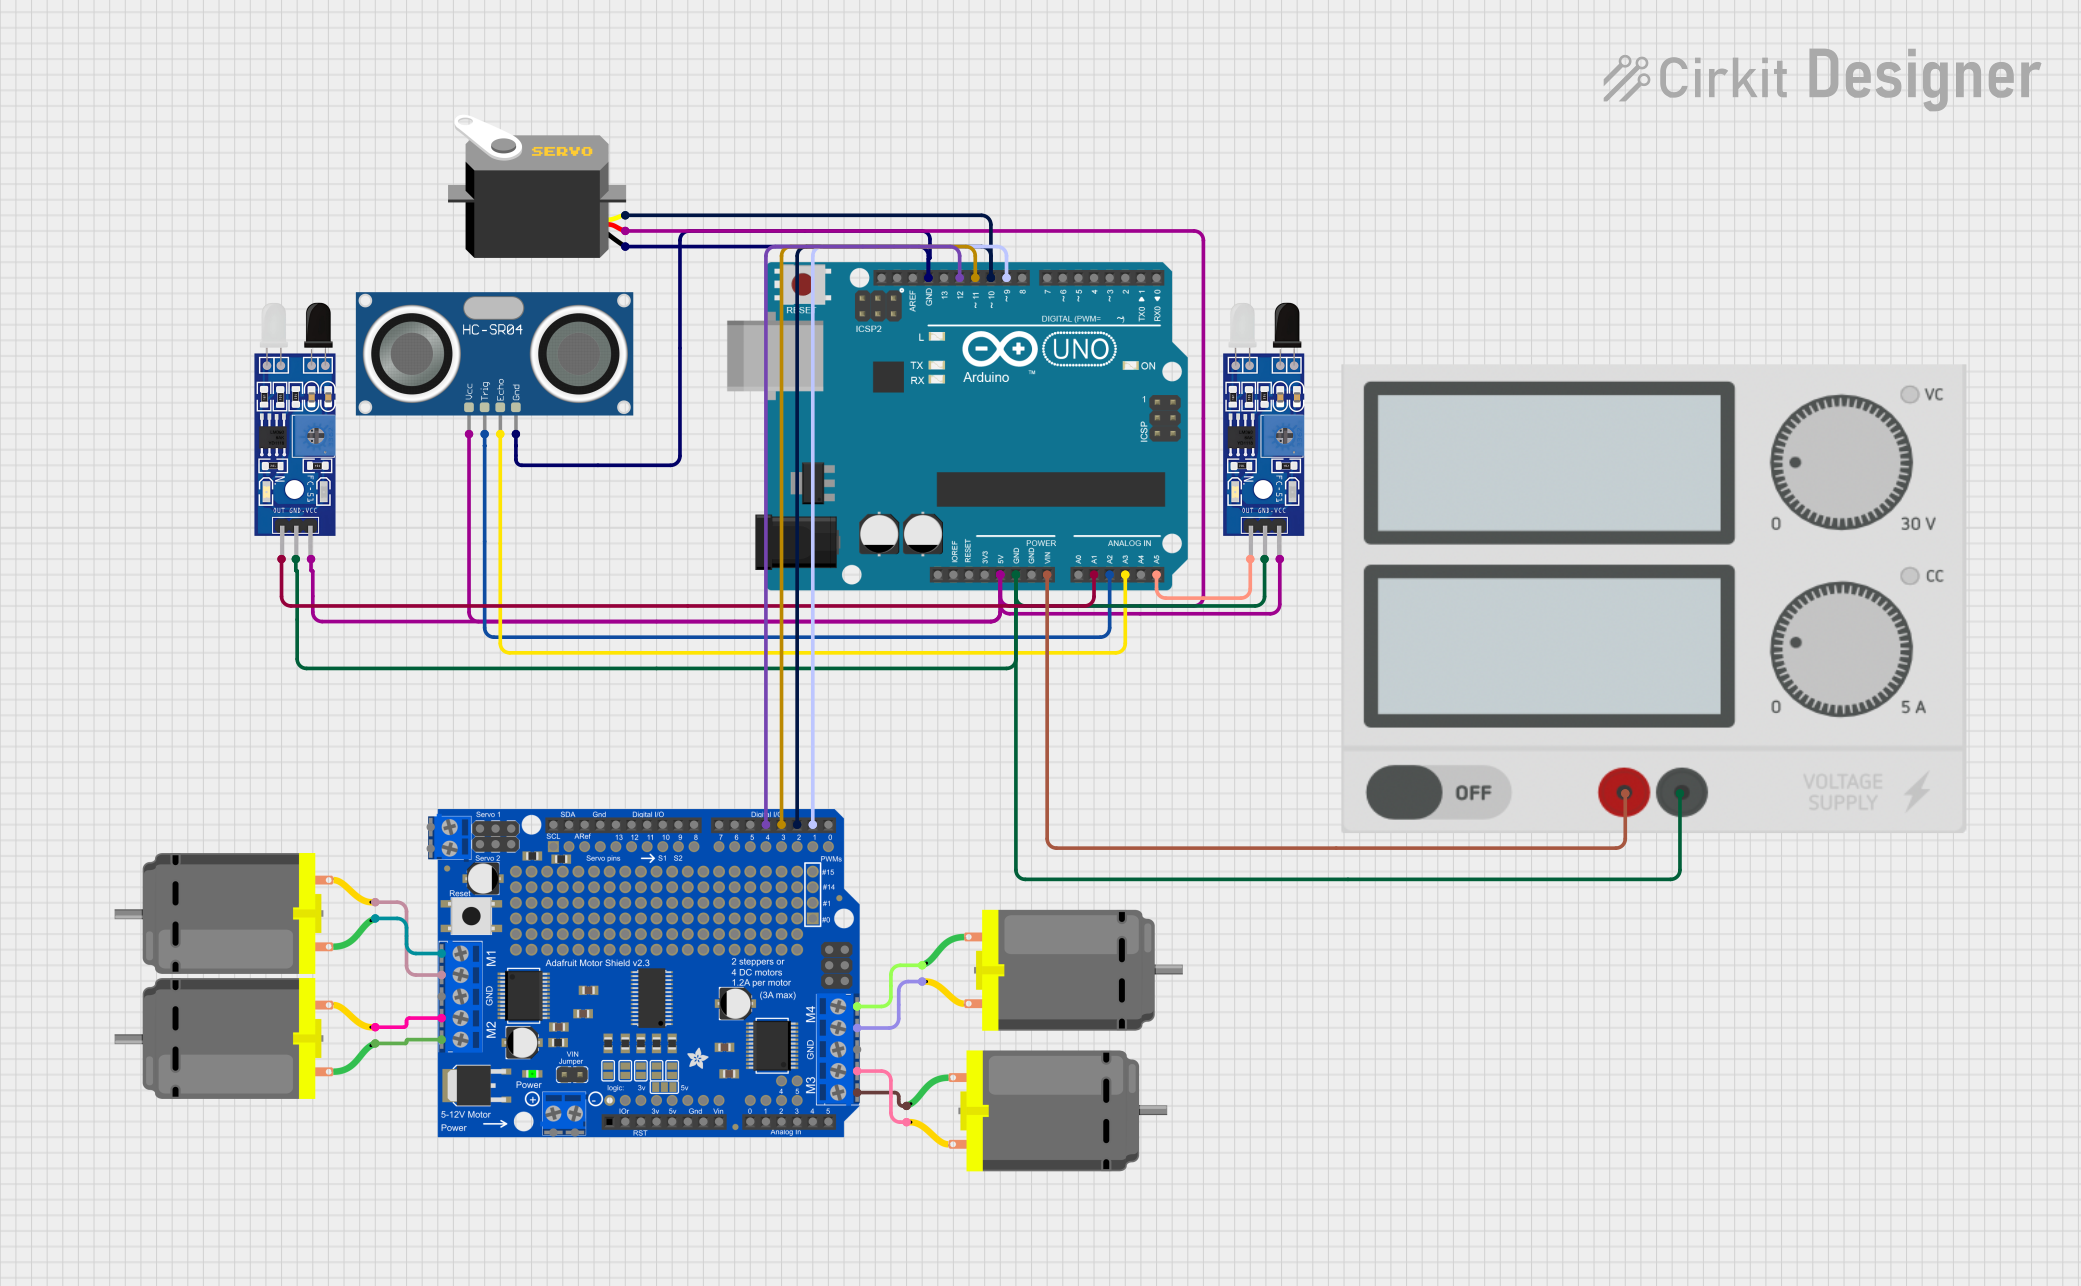
Circuit Documentation
Summary
The circuit is designed to interface an Arduino UNO with various sensors and actuators, including ultrasonic sensors, IR sensors, servo motors, and DC motors. The circuit is powered by an external power supply and uses an Adafruit Motor Shield to drive the motors. The Arduino UNO is the central microcontroller unit that processes sensor inputs and controls the actuators based on the programmed logic.
Component List
Arduino UNO
- Microcontroller board based on the ATmega328P
- It has 14 digital input/output pins, 6 analog inputs, a 16 MHz quartz crystal, a USB connection, a power jack, an ICSP header, and a reset button.
HC-SR04 Ultrasonic Sensor
- Ultrasonic distance sensor
- Provides 2cm to 400cm non-contact measurement functionality with a ranging accuracy that can reach up to 3mm.
DC Motor (4x)
- Electric motor that runs on direct current electricity
- Used for converting electrical energy into mechanical motion.
Power Supply
- Provides power to the circuit
- Has positive (+) and negative (-) terminals.
Sensor FC-51 IR (2x)
- Infrared obstacle avoidance sensor
- Detects the presence of an object within a certain range.
Servo
- Rotary actuator or linear actuator that allows for precise control of angular or linear position, velocity, and acceleration.
Adafruit Motor, Stepper & Servo Shield
- An add-on board for Arduino UNO
- Allows controlling up to 4 DC motors, 2 stepper motors, and 2 servos.
Wiring Details
Arduino UNO
- 5V pin connected to VCC of HC-SR04 Ultrasonic Sensor, Servo, and Sensor FC-51 IRs
- GND pin connected to GND of HC-SR04 Ultrasonic Sensor, Servo, and Sensor FC-51 IRs
- Vin pin connected to the positive terminal of the Power Supply
- A1 pin connected to OUT of Sensor FC-51 IR
- A2 pin connected to TRIG of HC-SR04 Ultrasonic Sensor
- A3 pin connected to ECHO of HC-SR04 Ultrasonic Sensor
- A5 pin connected to OUT of Sensor FC-51 IR
- D12 pin connected to D4 of Adafruit Motor Shield
- D11 pin connected to D3 of Adafruit Motor Shield
- D10 pin connected to D2 of Adafruit Motor Shield
- D9 pin connected to D1 of Adafruit Motor Shield
HC-SR04 Ultrasonic Sensor
- VCC connected to 5V of Arduino UNO
- TRIG connected to A2 of Arduino UNO
- ECHO connected to A3 of Arduino UNO
- GND connected to GND of Arduino UNO
DC Motors
- Each DC Motor has two pins connected to MxA and MxB (where x is 1, 2, 3, or 4) on the Adafruit Motor Shield.
Power Supply
- Positive terminal (+) connected to Vin of Arduino UNO
- Negative terminal (-) connected to GND of Arduino UNO
Sensor FC-51 IR
- VCC connected to 5V of Arduino UNO
- OUT connected to A1 and A5 of Arduino UNO (for two different instances of the sensor)
- GND connected to GND of Arduino UNO
Servo
- VCC connected to 5V of Arduino UNO
- GND connected to GND of Arduino UNO
- Pulse connected to D2 of Adafruit Motor Shield
Adafruit Motor, Stepper & Servo Shield
- D4 connected to D12 of Arduino UNO
- D3 connected to D11 of Arduino UNO
- D2 connected to D10 of Arduino UNO
- D1 connected to D9 of Arduino UNO
- MxA and MxB (where x is 1, 2, 3, or 4) connected to corresponding pins of DC Motors
Documented Code
Arduino UNO Code (sketch.ino)
void setup() {
  // put your setup code here, to run once:

}

void loop() {
  // put your main code here, to run repeatedly:

}
This is the basic structure of an Arduino sketch. The setup() function is called once when the sketch starts and is used to initialize settings. The loop() function runs repeatedly, allowing the microcontroller to perform operations based on sensor inputs and control outputs like motors and LEDs. The actual implementation details would be added to these functions based on the specific requirements of the circuit's operation.