
Arduino UNO Based Temperature and Humidity Display with LCD and DHT11 Sensor
View and Edit Project In Cirkit Designer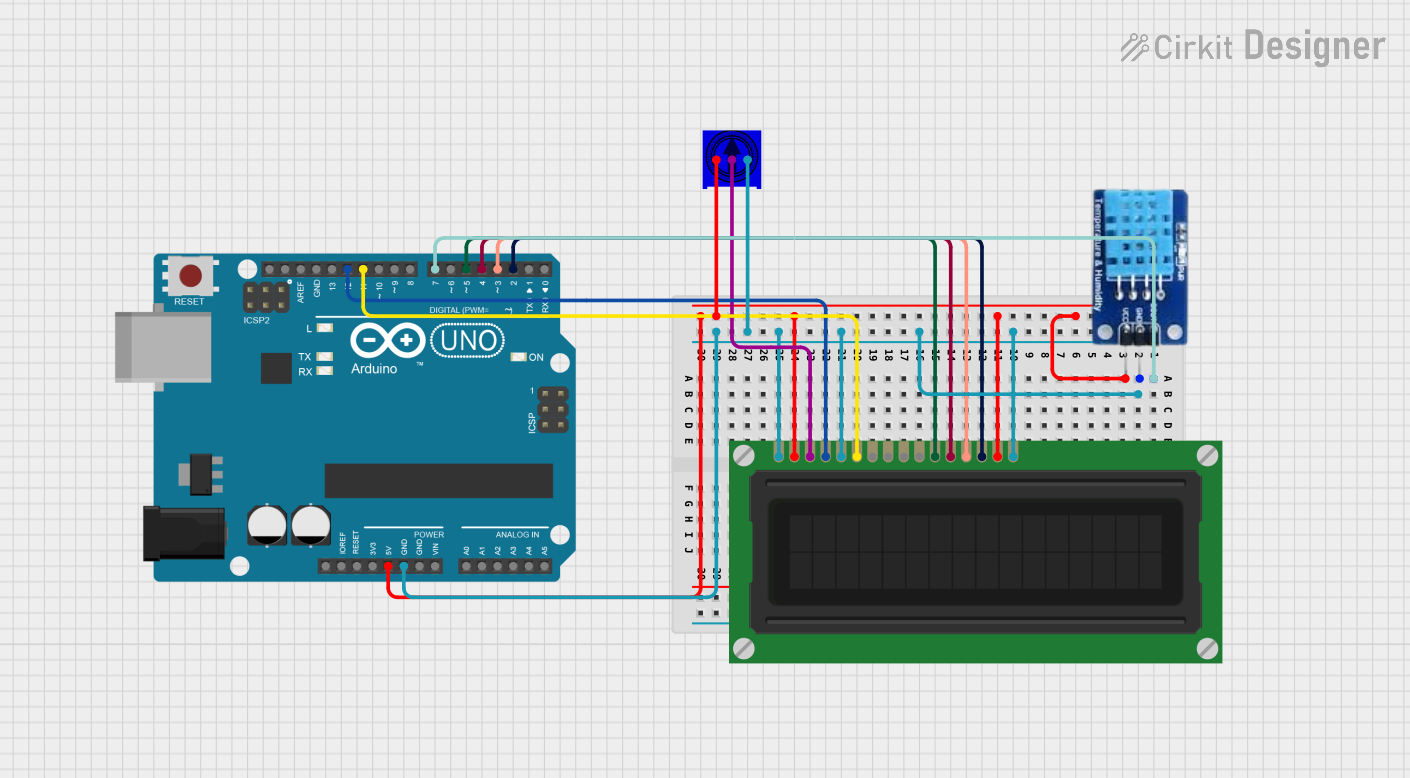
Circuit Documentation
Summary of the Circuit
This circuit is designed to interface an Arduino UNO with a DHT11 temperature and humidity sensor and an LCD display. The LCD is used to display data read from the DHT11 sensor. A potentiometer is included to adjust the contrast of the LCD. The Arduino UNO serves as the central processing unit, controlling the data flow and display output.
Component List
Arduino UNO
- Description: A microcontroller board based on the ATmega328P.
- Pins: UNUSED, IOREF, Reset, 3.3V, 5V, GND, Vin, A0-A5, SCL, SDA, AREF, D0-D13.
LCD Display (16 pin)
- Description: A 16-pin liquid crystal display for showing alphanumeric characters.
- Pins: VSS, VDD, VO, RS, R_W, E, DB0-DB7, A, K.
DHT11
- Description: A basic, ultra low-cost digital temperature and humidity sensor.
- Pins: DATA, GND, VCC.
TSR-3386UT Square Trimming Potentiometer
- Description: A variable resistor used to adjust the LCD contrast.
- Pins: Leg1, wiper, Leg2.
Wiring Details
Arduino UNO
- 5V connected to DHT11 VCC, LCD Display VDD, and Potentiometer Leg1.
- GND connected to DHT11 GND, LCD Display K, R_W, VSS, and Potentiometer Leg2.
- D2-D7 connected to LCD Display DB7-DB4, E, and RS respectively.
- D7 also connected to DHT11 DATA.
LCD Display (16 pin)
- VSS, R_W, K connected to Arduino UNO GND.
- VDD, A connected to Arduino UNO 5V.
- VO connected to Potentiometer wiper.
- RS connected to Arduino UNO D12.
- E connected to Arduino UNO D11.
- DB4-DB7 connected to Arduino UNO D5-D2 respectively.
DHT11
- DATA connected to Arduino UNO D7.
- GND connected to Arduino UNO GND.
- VCC connected to Arduino UNO 5V.
TSR-3386UT Square Trimming Potentiometer
- Leg1 connected to Arduino UNO 5V.
- wiper connected to LCD Display VO.
- Leg2 connected to Arduino UNO GND.
Documented Code
Arduino UNO Code (sketch.ino)
void setup() {
  // put your setup code here, to run once:

}

void loop() {
  // put your main code here, to run repeatedly:

}
Additional Notes
- The code provided for the Arduino UNO is a template with empty setup and loop functions. The actual implementation should initialize the LCD and DHT11 sensor, read data from the DHT11, and display it on the LCD.
- The
documentation.txtfile is empty and does not contain any additional information.