Cirkit Designer
Your all-in-one circuit design IDE
Home /
Project Documentation
Arduino UNO Based Temperature and Humidity Display with LCD and DHT11 Sensor

Circuit Documentation
Summary of the Circuit
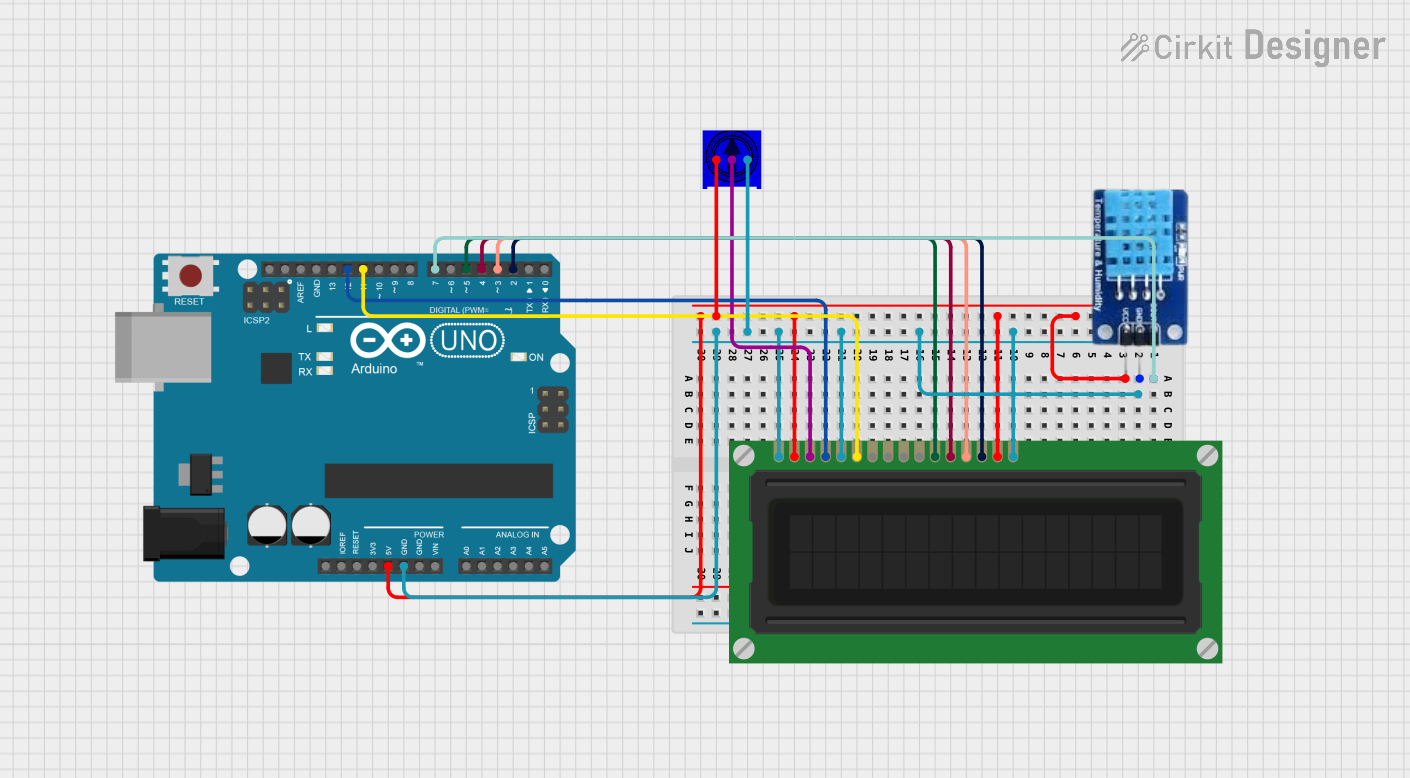
This circuit is designed to interface an Arduino UNO with a DHT11 temperature and humidity sensor and an LCD display. The LCD is used to display data read from the DHT11 sensor. A potentiometer is included to adjust the contrast of the LCD. The Arduino UNO serves as the central processing unit, controlling the data flow and display output.
Component List
Arduino UNO
- Description: A microcontroller board based on the ATmega328P.
- Pins: UNUSED, IOREF, Reset, 3.3V, 5V, GND, Vin, A0-A5, SCL, SDA, AREF, D0-D13.
LCD Display (16 pin)
- Description: A 16-pin liquid crystal display for showing alphanumeric characters.
- Pins: VSS, VDD, VO, RS, R_W, E, DB0-DB7, A, K.
DHT11
- Description: A basic, ultra low-cost digital temperature and humidity sensor.
- Pins: DATA, GND, VCC.
TSR-3386UT Square Trimming Potentiometer
- Description: A variable resistor used to adjust the LCD contrast.
- Pins: Leg1, wiper, Leg2.
Wiring Details
Arduino UNO
- 5V connected to DHT11 VCC, LCD Display VDD, and Potentiometer Leg1.
- GND connected to DHT11 GND, LCD Display K, R_W, VSS, and Potentiometer Leg2.
- D2-D7 connected to LCD Display DB7-DB4, E, and RS respectively.
- D7 also connected to DHT11 DATA.
LCD Display (16 pin)
- VSS, R_W, K connected to Arduino UNO GND.
- VDD, A connected to Arduino UNO 5V.
- VO connected to Potentiometer wiper.
- RS connected to Arduino UNO D12.
- E connected to Arduino UNO D11.
- DB4-DB7 connected to Arduino UNO D5-D2 respectively.
DHT11
- DATA connected to Arduino UNO D7.
- GND connected to Arduino UNO GND.
- VCC connected to Arduino UNO 5V.
TSR-3386UT Square Trimming Potentiometer
- Leg1 connected to Arduino UNO 5V.
- wiper connected to LCD Display VO.
- Leg2 connected to Arduino UNO GND.
Documented Code
Arduino UNO Code (sketch.ino)
void setup() {
  // put your setup code here, to run once:

}

void loop() {
  // put your main code here, to run repeatedly:

}
Additional Notes
- The code provided for the Arduino UNO is a template with empty setup and loop functions. The actual implementation should initialize the LCD and DHT11 sensor, read data from the DHT11, and display it on the LCD.
- The
documentation.txtfile is empty and does not contain any additional information.