
Arduino Mega 2560-Based Robotic System with Ultrasonic and IR Sensors
View and Edit Project In Cirkit Designer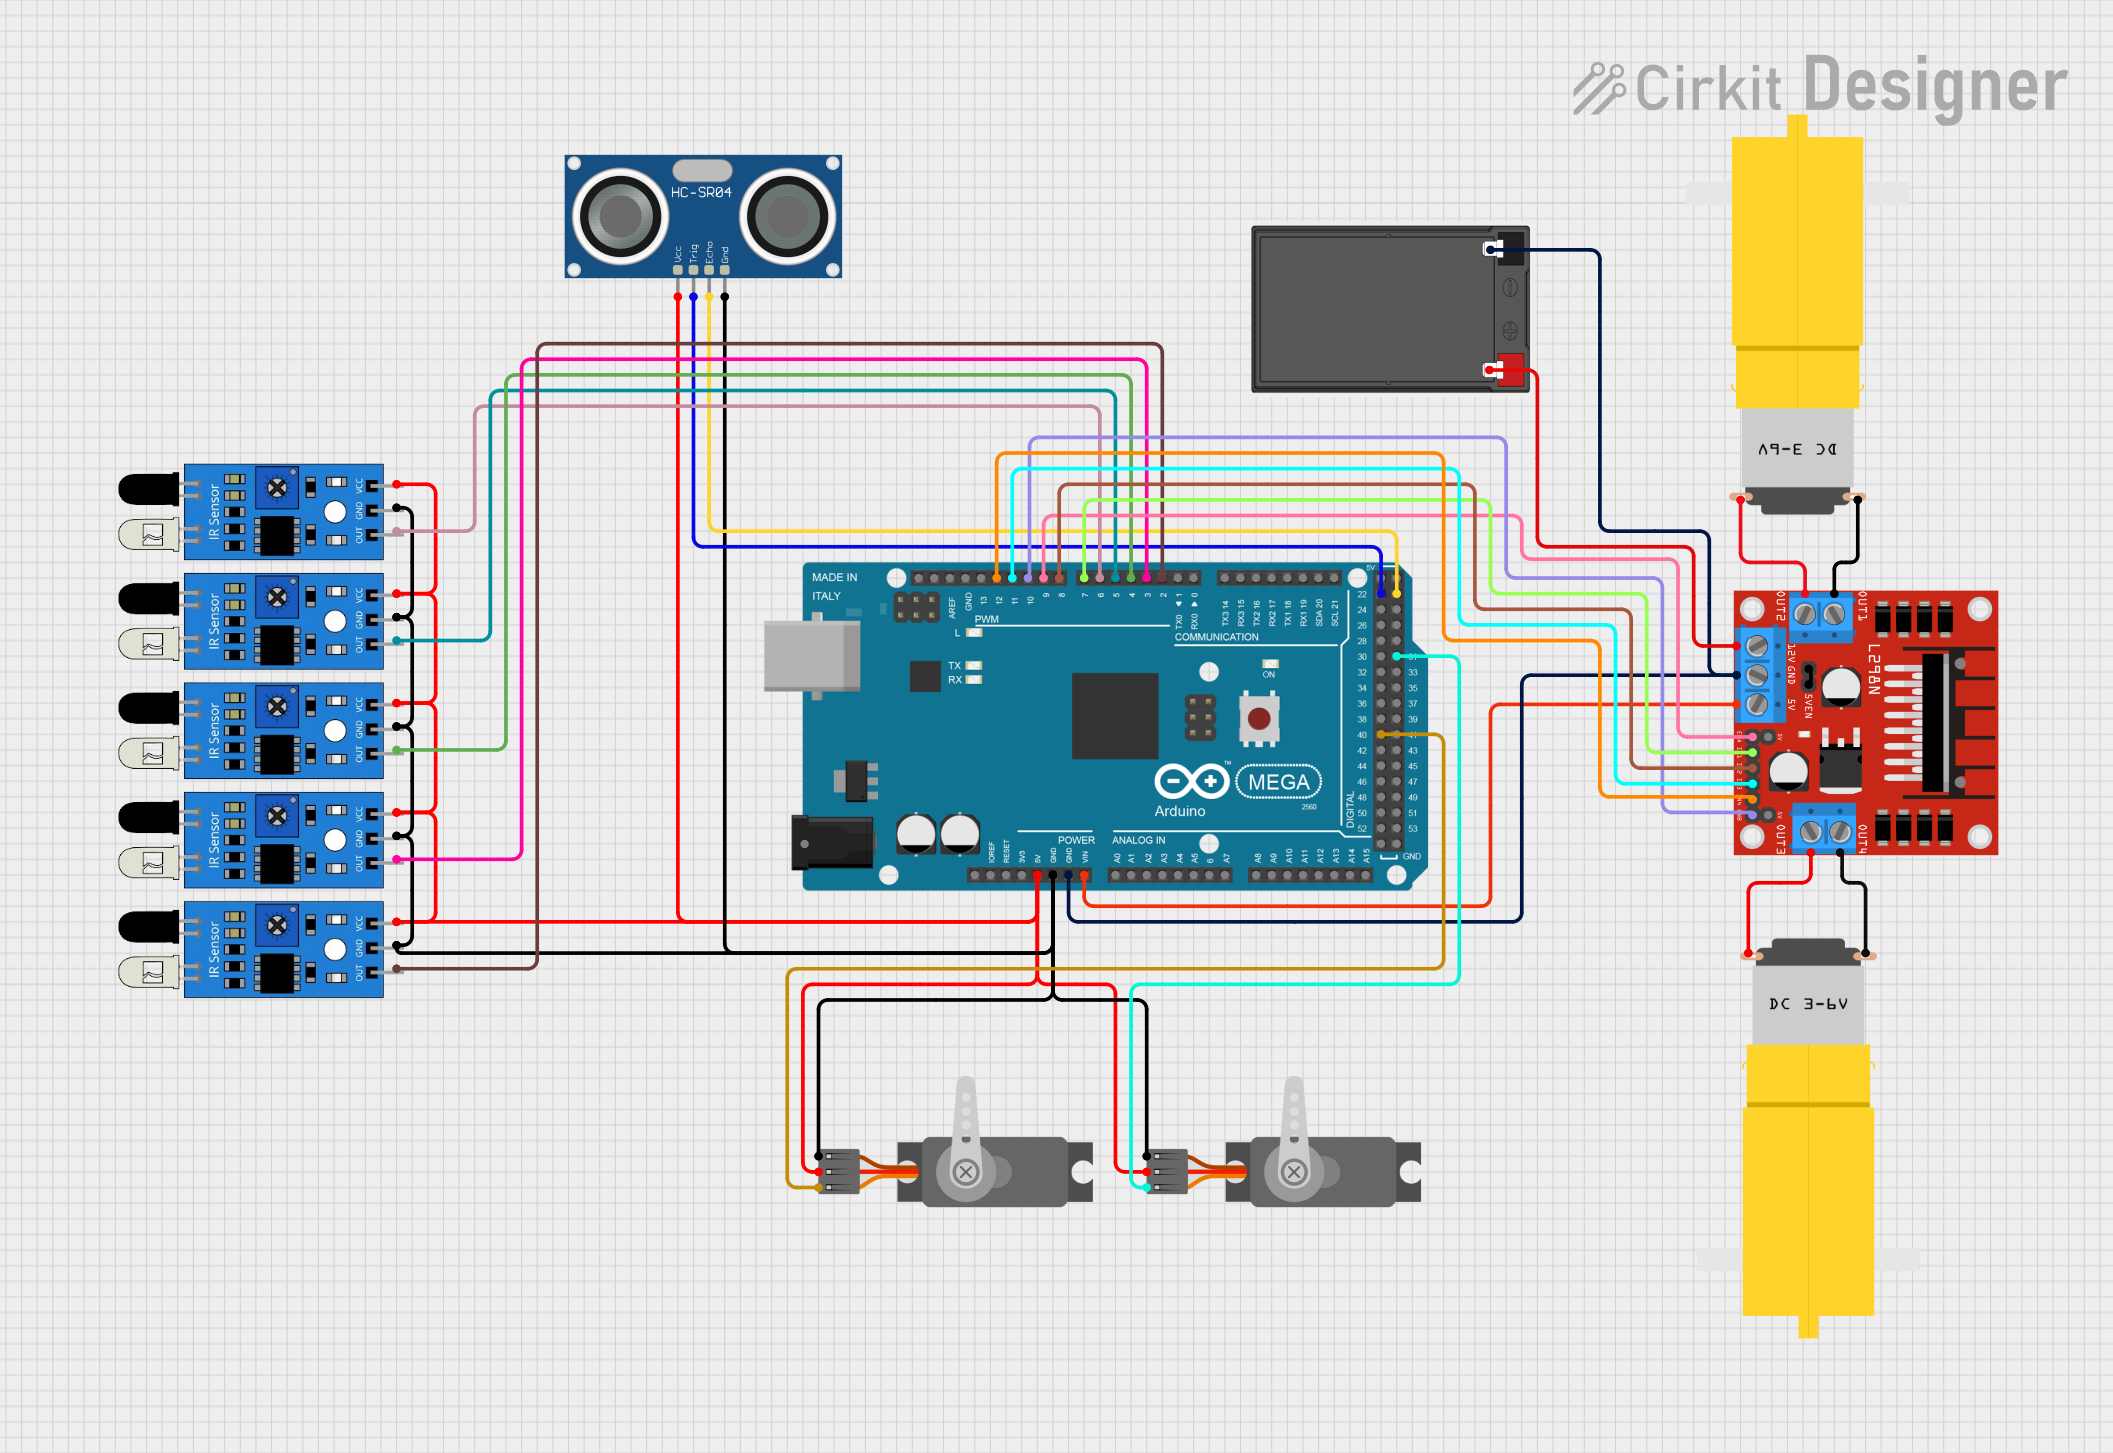
Circuit Documentation
Summary
This document provides a detailed overview of a circuit that includes an Arduino Mega 2560 microcontroller, various sensors (ultrasonic and infrared), servos, DC motors, and a motor driver. The circuit is designed to interface these components for a variety of sensing and actuation tasks.
Component List
HC-SR04 Ultrasonic Sensor
- Pins: VCC, TRIG, ECHO, GND
- Description: Ultrasonic distance sensor used for measuring distance by emitting and receiving ultrasonic waves.
Arduino Mega 2560
- Pins: IOREF, RESET, 3V3, 5V, GND, VIN, A0-A15, D0-D53, AREF, SDA, SCL
- Description: A microcontroller board based on the ATmega2560, used for controlling and interfacing with various sensors and actuators.
IR Sensor
- Pins: out, gnd, vcc
- Description: Infrared sensor used for detecting obstacles or objects.
Motor amarillo motorreductor hobby
- Pins: vcc, GND
- Description: DC motor with a gearbox for hobby projects.
L298N DC Motor Driver
- Pins: OUT1, OUT2, 12V, GND, 5V, OUT3, OUT4, 5V-ENA-JMP-I, 5V-ENA-JMP-O, +5V-J1, +5V-J2, ENA, IN1, IN2, IN3, IN4, ENB
- Description: Dual H-Bridge motor driver used to control the speed and direction of DC motors.
Servo (Wokwi Compatible)
- Pins: GND, V+, PWM
- Description: Servo motor used for precise control of angular position.
Battery
- Pins: -, +
- Description: Power source for the circuit.
Wiring Details
HC-SR04 Ultrasonic Sensor
- VCC connected to 5V on Arduino Mega 2560
- TRIG connected to D22 on Arduino Mega 2560
- ECHO connected to D23 on Arduino Mega 2560
- GND connected to GND on Arduino Mega 2560
Arduino Mega 2560
- 5V connected to VCC of various sensors and servos
- GND connected to GND of various sensors and servos
- VIN connected to 5V on L298N DC Motor Driver
- D22 connected to TRIG on HC-SR04 Ultrasonic Sensor
- D23 connected to ECHO on HC-SR04 Ultrasonic Sensor
- D2 PWM connected to out on IR Sensor
- D3 PWM connected to out on IR Sensor
- D4 PWM connected to out on IR Sensor
- D5 PWM connected to out on IR Sensor
- D6 PWM connected to out on IR Sensor
- D7 PWM connected to IN1 on L298N DC Motor Driver
- D8 PWM connected to IN2 on L298N DC Motor Driver
- D9 PWM connected to ENA on L298N DC Motor Driver
- D10 PWM connected to ENB on L298N DC Motor Driver
- D11 PWM connected to IN3 on L298N DC Motor Driver
- D12 PWM connected to IN4 on L298N DC Motor Driver
- D40 connected to PWM on Servo
- D31 connected to PWM on Servo
IR Sensor
- vcc connected to 5V on Arduino Mega 2560
- gnd connected to GND on Arduino Mega 2560
- out connected to various PWM pins on Arduino Mega 2560
Motor amarillo motorreductor hobby
- vcc connected to OUT2 on L298N DC Motor Driver
- GND connected to OUT1 on L298N DC Motor Driver
- vcc connected to OUT4 on L298N DC Motor Driver
- GND connected to OUT3 on L298N DC Motor Driver
L298N DC Motor Driver
- GND connected to GND on Arduino Mega 2560 and battery
- 5V connected to VIN on Arduino Mega 2560
- 12V connected to + on battery
- OUT1 connected to GND on Motor
- OUT2 connected to vcc on Motor
- OUT3 connected to GND on Motor
- OUT4 connected to vcc on Motor
- IN1 connected to D7 PWM on Arduino Mega 2560
- IN2 connected to D8 PWM on Arduino Mega 2560
- ENA connected to D9 PWM on Arduino Mega 2560
- ENB connected to D10 PWM on Arduino Mega 2560
- IN3 connected to D11 PWM on Arduino Mega 2560
- IN4 connected to D12 PWM on Arduino Mega 2560
Servo (Wokwi Compatible)
- V+ connected to 5V on Arduino Mega 2560
- GND connected to GND on Arduino Mega 2560
- PWM connected to D40 on Arduino Mega 2560
Battery
- + connected to 12V on L298N DC Motor Driver
- - connected to GND on Arduino Mega 2560 and L298N DC Motor Driver
Documented Code
Arduino Mega 2560 Code
void setup() {
  // put your setup code here, to run once:

}

void loop() {
  // put your main code here, to run repeatedly:

}
This code is a basic template for the Arduino Mega 2560. The setup() function is used to initialize any settings or configurations, and the loop() function contains the main code that runs repeatedly.
This concludes the documentation for the circuit. Each component and its connections have been detailed, and the code for the Arduino Mega 2560 has been provided.