
Arduino and Raspberry Pi Powered Robotic Arm with Webcam and Ultrasonic Sensor
View and Edit Project In Cirkit Designer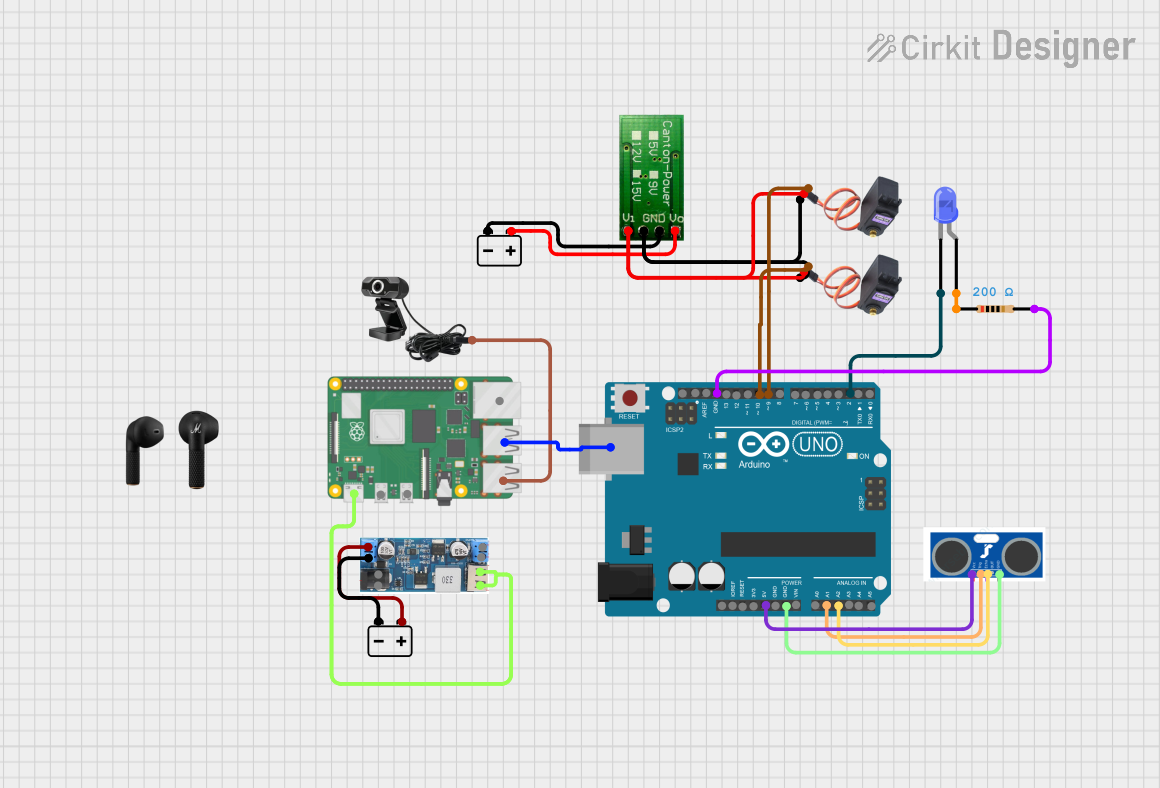
Circuit Documentation
Summary
This document provides a detailed overview of a circuit that includes various components such as a 12V battery, LED, resistors, an Arduino UNO, a DC-DC converter, a webcam, servos, a Raspberry Pi, an ultrasonic sensor, and a step-up converter. The circuit is designed to interface these components to perform specific tasks, with the Arduino UNO and Raspberry Pi acting as the primary controllers.
Component List
12V Battery
- Pins: -, +
- Description: Provides 12V power supply to the circuit.
- Properties: None
LED: Two Pin (blue)
- Pins: cathode, anode
- Description: A blue LED used for visual indication.
- Properties: None
Resistor
- Pins: pin1, pin2
- Description: Limits the current flowing through the LED.
- Properties:
- Resistance: 200 Ohms
Arduino UNO
- Pins: UNUSED, IOREF, Reset, 3.3V, 5V, GND, Vin, A0, A1, A2, A3, A4, A5, SCL, SDA, AREF, D13, D12, D11, D10, D9, D8, D7, D6, D5, D4, D3, D2, D1, D0, USB-type B
- Description: Microcontroller used to control various components.
- Properties: None
DCDC 12V/5V 3A
- Pins: 12V (+), GND, 5V (+), Vin (+), V in (-)
- Description: Converts 12V to 5V for powering components.
- Properties: None
Webcam
- Pins: USB
- Description: Captures video input.
- Properties: None
MG996R Servo Motor
- Pins: GND, VCC, SIG
- Description: Servo motor for mechanical movement.
- Properties: None
5V to 12V Step-up Converter
- Pins: V1, GND, V0
- Description: Steps up 5V to 12V.
- Properties: None
Raspberry Pi 4 B
- Pins: usb 2.0, usb 3.0, Micro HDMI PORT 1, Micro HDMI PORT 2, usb-c Power Supply, Gigabit Ethernet
- Description: Single-board computer for processing and control.
- Properties: None
HC-SR05 Ultrasonic Sensor
- Pins: VCC, TRIG, ECHO, GND
- Description: Measures distance using ultrasonic waves.
- Properties: None
Earphone
- Pins: None
- Description: Audio output device.
- Properties: None
Wiring Details
12V Battery
- + connected to Vin (+) of DCDC 12V/5V 3A
- - connected to V in (-) of DCDC 12V/5V 3A
- + connected to V0 of 5V to 12V Step-up Converter
- - connected to GND of 5V to 12V Step-up Converter
LED: Two Pin (blue)
- cathode connected to D2 of Arduino UNO
- anode connected to pin1 of Resistor
Resistor
- pin1 connected to anode of LED: Two Pin (blue)
- pin2 connected to GND of Arduino UNO
Arduino UNO
- USB-type B connected to usb 3.0 of Raspberry Pi 4 B
- D2 connected to cathode of LED: Two Pin (blue)
- GND connected to pin2 of Resistor
- 5V connected to VCC of HC-SR05
- GND connected to GND of HC-SR05
- A1 connected to TRIG of HC-SR05
- A2 connected to ECHO of HC-SR05
- D10 connected to SIG of MG996R Servo Motor
- D9 connected to SIG of MG996R Servo Motor
DCDC 12V/5V 3A
- 5V (+) connected to usb-c Power Supply of Raspberry Pi 4 B
- GND connected to usb-c Power Supply of Raspberry Pi 4 B
- Vin (+) connected to + of 12V Battery
- V in (-) connected to - of 12V Battery
Webcam
- USB connected to usb 2.0 of Raspberry Pi 4 B
MG996R Servo Motor
- SIG connected to D10 of Arduino UNO
- SIG connected to D9 of Arduino UNO
- VCC connected to V1 of 5V to 12V Step-up Converter
- GND connected to GND of 5V to 12V Step-up Converter
5V to 12V Step-up Converter
- V1 connected to VCC of MG996R Servo Motor
- GND connected to GND of MG996R Servo Motor
- V0 connected to + of 12V Battery
- GND connected to - of 12V Battery
Raspberry Pi 4 B
- usb 2.0 connected to USB of Webcam
- usb 3.0 connected to USB-type B of Arduino UNO
- usb-c Power Supply connected to 5V (+) and GND of DCDC 12V/5V 3A
HC-SR05 Ultrasonic Sensor
- VCC connected to 5V of Arduino UNO
- GND connected to GND of Arduino UNO
- TRIG connected to A1 of Arduino UNO
- ECHO connected to A2 of Arduino UNO
Documented Code
Arduino UNO Code (sketch.ino)
void setup() {
  // put your setup code here, to run once:

}

void loop() {
  // put your main code here, to run repeatedly:

}
Additional Documentation (documentation.txt)
This document provides a comprehensive overview of the circuit, including the components used, their connections, and the code running on the Arduino UNO.