
Arduino UNO Based Obstacle-Avoiding Robot with Bluetooth Control
View and Edit Project In Cirkit Designer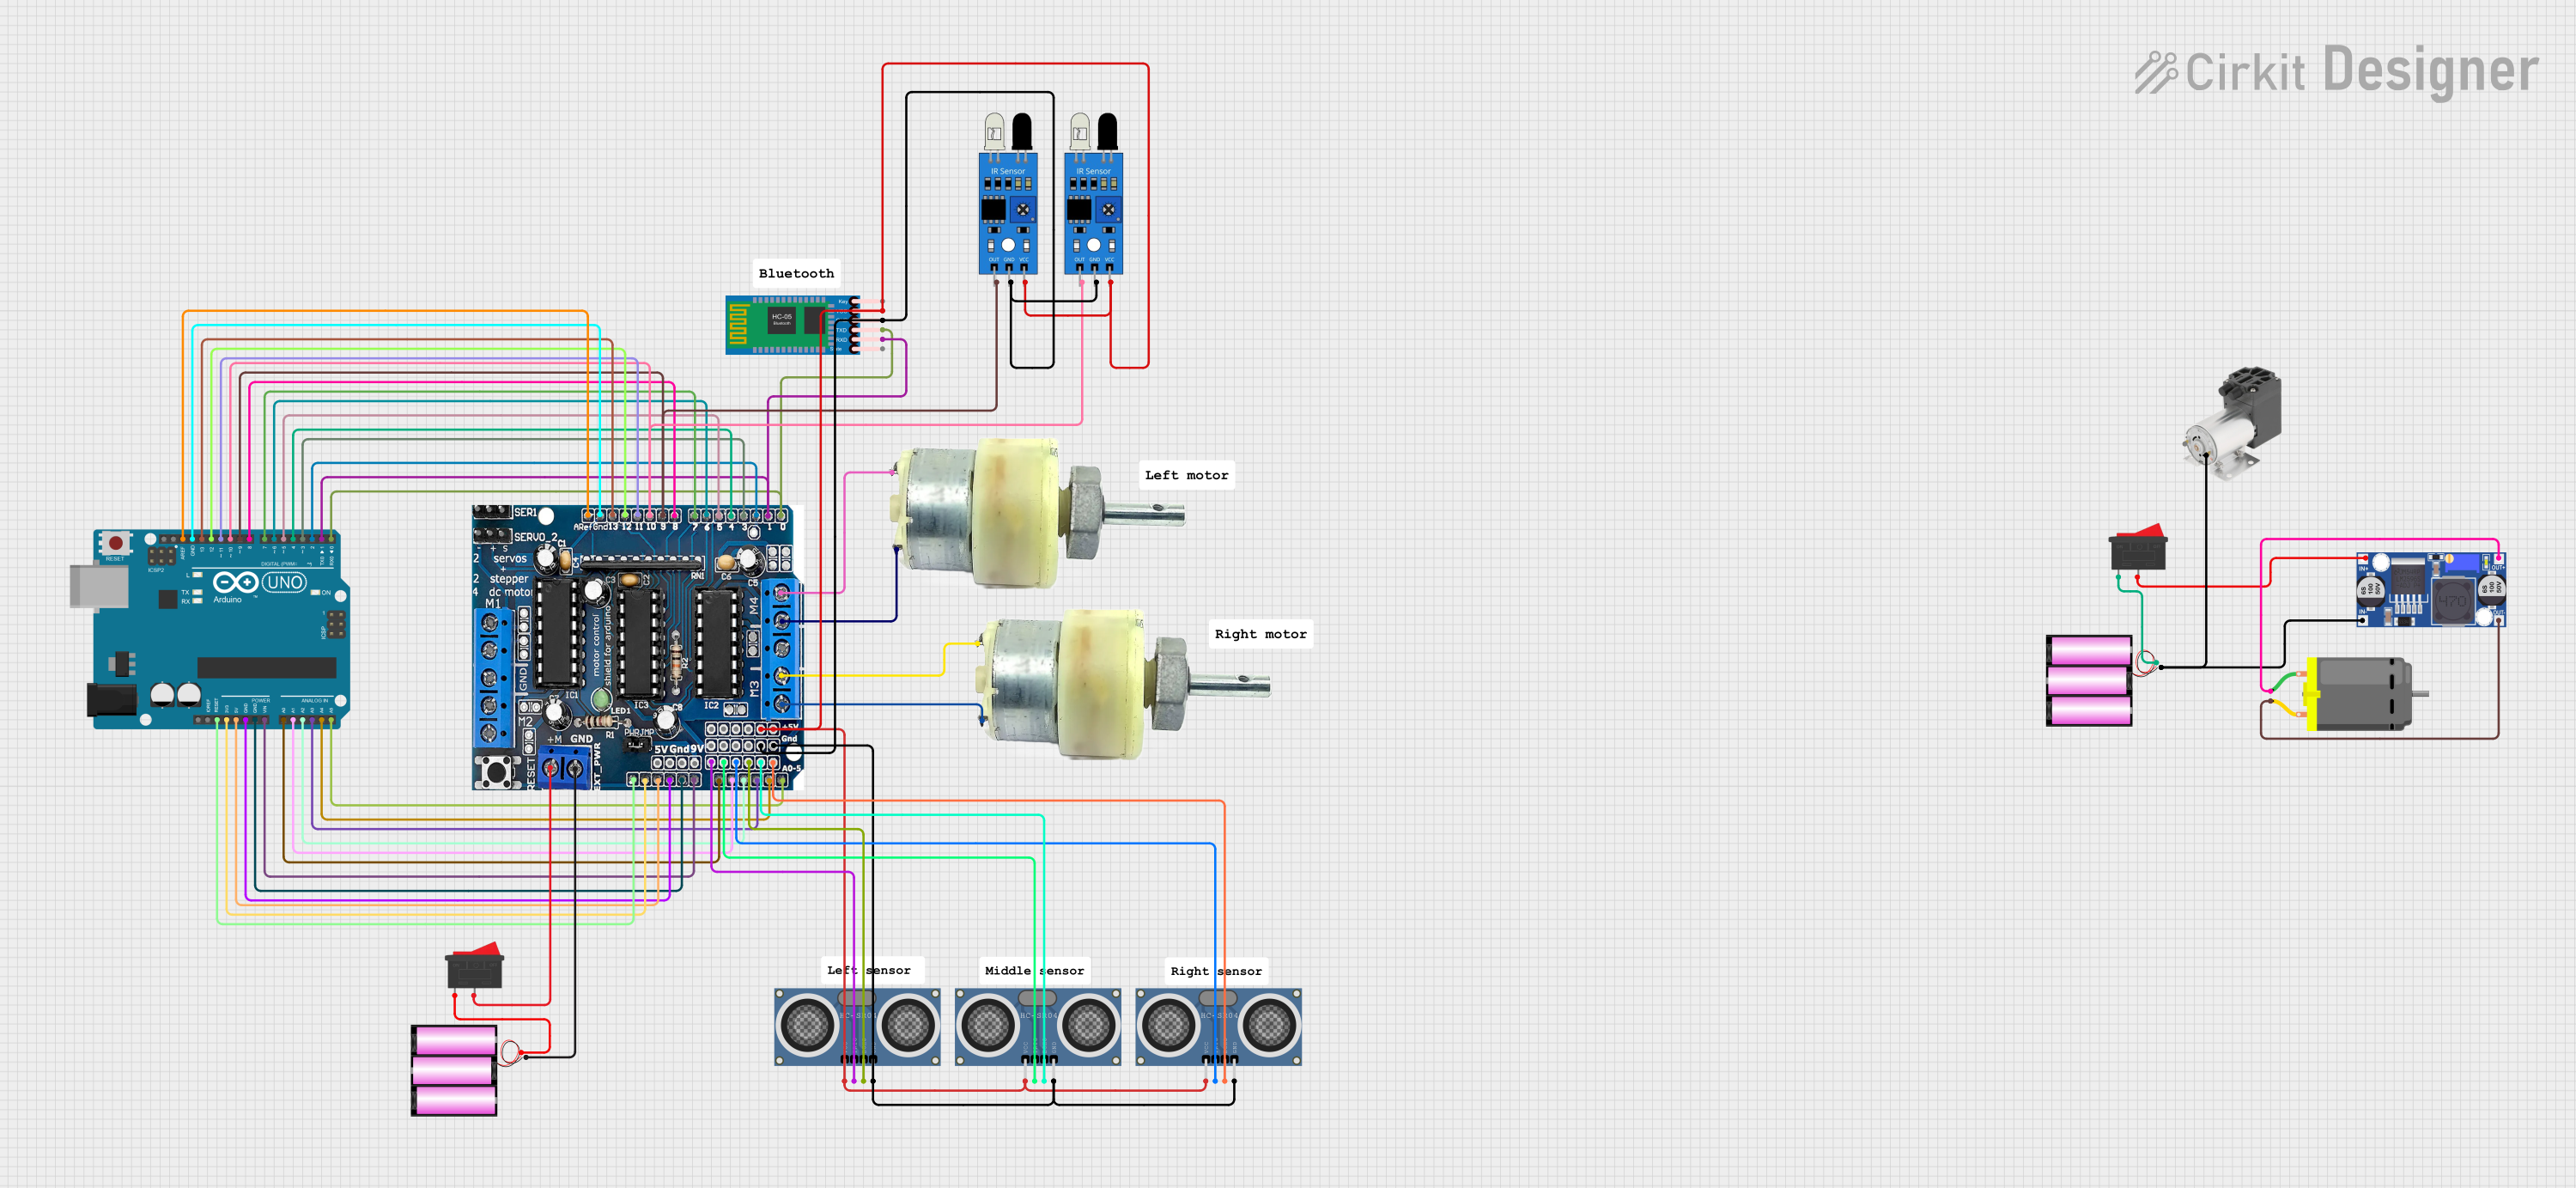
Circuit Documentation
Summary
This circuit integrates a variety of components including an Arduino UNO, a motor driver (L293D), ultrasonic distance sensors (HC-SR04), IR sensors, a Bluetooth module (HC-05), DC motors, a vacuum pump, a buck converter, and batteries. The Arduino UNO serves as the central microcontroller, interfacing with sensors and controlling actuators via the L293D motor driver. The circuit is designed to receive inputs from the ultrasonic and IR sensors, process the data, and control motors accordingly. Communication capabilities are provided by the HC-05 Bluetooth module. Power management is handled by batteries, a buck converter, and switches.
Component List
Arduino UNO
A microcontroller board based on the ATmega328P. It has digital input/output pins, analog inputs, a USB connection for programming, and power management features.
L293D Motor Driver
An integrated circuit that allows DC motors to be driven in both directions. It is capable of driving two motors simultaneously and provides thermal shutdown and internal clamp diodes.
HC-SR04 Ultrasonic Distance Sensor (Wokwi Compatible)
A sensor that measures distance by emitting an ultrasonic wave and measuring the time taken for the echo to return.
12V Geared Motor
A motor with a gearbox to provide high torque at lower speeds.
Battery 12V
A 12-volt battery to provide power to the circuit.
HC-05 Bluetooth Module
A wireless communication module that allows for serial communication over Bluetooth.
IR Sensor
An infrared sensor that detects infrared light to determine the presence of objects.
Rocker Switch
A switch that allows for the circuit to be turned on or off.
Mini Vacuum Pump
A small pump that can create a vacuum for various applications.
DC Motor
A simple electric motor that runs on direct current (DC).
Buck Converter
A DC-DC converter that steps down voltage from a higher level to a lower level.
Wiring Details
Arduino UNO
- Reset connected to L293D RESET
- 3.3V connected to L293D 3.3V
- 5V connected to L293D 5V, HC-05 VCC, IR sensors VCC, and HC-SR04 VCC
- GND connected to L293D GND, HC-05 GND, IR sensors GND, and HC-SR04 GND
- Vin connected to L293D VIN
- A0-A5 connected to corresponding L293D A0-A5
- D0-D13 connected to corresponding L293D D0-D13
- D1 (TX) connected to HC-05 RXD
- D0 (RX) connected to HC-05 TXD
L293D Motor Driver
- RESET, 3.3V, 5V, GND, VIN, A0-A5, D0-D13 connected to corresponding Arduino UNO pins
- "+" connected to Rocker Switch 2, 12V Geared Motor Terminal 2, and 12V Geared Motor Terminal 1
- "-" connected to Battery 12V -, 12V Geared Motor Terminal 2, and 12V Geared Motor Terminal 1
HC-SR04 Ultrasonic Distance Sensors
- VCC connected to 5V from L293D
- GND connected to GND from L293D
- TRIG connected to A0, A1, and A2 on L293D
- ECHO connected to A3, A4/SDA, and A5/SCL on L293D
IR Sensors
- VCC connected to 5V from L293D
- GND connected to GND from L293D
- OUT connected to D10 and D9 on Arduino UNO
HC-05 Bluetooth Module
- VCC connected to 5V from L293D
- GND connected to GND from L293D
- TXD connected to D0 (RX) on Arduino UNO
- RXD connected to D1 (TX) on Arduino UNO
Rocker Switches
- Rocker Switch 1 connected between Battery 12V + and L293D +
- Rocker Switch 2 connected between Battery 12V + and Buck Converter IN+
Buck Converter
- IN+ connected to Rocker Switch 2
- IN- connected to Battery 12V - and Mini Vacuum Pump -
- OUT+ connected to DC Motor pin 1
- OUT- connected to DC Motor pin 2
Batteries
- Battery 12V + connected to Rocker Switch 1 and Rocker Switch 2
- Battery 12V - connected to L293D - and Buck Converter IN-
Motors and Pump
- 12V Geared Motor Terminals connected to L293D + and -
- Mini Vacuum Pump + connected to Buck Converter OUT+
- DC Motor pins connected to Buck Converter OUT+ and OUT-
Documented Code
Arduino UNO Code (sketch.ino)
void setup() {
  // put your setup code here, to run once:

}

void loop() {
  // put your main code here, to run repeatedly:

}
This code is a template for the Arduino UNO and does not contain any functional code. It provides the basic structure for an Arduino sketch with setup() and loop() functions. The setup() function is intended for initialization code that runs once, while the loop() function contains code that runs repeatedly, forming the main logic of the program.