Arduino-Controlled Audio Playback System with LCD Display and RTC
Circuit Documentation
Summary
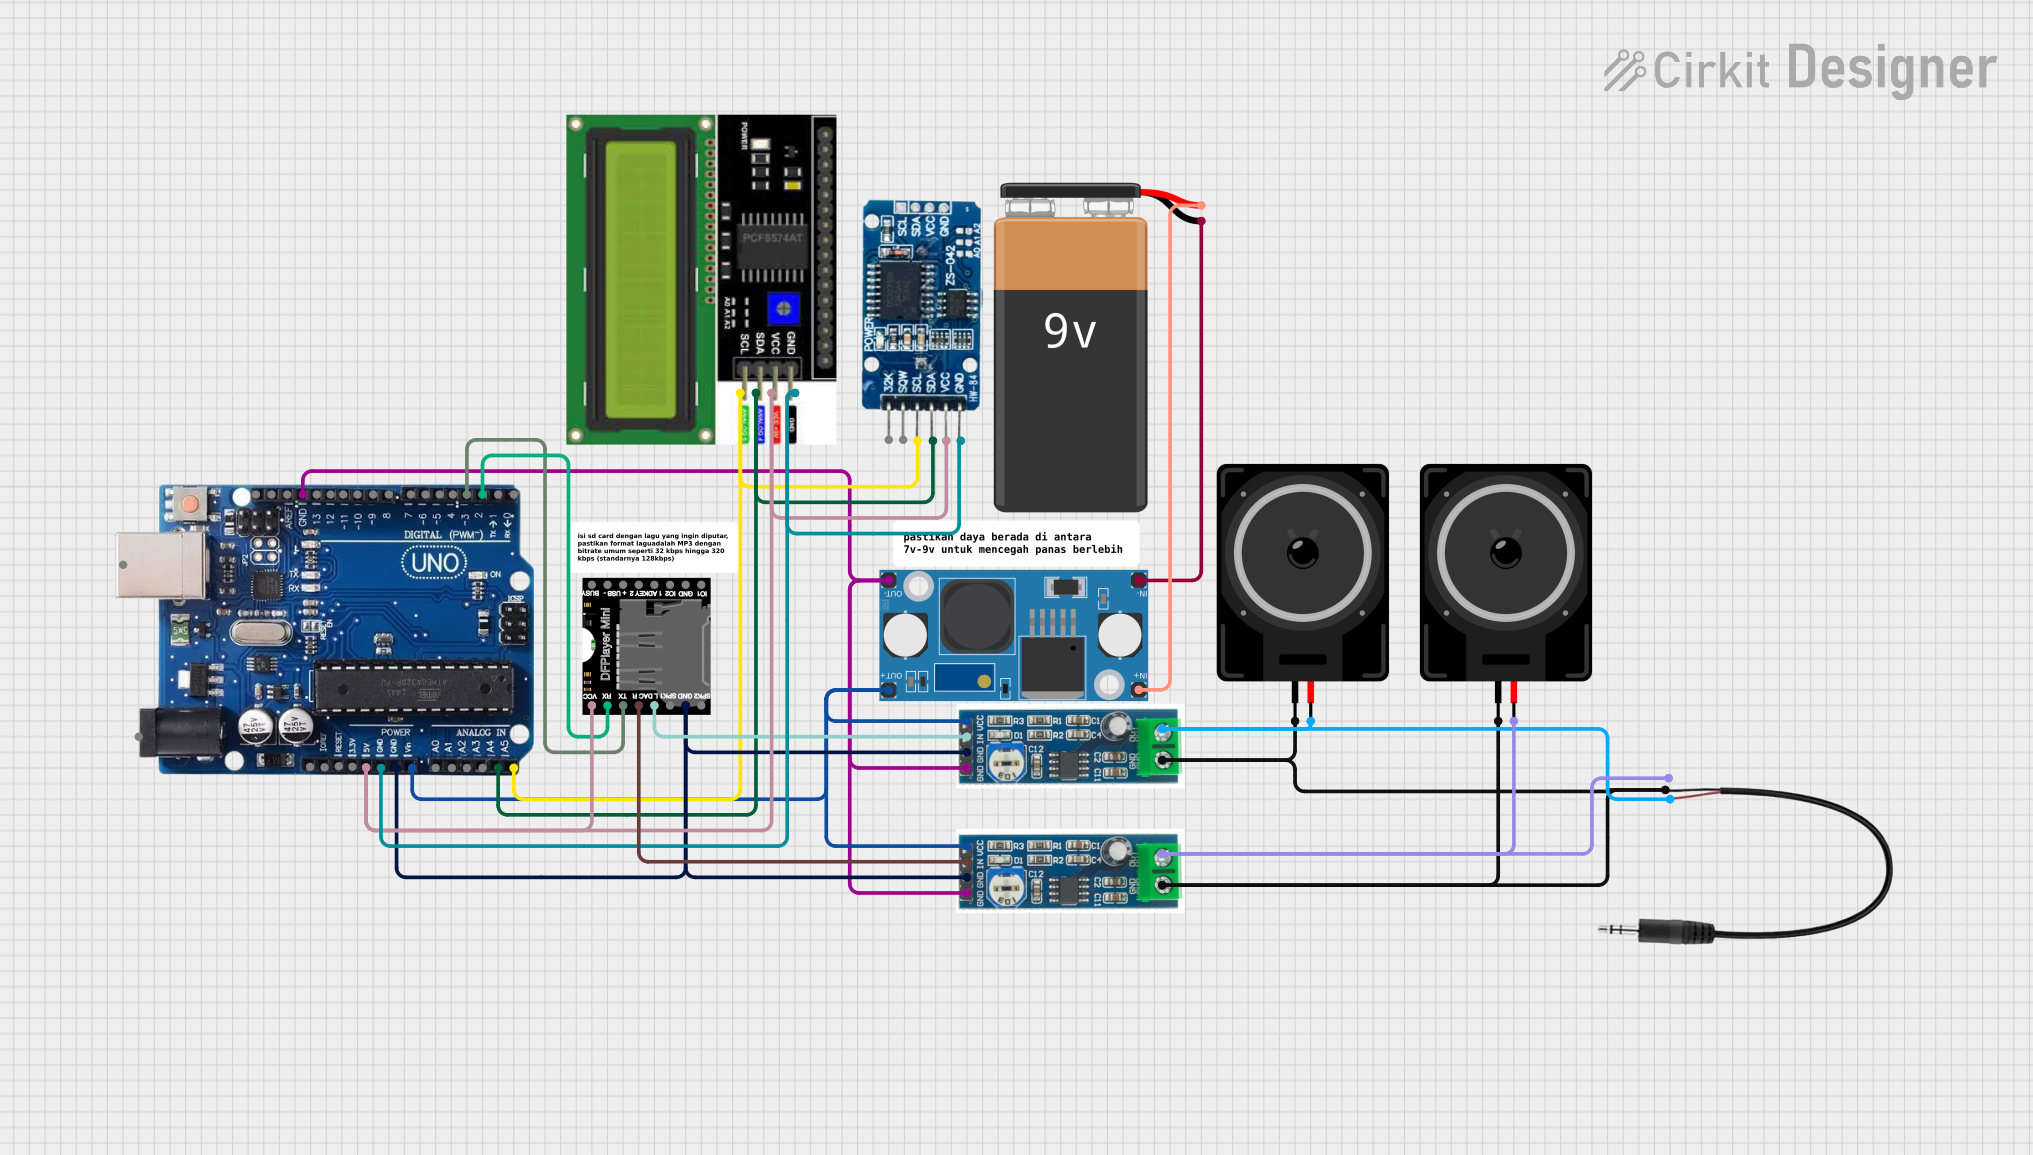
This circuit is designed to interface an Arduino Uno R3 with various peripheral modules including an LCD I2C Display, an RTC DS3231 module for real-time clock functionality, a DFPlayer MINI for audio playback, and two LM386 audio amplifier modules connected to loudspeakers. The circuit is powered by a 9V battery, which is stepped down to the required voltage levels using an LM2596 Step Down Module. The audio output from the DFPlayer MINI is amplified by the LM386 modules and output to the loudspeakers. The Arduino Uno R3 serves as the central controller, interfacing with the I2C devices (LCD and RTC) and controlling the DFPlayer MINI via serial communication.
Component List
- Arduino Uno R3: A microcontroller board based on the ATmega328P, featuring digital and analog I/O pins.
- LCD I2C Display: A liquid crystal display that uses the I2C protocol for communication.
- RTC DS3231: A real-time clock module that provides accurate timekeeping with I2C communication.
- LM386 Audio Amplifier Module: An audio amplifier module for amplifying audio signals.
- LM2596 Step Down Module: A DC-DC converter module used to step down the voltage from the battery.
- DFPlayer MINI: A small and low-cost MP3 module that can directly play MP3 files from a microSD card or USB stick.
- 9V Battery: A standard 9V battery used to power the circuit.
- Loudspeaker: An electroacoustic transducer used to produce sound.
- 3.5mm Audio Jack 3 Pin: A common audio connector for stereo audio signals.
Wiring Details
Arduino Uno R3
5Vconnected to VCC of LCD I2C Display, RTC DS3231, and DFPlayer MINI.GNDconnected to GND of LCD I2C Display, RTC DS3231, DFPlayer MINI, LM386 Audio Amplifier Modules, and LM2596 Step Down Module.A4/SDAconnected to SDA of LCD I2C Display and RTC DS3231.A5/SCLconnected to SCL of LCD I2C Display and RTC DS3231.VINconnected to VCC of LM386 Audio Amplifier Modules and OUT+ of LM2596 Step Down Module.2connected to RX of DFPlayer MINI.3connected to TX of DFPlayer MINI.
LCD I2C Display
GNDconnected to GND of Arduino Uno R3.VCCconnected to 5V of Arduino Uno R3.SDAconnected to A4/SDA of Arduino Uno R3.SCLconnected to A5/SCL of Arduino Uno R3.
RTC DS3231
GNDconnected to GND of Arduino Uno R3.VCCconnected to 5V of Arduino Uno R3.SDAconnected to A4/SDA of Arduino Uno R3.SCLconnected to A5/SCL of Arduino Uno R3.
LM386 Audio Amplifier Modules
VCCconnected to VIN of Arduino Uno R3.GNDconnected to GND of Arduino Uno R3 and Loudspeakers.INconnected to DAC_R and DAC_L of DFPlayer MINI for respective modules.OUTconnected to Loudspeakers and 3.5mm Audio Jack 3 Pin for respective channels.
LM2596 Step Down Module
IN+connected to + of 9V Battery.IN-connected to - of 9V Battery.OUT+connected to VIN of Arduino Uno R3.OUT-connected to GND of Arduino Uno R3.
DFPlayer MINI
VCCconnected to 5V of Arduino Uno R3.GNDconnected to GND of Arduino Uno R3.RXconnected to pin 2 of Arduino Uno R3.TXconnected to pin 3 of Arduino Uno R3.DAC_Rconnected to IN of one LM386 Audio Amplifier Module.DAC_Lconnected to IN of the other LM386 Audio Amplifier Module.
Loudspeakers
- One terminal connected to OUT of respective LM386 Audio Amplifier Modules.
- Other terminal connected to GND of respective LM386 Audio Amplifier Modules.
3.5mm Audio Jack 3 Pin
Lconnected to OUT of one LM386 Audio Amplifier Module.Rconnected to OUT of the other LM386 Audio Amplifier Module.GNDconnected to GND of LM386 Audio Amplifier Modules.
9V Battery
+connected to IN+ of LM2596 Step Down Module.-connected to IN- of LM2596 Step Down Module.
Documented Code
There is no code provided for the microcontrollers in the circuit. The Arduino Uno R3 would typically be programmed to control the DFPlayer MINI via serial commands, update and retrieve time from the RTC DS3231, and display information on the LCD I2C Display. The code would be written in C/C++ using the Arduino IDE and would include libraries for handling I2C communication and interfacing with the DFPlayer MINI.