
Arduino Leonardo-Based Sequential LED Lighting System with Pushbutton Control
View and Edit Project In Cirkit Designer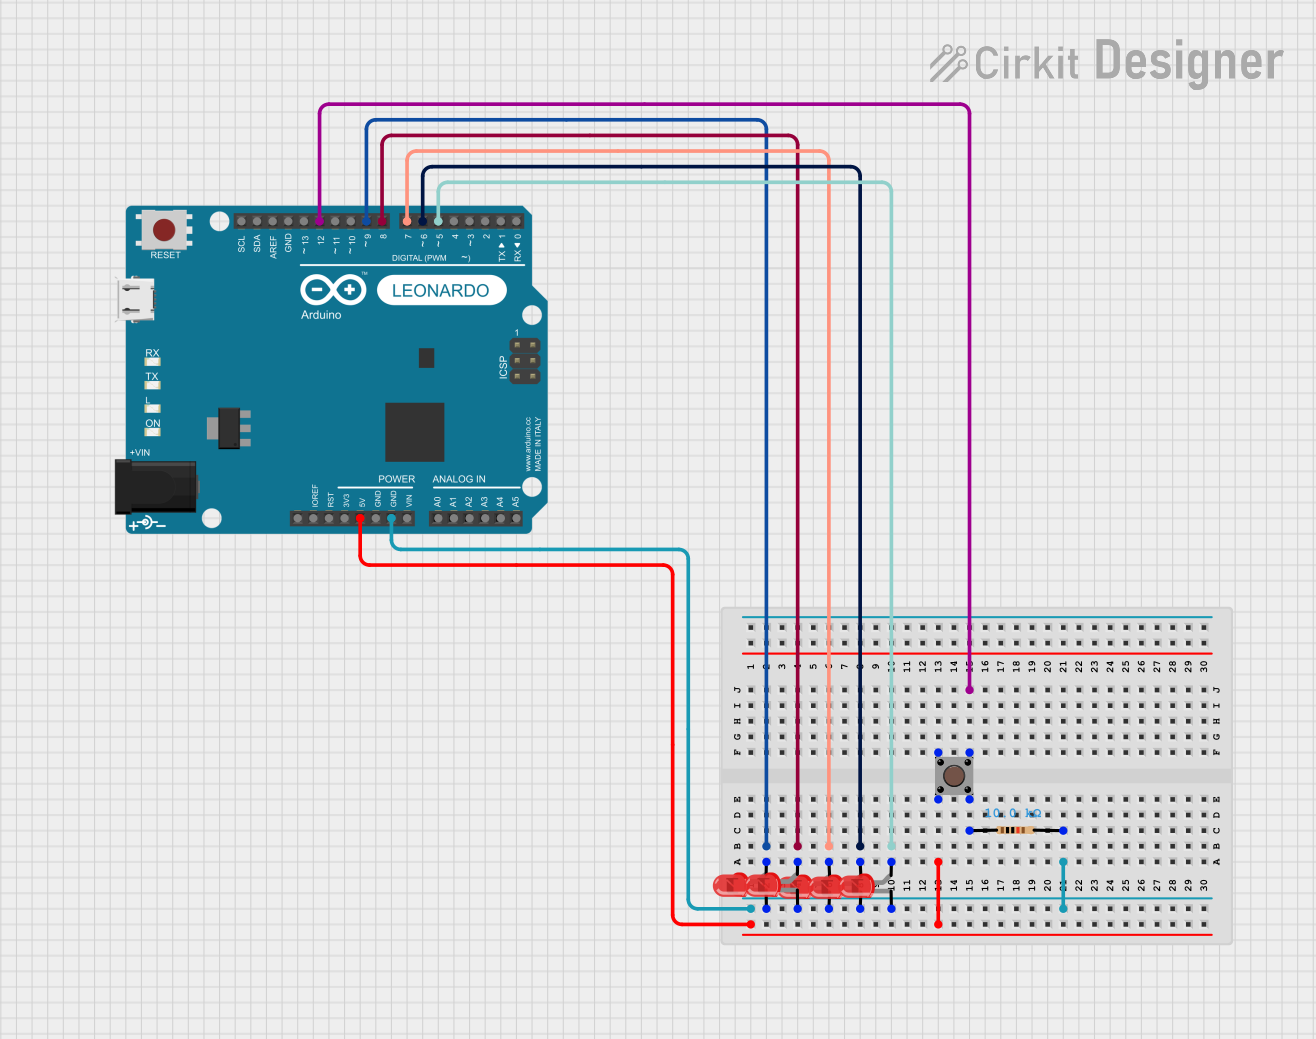
Circuit Documentation
Summary
This circuit consists of an Arduino Leonardo microcontroller, five red LEDs, a pushbutton, and a resistor. The circuit is designed to light up the LEDs sequentially when the pushbutton is pressed. The LEDs will remain lit for a random duration before turning off.
Component List
Arduino Leonardo (Rev3b)
- Description: A microcontroller board based on the ATmega32u4.
- Pins: D0/RX, D1/TX, D2/SDA, D3 PWM/SCL, D4/A6, D5 PWM, D6 PWM/A7, D7, n.c., IOREF, RESET, 3V3, 5V, GND, VIN, A0, A1, A2, A3, A4, A5, D8/A8, D9 PWM/A9, D10 PWM/A10, D11 PWM, D12/A11, D13 PWM, AREF, SDA, SCL
LED: Two Pin (red)
- Description: A red LED with two pins.
- Pins: cathode, anode
Pushbutton
- Description: A simple pushbutton with four pins.
- Pins: Pin 3 (out), Pin 4 (out), Pin 1 (in), Pin 2 (in)
Resistor
- Description: A resistor with a resistance of 10k Ohms.
- Pins: pin1, pin2
- Properties:
- Resistance: 10k Ohms
Wiring Details
Arduino Leonardo (Rev3b)
- 5V connected to Pushbutton Pin 2 (in)
- GND connected to:
- LED cathode
- Resistor pin2
- D9 PWM/A9 connected to LED anode
- D8/A8 connected to LED anode
- D7 connected to LED anode
- D6 PWM/A7 connected to LED anode
- D5 PWM connected to LED anode
- D12/A11 connected to Pushbutton Pin 3 (out)
LED: Two Pin (red)
- cathode connected to Arduino Leonardo GND
- anode connected to:
- Arduino Leonardo D9 PWM/A9
- Arduino Leonardo D8/A8
- Arduino Leonardo D7
- Arduino Leonardo D6 PWM/A7
- Arduino Leonardo D5 PWM
Pushbutton
- Pin 2 (in) connected to Arduino Leonardo 5V
- Pin 3 (out) connected to Arduino Leonardo D12/A11
- Pin 4 (out) connected to Resistor pin1
Resistor
- pin1 connected to Pushbutton Pin 4 (out)
- pin2 connected to Arduino Leonardo GND
Code Documentation
const int red1 = 9;
const int red2 = 8;
const int red3 = 7;
const int red4 = 6;
const int red5 = 5;
const int buttonPin = 12;

int buttonState = 0;

void setup() {
  // put your setup code here, to run once:
  pinMode(red1, OUTPUT);
  pinMode(red2, OUTPUT);
  pinMode(red3, OUTPUT);
  pinMode(red4, OUTPUT);
  pinMode(red5, OUTPUT);
  pinMode(buttonPin, INPUT);
}

void loop() {
  // put your main code here, to run repeatedly:
  int randNumber = random(3000,8000);

  buttonState = digitalRead(buttonPin);

  if (buttonState == HIGH) {
    digitalWrite(red1, HIGH);
    delay(1000);
    digitalWrite(red2, HIGH);
    delay(1000);
    digitalWrite(red3, HIGH);
    delay(1000);
    digitalWrite(red4, HIGH);
    delay(1000);
    digitalWrite(red5, HIGH);
    delay(randNumber);
    digitalWrite(red1, LOW);
    digitalWrite(red2, LOW);
    digitalWrite(red3, LOW);
    digitalWrite(red4, LOW);
    digitalWrite(red5, LOW);
  } else {
    // Do nothing
  }
}
This code initializes the pins connected to the LEDs as outputs and the pin connected to the pushbutton as an input. In the main loop, it checks the state of the pushbutton. If the button is pressed, it sequentially lights up the LEDs with a delay of 1 second between each LED. After all LEDs are lit, they stay on for a random duration between 3 to 8 seconds before turning off.