
Arduino MKR Zero-Based Force-Sensitive LED Control with SD Card Logging
View and Edit Project In Cirkit Designer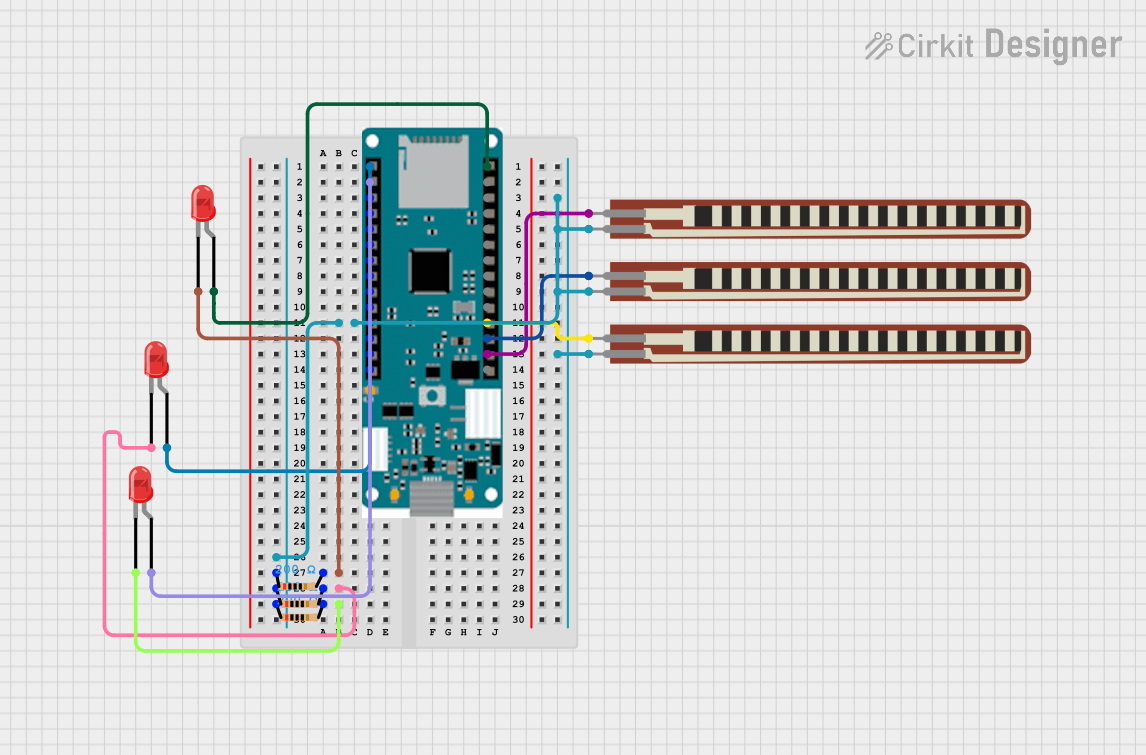
Circuit Documentation
Summary
This circuit is designed to monitor force-sensitive resistors (FSRs) and control LEDs based on the force applied. The circuit uses an Arduino Mkr Zero microcontroller to read the analog values from the FSRs and turn on/off LEDs accordingly. The system also logs events to an SD card.
Component List
2.2 inch Basic Flex Resistor
- Description: A flexible resistor that changes resistance based on the applied force.
- Pins: Pin 1, Pin 2
LED: Two Pin (red)
- Description: A red LED with two pins.
- Pins: Anode, Cathode
Arduino Mkr Zero
- Description: A microcontroller board based on the SAMD21 microcontroller.
- Pins: 5V, Vin, VCC, GND, Reset, 14, 13, 12, 11, 10, 9, 8, 7, 6, 5, 4, 3, 2, 1, 0, A6, A5, A4, A3, A2, A1, A0, AREF
Resistor
- Description: A resistor with a resistance of 200 Ohms.
- Pins: Pin 1, Pin 2
- Properties: Resistance = 200 Ohms
Wiring Details
2.2 inch Basic Flex Resistor
Instance 1:
- Pin 1: Connected to GND of Arduino Mkr Zero
- Pin 2: Connected to A0 of Arduino Mkr Zero
Instance 2:
- Pin 1: Connected to GND of Arduino Mkr Zero
- Pin 2: Connected to A1 of Arduino Mkr Zero
Instance 3:
- Pin 1: Connected to GND of Arduino Mkr Zero
- Pin 2: Connected to A2 of Arduino Mkr Zero
LED: Two Pin (red)
Instance 1:
- Anode: Connected to Pin 5 of Arduino Mkr Zero
- Cathode: Connected to Pin 2 of Resistor
Instance 2:
- Anode: Connected to Pin 6 of Arduino Mkr Zero
- Cathode: Connected to Pin 2 of Resistor
Instance 3:
- Anode: Connected to Pin 7 of Arduino Mkr Zero
- Cathode: Connected to Pin 2 of Resistor
Arduino Mkr Zero
- Pin 5: Connected to Anode of LED Instance 1
- Pin 6: Connected to Anode of LED Instance 2
- Pin 7: Connected to Anode of LED Instance 3
- A0: Connected to Pin 2 of 2.2 inch Basic Flex Resistor Instance 1
- A1: Connected to Pin 2 of 2.2 inch Basic Flex Resistor Instance 2
- A2: Connected to Pin 2 of 2.2 inch Basic Flex Resistor Instance 3
- GND: Connected to Pin 1 of all Resistors and Pin 1 of all 2.2 inch Basic Flex Resistors
Resistor
Instance 1:
- Pin 1: Connected to GND of Arduino Mkr Zero
- Pin 2: Connected to Cathode of LED Instance 3
Instance 2:
- Pin 1: Connected to GND of Arduino Mkr Zero
- Pin 2: Connected to Cathode of LED Instance 2
Instance 3:
- Pin 1: Connected to GND of Arduino Mkr Zero
- Pin 2: Connected to Cathode of LED Instance 1
Code Documentation
#include <SPI.h>
#include <SD.h>

// Pin definitions
const int FSR_PINS[] = {A0, A1, A2};  // Analog pins for FSRs
const int LED_PINS[] = {5, 6, 7};     // Digital pins for LEDs

// Threshold force (150 grams ~ depends on resistor setup and conversion)
const int FORCE_THRESHOLD = 150;

// State tracking
bool ledState[] = {false, false, false};

// SD card file
File logFile;

void setup() {
  // Initialize serial communication
  Serial.begin(9600);

  // Initialize LED pins as outputs
  for (int i = 0; i < 3; i++) {
    pinMode(LED_PINS[i], OUTPUT);
    digitalWrite(LED_PINS[i], LOW);
  }

  // Initialize SD card (MKR Zero has built-in SD reader)
  if (!SD.begin()) {
    Serial.println("SD card initialization failed!");
    while (true);
  }
  Serial.println("SD card initialized.");

  // Open log file
  logFile = SD.open("log.txt", FILE_WRITE);
  if (!logFile) {
    Serial.println("Failed to open log file!");
    while (true);
  }
  logFile.println("Slot Log Initialized");
  logFile.close();
}

void loop() {
  for (int i = 0; i < 3; i++) {
    int force = analogRead(FSR_PINS[i]); // Read FSR value

    // Check if force exceeds threshold
    if (force >= FORCE_THRESHOLD && !ledState[i]) {
      ledState[i] = true;
      digitalWrite(LED_PINS[i], HIGH);
      logEvent(i + 1, "triggered");
    }

    // Check if force drops below threshold
    else if (force < FORCE_THRESHOLD && ledState[i]) {
      ledState[i] = false;
      digitalWrite(LED_PINS[i], LOW);
      logEvent(i + 1, "turned off");
    }
  }
  delay(100); // Add a small delay to prevent rapid looping
}

void logEvent(int slot, const char* event) {
  logFile = SD.open("log.txt", FILE_WRITE);
  if (logFile) {
    String logEntry = "Slot #" + String(slot) + " " + event + " at " + String(millis()) + " ms";
    logFile.println(logEntry);
    logFile.close();
    Serial.println(logEntry);
  } else {
    Serial.println("Error writing to log file!");
  }
}
This code initializes the Arduino Mkr Zero to read values from the FSRs and control the LEDs based on the force applied. It also logs events to an SD card, indicating when each slot is triggered or turned off.