Arduino UNO Membrane Keypad Interface
Circuit Documentation
Summary
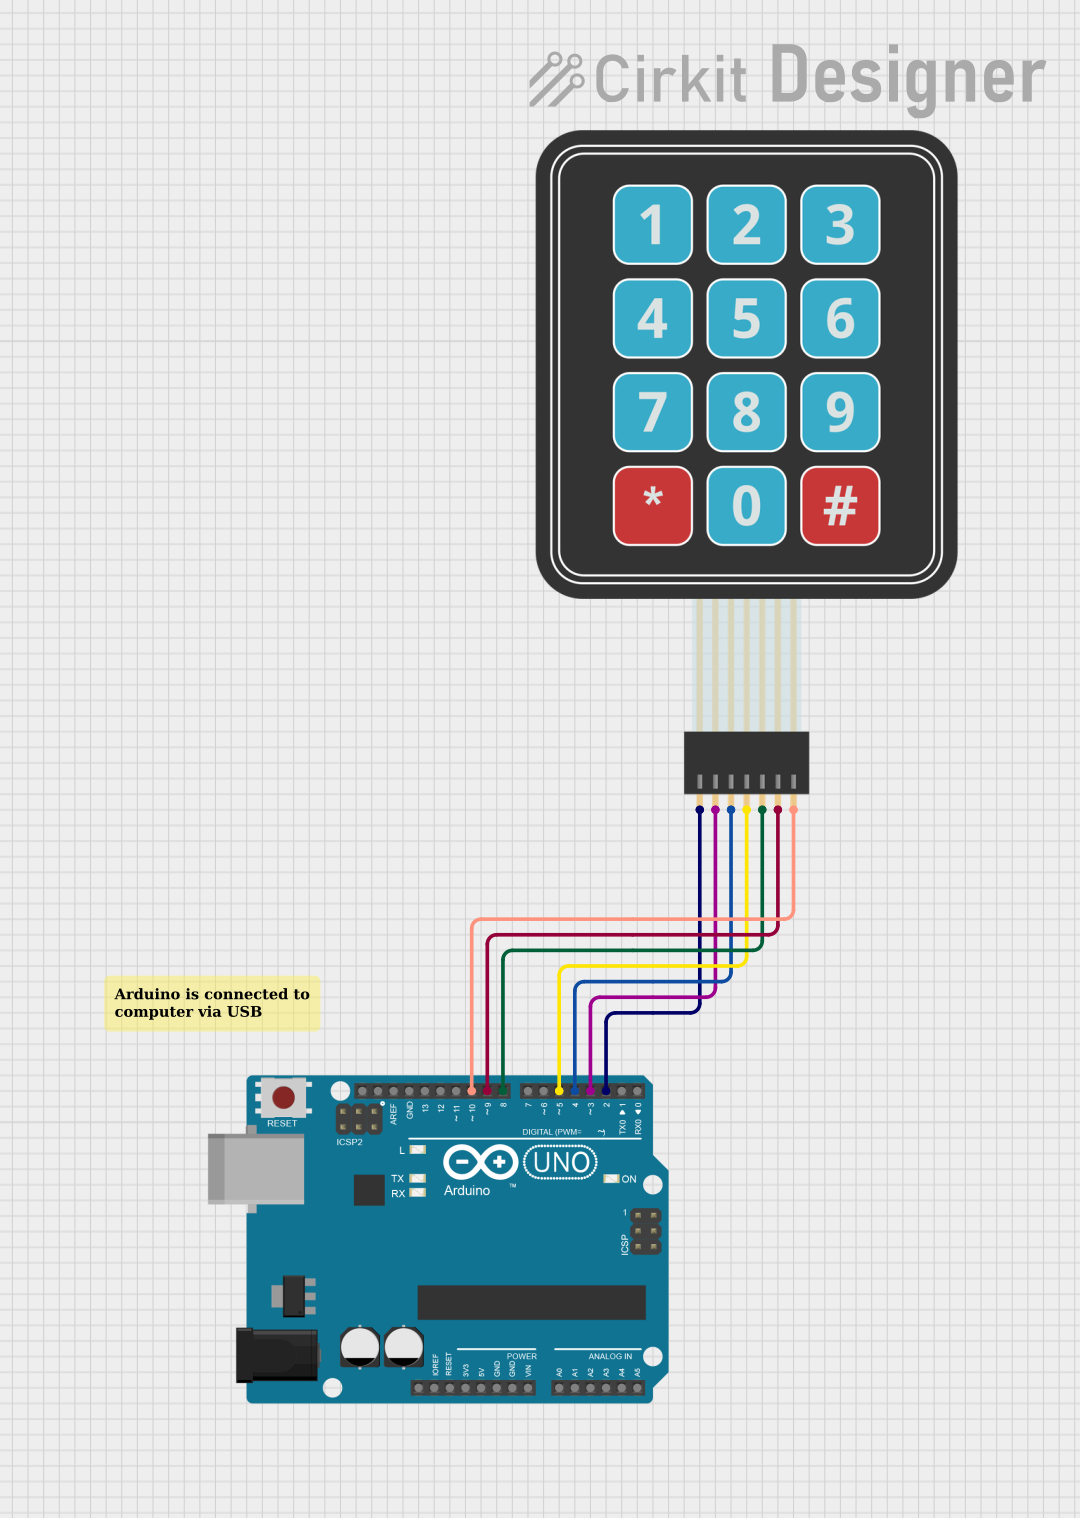
This circuit integrates a Membrane Matrix Keypad with an Arduino UNO microcontroller. The purpose of the circuit is to detect and process keypress events from the keypad and output the state of the keypresses to the Serial Monitor. The Arduino UNO is programmed to read inputs from the keypad, determine if a key has been pressed or released, and then print the corresponding key state to the Serial Monitor at a baud rate of 9600.
Component List
Membrane Matrix Keypad
- Description: A keypad with a matrix layout that allows for multiple button inputs.
- Pins: Row 1, Row 2, Row 3, Row 4, Column 1, Column 2, Column 3
Arduino UNO
- Description: A microcontroller board based on the ATmega328P.
- Pins: UNUSED, IOREF, Reset, 3.3V, 5V, GND, Vin, A0, A1, A2, A3, A4, A5, SCL, SDA, AREF, D13, D12, D11, D10, D9, D8, D7, D6, D5, D4, D3, D2, D1, D0
Comment
- Description: A placeholder or annotation within the circuit design, not a physical component.
Wiring Details
Membrane Matrix Keypad
- Row 1 connected to Arduino UNO pin D2
- Row 2 connected to Arduino UNO pin D3
- Row 3 connected to Arduino UNO pin D4
- Row 4 connected to Arduino UNO pin D5
- Column 1 connected to Arduino UNO pin D8
- Column 2 connected to Arduino UNO pin D9
- Column 3 connected to Arduino UNO pin D10
Arduino UNO
- D2 connected to Membrane Matrix Keypad Row 1
- D3 connected to Membrane Matrix Keypad Row 2
- D4 connected to Membrane Matrix Keypad Row 3
- D5 connected to Membrane Matrix Keypad Row 4
- D8 connected to Membrane Matrix Keypad Column 1
- D9 connected to Membrane Matrix Keypad Column 2
- D10 connected to Membrane Matrix Keypad Column 3
Documented Code
The following code is written for the Arduino UNO to interface with the Membrane Matrix Keypad:
/**
 * This example shows how to read and print out the keypress state of the
 * Adafruit 3x4 membrane matrix keypad.
 *
 * - Make sure to first install the following libraries through the Arduino Library Manager:
 *   - Adafruit Keypad (by Adafruit)
 * - To view the keypress state, open the Serial Monitor inside the Arduino IDE
 * and make sure baud rate is 9600.
 *
 * This example was originally written by Adafruit Industries.
 */

// Use this example with the Adafruit Keypad products.
// You'll need to know the Product ID for your keypad.
// Here's a summary:
//   * PID3844 4x4 Matrix Keypad
//   * PID3845 3x4 Matrix Keypad
//   * PID1824 3x4 Phone-style Matrix Keypad
//   * PID1332 Membrane 1x4 Keypad
//   * PID419  Membrane 3x4 Matrix Keypad

#include "Adafruit_Keypad.h"

// define your specific keypad here via PID
#define KEYPAD_PID419
// define your pins here
// can ignore ones that don't apply
#define R1    2
#define R2    3
#define R3    4
#define R4    5
#define C1    8
#define C2    9
#define C3    10
#define C4    11
// leave this import after the above configuration
#include "keypad_config.h"

//initialize an instance of class NewKeypad
Adafruit_Keypad customKeypad = Adafruit_Keypad( makeKeymap(keys), rowPins, colPins, ROWS, COLS);

void setup() {
  Serial.begin(9600);
  customKeypad.begin();
}

void loop() {
  // put your main code here, to run repeatedly:
  customKeypad.tick();

  while(customKeypad.available()){
    keypadEvent e = customKeypad.read();
    Serial.print((char)e.bit.KEY);
    if(e.bit.EVENT == KEY_JUST_PRESSED) Serial.println(" pressed");
    else if(e.bit.EVENT == KEY_JUST_RELEASED) Serial.println(" released");
  }

  delay(10);
}
This code is designed to be uploaded to the Arduino UNO microcontroller. It utilizes the Adafruit Keypad library to manage the keypad states and outputs the keypress information to the Serial Monitor. The pins defined in the code correspond to the wiring details provided in the previous section.