
ESP8266-Based Smart Access Control with Fingerprint Verification and Voice Recognition
View and Edit Project In Cirkit Designer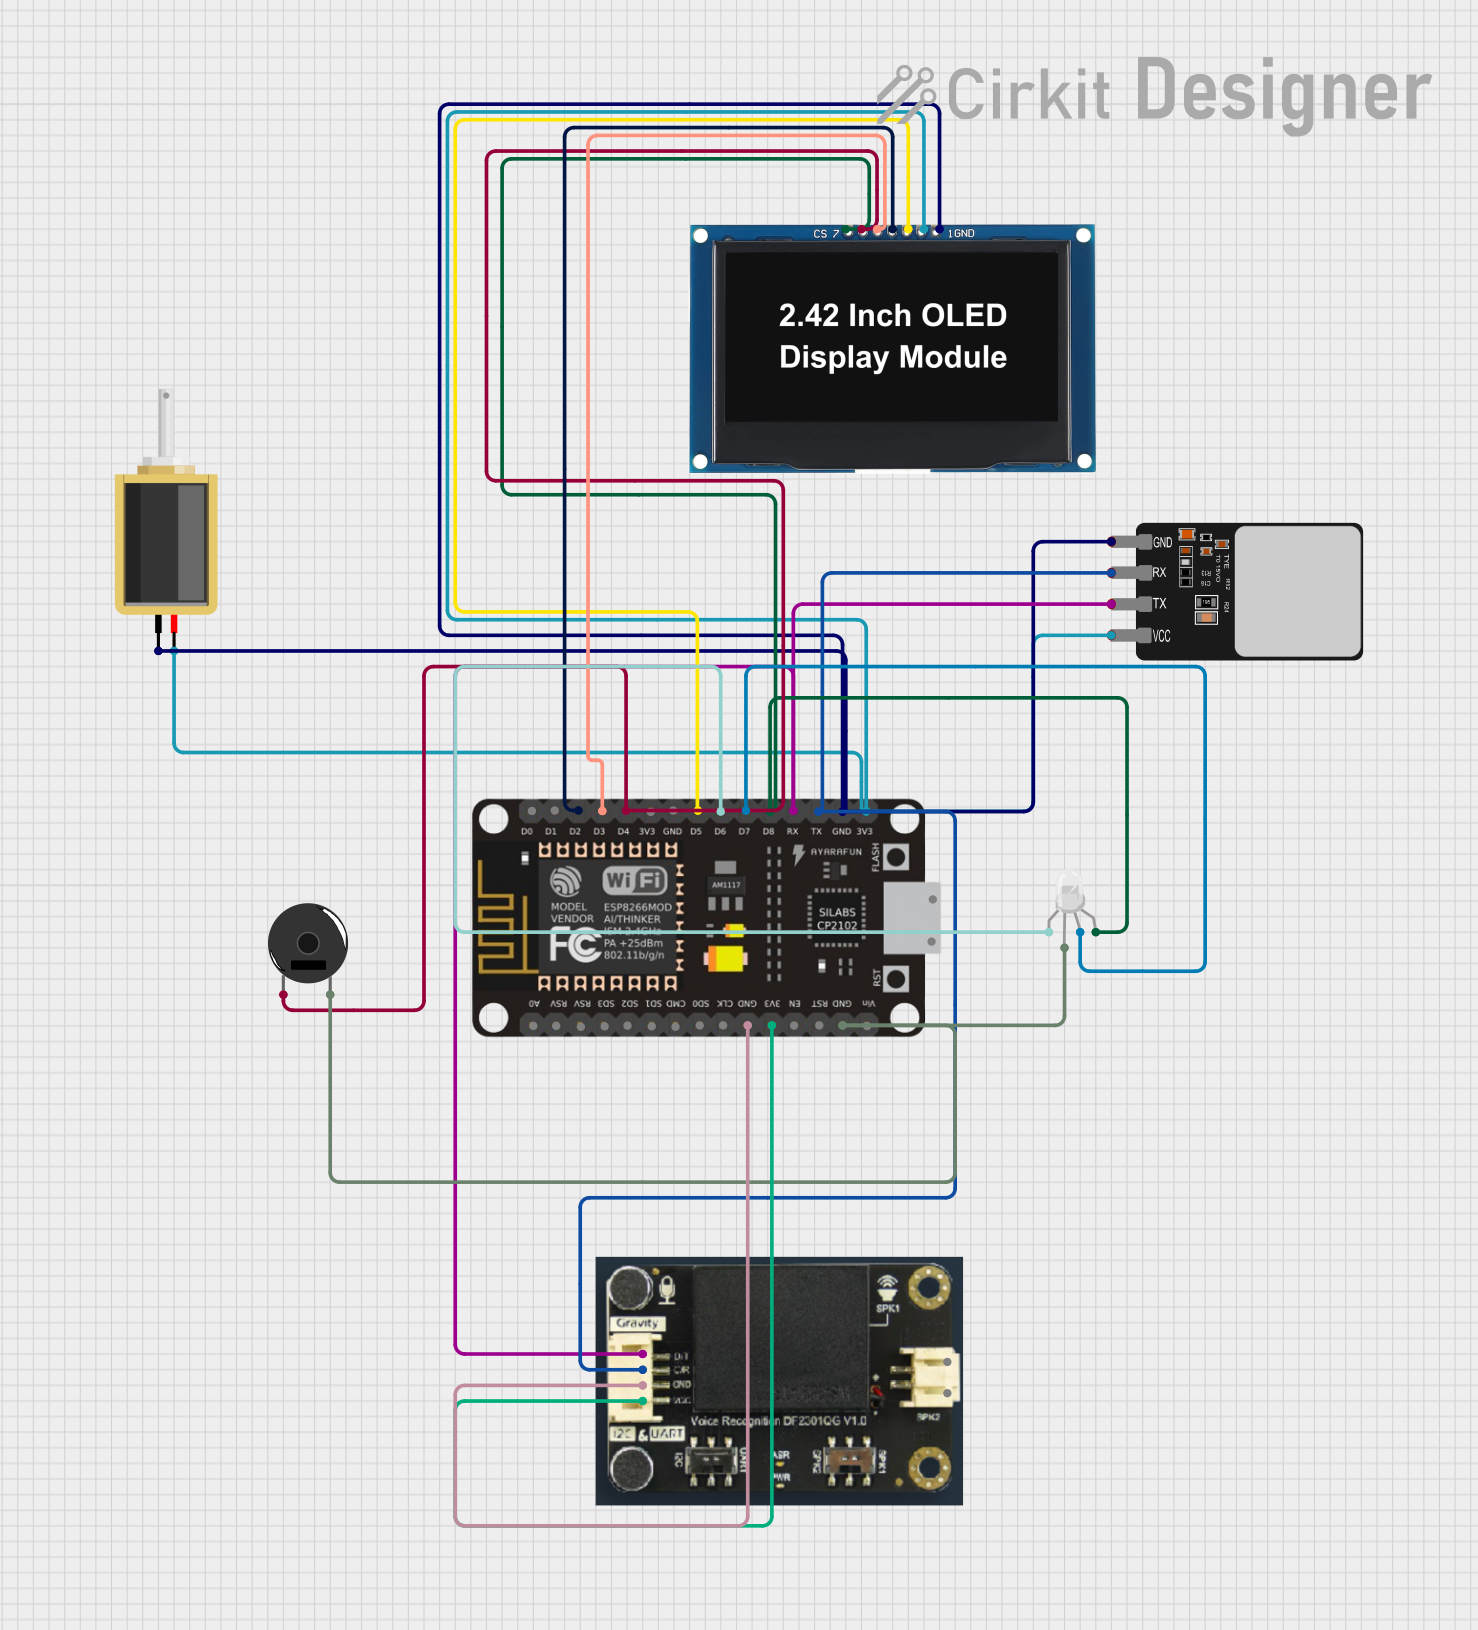
Circuit Documentation
Summary
This circuit is designed around the ESP-8266 microcontroller, which serves as the central processing unit. The circuit includes a variety of peripherals including an OLED display, a piezo buzzer, an RGB LED, a fingerprint scanner, a solenoid, and a voice recognition module. The ESP-8266 manages sensor data, controls actuators, and communicates with external devices. The circuit is likely intended for a security or access control system, where user authentication via fingerprint triggers a solenoid lock and provides visual and audible feedback.
Component List
ESP-8266 Controller
- Microcontroller with WiFi capability.
- Interfaces with various sensors and actuators.
- Manages data communication and processing.
Solenoid
- Electromechanical device used to control a mechanism or system, such as a lock.
Piezo Buzzer
- An electronic device that emits sound when an electric current is applied.
RGB LED (Wokwi compatible)
- A light-emitting diode that can display multiple colors through the combination of red, green, and blue diodes.
Fingerprint Scanner
- Biometric sensor for identifying users by their fingerprints.
OLED Display 2.42"
- A small screen that displays information, likely used for user feedback or status display.
DF Robot Gravity Voice Recognition Module
- A module that can recognize voice commands for hands-free control.
Wiring Details
ESP-8266 Controller
D2connected to OLED Display (SDA)D3connected to OLED Display (RES)D4connected to Piezo Buzzer and OLED Display (DC)D5connected to SolenoidD6connected to RGB LED (R)D7connected to RGB LED (G) and Piezo BuzzerD8connected to RGB LED (B)RXconnected to Fingerprint Scanner (TX) and Voice Recognition Module (D/T)TXconnected to Fingerprint Scanner (RX) and Voice Recognition Module (C/R)3V3connected to Fingerprint Scanner (VCC), OLED Display (VCC), Solenoid, and Voice Recognition Module (VCC)GNDconnected to RGB LED (COM), Piezo Buzzer, Fingerprint Scanner (GND), OLED Display (GND), Solenoid, and Voice Recognition Module (GND)
Solenoid
pin1connected to ESP-8266 Controller (GND)pin2connected to ESP-8266 Controller (3V3)
Piezo Buzzer
pin 1connected to ESP-8266 Controller (D4)pin 2connected to ESP-8266 Controller (GND)
RGB LED (Wokwi compatible)
Rconnected to ESP-8266 Controller (D6)COMconnected to ESP-8266 Controller (GND)Gconnected to ESP-8266 Controller (D7)Bconnected to ESP-8266 Controller (D8)
Fingerprint Scanner
TXconnected to ESP-8266 Controller (RX)RXconnected to ESP-8266 Controller (TX)GNDconnected to ESP-8266 Controller (GND)VCCconnected to ESP-8266 Controller (3V3)
OLED Display 2.42"
GNDconnected to ESP-8266 Controller (GND)VCCconnected to ESP-8266 Controller (3V3)SCKconnected to ESP-8266 Controller (D5)SDAconnected to ESP-8266 Controller (D2)RESconnected to ESP-8266 Controller (D3)DCconnected to ESP-8266 Controller (D4)CSconnected to ESP-8266 Controller (D8)
DF Robot Gravity Voice Recognition Module
D/Tconnected to ESP-8266 Controller (RX)C/Rconnected to ESP-8266 Controller (TX)GNDconnected to ESP-8266 Controller (GND)VCCconnected to ESP-8266 Controller (3V3)
Documented Code
#include <DHT.h>
#include <SoftwareSerial.h>
#include <ESP8266WiFi.h>
#include <FirebaseESP8266.h>

// WiFi Configuration
#define WIFI_SSID "your_SSID"
#define WIFI_PASSWORD "your_PASSWORD"

// Firebase Configuration
#define FIREBASE_HOST "your_firebase_database.firebaseio.com"
#define FIREBASE_AUTH "your_firebase_database_secret"

#define DHTPIN D8        // Pin for DHT sensor
#define DHTTYPE DHT11    // DHT sensor type
DHT dht(DHTPIN, DHTTYPE);

SoftwareSerial mySerial(D2, D3); // RX, TX for fingerprint
FirebaseData firebaseData;

// Pins for components
const int solenoidPin = D5;
const int fingerprintTxPin = D2;
const int fingerprintRxPin = D3;
const int buzzerPin = D7;
const int pushButtonPin = D4;
const int ledRedPin = D9;
const int ledGreenPin = D10;
const int ledBluePin = D11;

// Variables for control
bool isRewardGranted = false;

// Setup function
void setup() {
  Serial.begin(115200);
  mySerial.begin(57600); // Communication speed for fingerprint
  pinMode(solenoidPin, OUTPUT);
  pinMode(buzzerPin, OUTPUT);
  pinMode(pushButtonPin, INPUT_PULLUP);
  pinMode(ledRedPin, OUTPUT);
  pinMode(ledGreenPin, OUTPUT);
  pinMode(ledBluePin, OUTPUT);

  dht.begin();

  // Connect to WiFi
  WiFi.begin(WIFI_SSID, WIFI_PASSWORD);
  while (WiFi.status() != WL_CONNECTED) {
    delay(500);
    Serial.print(".");
  }
  Serial.println("Connected to WiFi");

  // Connect to Firebase
  Firebase.begin(FIREBASE_HOST, FIREBASE_AUTH);
}

// Loop function
void loop() {
  // Check temperature and humidity
  float temperature = dht.readTemperature();
  float humidity = dht.readHumidity();

  // Send data to Firebase
  Firebase.setFloat(firebaseData, "/temperature", temperature);
  Firebase.setFloat(firebaseData, "/humidity", humidity);

  // Check push button status
  if (digitalRead(pushButtonPin) == LOW) {
    // If button is pressed, perform fingerprint verification
    if (verifyFingerprint()) {
      if (!isRewardGranted) {
        grantReward();
      }
    }
    delay(500); // Debounce delay
  }

  // Check reward condition
  if (isRewardGranted) {
    // Turn off solenoid after 10 seconds
    delay(10000);
    digitalWrite(solenoidPin, LOW);
    isRewardGranted = false;
  }
}

// Function to verify fingerprint
bool verifyFingerprint() {
  // Implement code for fingerprint verification
  return true; // Replace with fingerprint verification logic
}

// Function to grant reward
void grantReward() {
  digitalWrite(solenoidPin, HIGH);
  tone(buzzerPin, 1000, 500); // Sound buzzer
  isRewardGranted = true;

  // Light up RGB LED as an indicator
  digitalWrite(ledRedPin, HIGH);
  delay(500);
  digitalWrite(ledRedPin, LOW);
  digitalWrite(ledGreenPin, HIGH);
  delay(500);
  digitalWrite(ledGreenPin, LOW);
  digitalWrite(ledBluePin, HIGH);
  delay(500);
  digitalWrite(ledBluePin, LOW);
}
Note: The code provided is a basic template and requires further implementation for the fingerprint verification process. Additionally, the pin definitions for the RGB LED in the code do not match the wiring details provided. The correct pin assignments should be used in the final implementation.