
Arduino UNO Controlled Water Dispenser with Dual Pushbutton Relay Activation
View and Edit Project In Cirkit Designer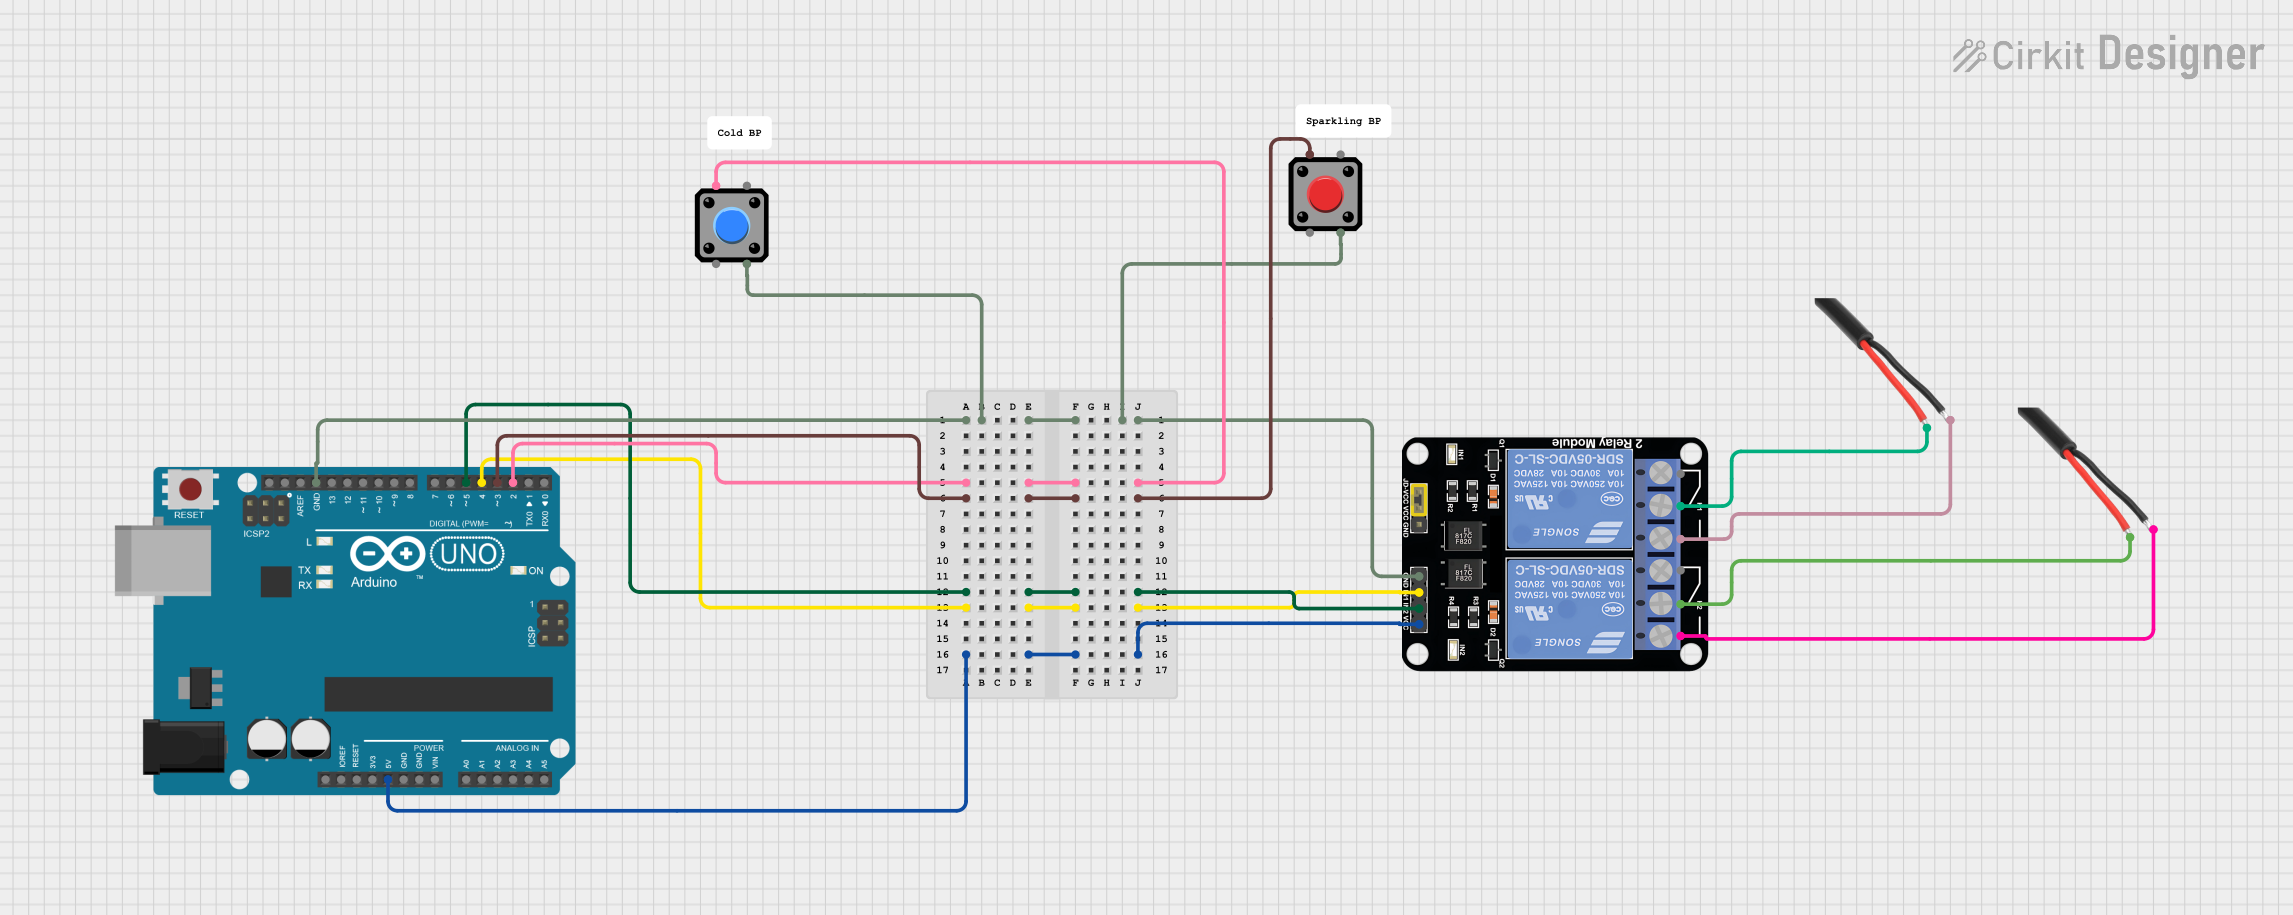
Circuit Documentation
Summary of the Circuit
This circuit is designed to control a dispensing system using an Arduino UNO microcontroller. The system includes two pushbuttons that trigger the dispensing of cold water and sparkling water. A relay module is used to switch AC loads that could represent the actual dispensing mechanism. The Arduino UNO reads the state of the pushbuttons and controls the relay module accordingly. The circuit also includes AC wires to connect the relay module to the AC loads.
Component List
Arduino UNO
- Description: A microcontroller board based on the ATmega328P.
- Purpose: Acts as the central controller for the dispensing system, reading inputs from pushbuttons and controlling the relay module.
Pushbutton (x2)
- Description: A simple switch mechanism for controlling some aspect of a machine or a process.
- Purpose: Used to input user commands to the dispensing system, triggering the dispensing of cold or sparkling water.
Relay Module 2 Channel
- Description: An electrically operated switch that allows you to control a high power circuit with a low power signal.
- Purpose: Used to switch the AC loads that dispense water when activated by the Arduino UNO.
AC Wire (x2)
- Description: A wire capable of carrying alternating current (AC) to power devices or transmit electricity.
- Purpose: Connects the relay module to the AC loads.
Comment (x2)
- Description: A non-electrical component used for leaving notes or annotations in the circuit design.
- Purpose: Provides additional information or clarification within the circuit design.
Wiring Details
Arduino UNO
- GND: Connected to the ground pins of both pushbuttons and the GND pin of the relay module.
- D2: Connected to Pin 1 of the first pushbutton.
- D3: Connected to Pin 1 of the second pushbutton.
- D4: Connected to IN1 of the relay module.
- D5: Connected to IN2 of the relay module.
- 5V: Connected to VCC of the relay module.
Pushbutton
- Pin 1: Connected to D2 (first pushbutton) and D3 (second pushbutton) on the Arduino UNO.
- Pin 3: Both pushbuttons share a common ground connection with the Arduino UNO and the relay module.
Relay Module 2 Channel
- GND: Connected to the ground of the Arduino UNO.
- IN1: Controlled by D4 on the Arduino UNO.
- IN2: Controlled by D5 on the Arduino UNO.
- VCC: Powered by the 5V output from the Arduino UNO.
- COM: Connected to the Phase of the first AC wire.
- NO1: Connected to the GND of the first AC wire.
- COM: Also connected to the Phase of the second AC wire.
- NO2: Connected to the GND of the second AC wire.
AC Wire
- Phase: Connected to the COM pin of the relay module.
- GND: Connected to the NO1 and NO2 pins of the relay module.
Documented Code
/*
 * This Arduino sketch controls a dispensing system with two buttons:
 * one for cold water and one for sparkling water. When a button is
 * pressed, the corresponding dispensing sequence is executed.
 */

const int buttonColdPin = 2; // Pin connected to Button Cold
const int buttonSparklingPin = 3; // Pin connected to Button Sparkling
const int pedalDispensePin = 4; // Pin controlling Pedal Dispense Harness
const int pedalSelectPin = 5; // Pin controlling Pedal Select Harness

void setup() {
  pinMode(buttonColdPin, INPUT_PULLUP);
  pinMode(buttonSparklingPin, INPUT_PULLUP);
  pinMode(pedalDispensePin, OUTPUT);
  pinMode(pedalSelectPin, OUTPUT);
  digitalWrite(pedalDispensePin, LOW);
  digitalWrite(pedalSelectPin, LOW);
}

void loop() {
  if (digitalRead(buttonColdPin) == LOW) {
    // Button Cold pressed
    digitalWrite(pedalDispensePin, HIGH);
    delay(1000); // 1 second
    digitalWrite(pedalDispensePin, LOW);
    delay(200); // 0.2 seconds
    digitalWrite(pedalDispensePin, HIGH);
    delay(3000); // 3 seconds
    digitalWrite(pedalDispensePin, LOW);
  }

  if (digitalRead(buttonSparklingPin) == LOW) {
    // Button Sparkling pressed
    digitalWrite(pedalDispensePin, HIGH);
    delay(1000); // 1 second
    digitalWrite(pedalDispensePin, LOW);
    delay(200); // 0.2 seconds
    digitalWrite(pedalSelectPin, HIGH);
    delay(200); // 0.2 seconds
    digitalWrite(pedalSelectPin, LOW);
    delay(200); // 0.2 seconds
    digitalWrite(pedalSelectPin, HIGH);
    delay(200); // 0.2 seconds
    digitalWrite(pedalSelectPin, LOW);
    digitalWrite(pedalDispensePin, HIGH);
    delay(3000); // 3 seconds
    digitalWrite(pedalDispensePin, LOW);
  }
}
Filename: sketch.ino
Description: The code defines the behavior of the Arduino UNO when interacting with the pushbuttons and relay module. It sets up the necessary pins as inputs or outputs and defines the logic to be executed when each button is pressed. The code uses digitalRead to check the state of the pushbuttons and digitalWrite to control the relay module. Delays are used to manage the timing of the dispensing sequence.