
Arduino-Powered Stepper Motor Control with Pushbutton Interface
View and Edit Project In Cirkit Designer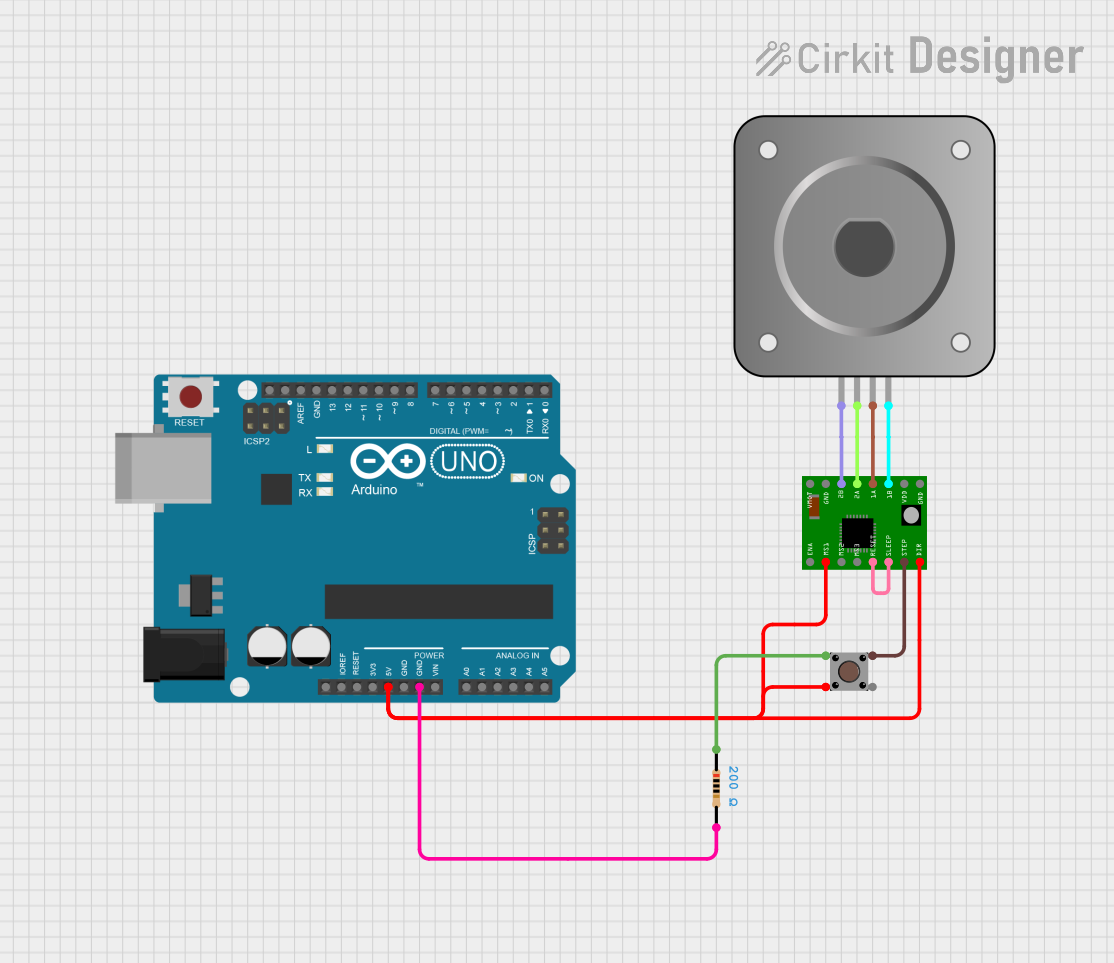
Circuit Documentation
Summary
This circuit is designed to control a Bipolar Stepper Motor using an A4988 Stepper Motor Driver, an Arduino UNO microcontroller, and a pushbutton for user input. The pushbutton allows the user to initiate the motor's movement, while the Arduino UNO processes the input and sends the appropriate signals to the stepper motor driver to control the motor's operation.
Component List
Arduino UNO
- Description: A microcontroller board based on the ATmega328P.
- Purpose: Acts as the main control unit for the circuit, processing inputs from the pushbutton and controlling the stepper motor driver.
Pushbutton
- Description: A simple mechanical switch that can be pressed to complete a circuit.
- Purpose: Used to provide user input to start or stop the stepper motor.
A4988 Stepper Motor Driver Carrier
- Description: A driver module for controlling stepper motors.
- Purpose: Interfaces between the Arduino and the stepper motor, allowing for precise control of the motor's movement.
Bipolar Stepper Motor (NEMA 17)
- Description: A type of stepper motor with two coils.
- Purpose: The motor that is controlled by the A4988 driver to perform mechanical tasks.
Resistor
- Description: An electronic component that resists the flow of current.
- Purpose: Used in the circuit to limit current and protect other components.
Wiring Details
Arduino UNO
5V connected to Pushbutton Pin 4 (out)
GND connected to Resistor pin2
Pushbutton
Pin 1 (in) connected to A4988 STEP
Pin 2 (in) connected to Resistor pin1
A4988 Stepper Motor Driver Carrier
MS1 connected to 5V
DIR connected to 5V
STEP connected to Pushbutton Pin 1 (in)
RESET connected to SLEEP
Bipolar Stepper Motor (NEMA 17)
B- connected to A4988 1B
B+ connected to A4988 1A
A+ connected to A4988 2A
A- connected to A4988 2B
Resistor
pin1 connected to Pushbutton Pin 2 (in)
pin2 connected to GND
Documented Code
Arduino Code
void setup() {
  // put your setup code here, to run once:

}

void loop() {
  // put your main code here, to run repeatedly:

}
Documentation
This section is reserved for additional documentation or notes related to the circuit and its operation. Currently, there are no additional notes provided.